Showing posts with label medallion. Show all posts

Wednesday, 15 April 2026

literally out of the box

Pin It now!

and functioning as a threader holder! Why didn't I think of this solution ages ago?! Here's the full story ...

Going back a few weeks, Anita showed me a vintage edging she had picked up at a thrift store. A single shuttle trefoil/clover edging with a curious way of joining the rings. It looked so good, too. Thought I'd work a sample but somehow I let my shuttle take over and ended up with this medallion.

Now I wasn't in the mood to use a picot gauge despite having a few handmade folded picot gauges, which is why the bare thread spaces are not perfect.

Nevertheless the highlight of this medallion is the little twist at the base of each ring. 

All I am doing is attempting to make a 1st half-stitch (ie. bringing the thread from Under the previous thread) without actually transferring or flipping it. This leads to all that twisting. One has to be careful with it. As you can see, the stitch is not tensioned and snugged completely since I wanted a loose twist. 
There is ample scope to play around with the effect, adding more half-stitches, etc.

It then reminded me of something that Ninetta had done. Turns out she used a lock join to simulate a twist in this vintage motif here - https://ninettacaruso.blogspot.com/2020/08/locked-in-old-corner.html - from Emmy Liebert's 1916 book.

So coming back to the problem that was awaiting a solution. I whip stitch tail ends using tapestry needles and a threader to thread the needle. The latter is kept in a different box within the larger project box. I wanted a way to have both the needle container and the threader to be together - pick them up in one go. Didn't want to use tape; couldn't use a magnet; couldn't glue it down for obvious reasons. 

This medallion which happened to lie over the circular box struck me as the perfect solution. I glued it down with a spot of glue at 3 points, that's it! 

Being so open and airy, the threader easily slips through any space yet stays put! And no fear of the wire being bent or getting caught anywhere. A safe haven!
Anita called this the Threader Keeper!!! Now she's one to think out of the box and guess it is rubbing off on me, LOL.

Oh, and I am submitting this BTS medallion (my 5th submission) for Natalie Rogers' Picot Bingo 2026 Level 2, crossing out one box -  
  • Use Bare Thread Space. 

Friday, 6 June 2025

bridge tatting

Pin It now!

 Like I said in my recent posts, expert and experienced tatters have graciously come to my aid whenever I asked for it. And some have gone a step further by sharing their work and/or discussing techniques and terminology even before I asked.  One such is Judith Connors who has been instrumental in guiding and inspiring me through this past decade. My presentations have been influenced by her despite not being a perfect student.

Early last month, Judith sent me her article on 'Building Bridges' along with a pic of her Fan motif (If you are a member, you can see her model in the Queensland Tatters 2025 group post here - https://craftree.com/forum/threadfs/40423?page=1#258577). We had discussed bridging some years back, too. I was in a state of tatting inertia when this motif instantly spurred me to wind my shuttles and tat since this decorative/functional bridge had been on my trial list since 2019 (https://craftree.com/forum/threads/39159), but never got down to actually applying it. I did do the Rose Motif from Priscilla Tatting Book No.3!   

Bridging Flower Motif - based and adapted from Judith Connors' Fan motif
sharing my process, pattern, and tips/tricks

How many rounds does this motif have? 
Do we cut after the inner 'rosette' round?
Were Celtic shuttles or needle used for the Celtic effect?
Or were 4 shuttles used for the interlaced/overlapping chains? 

Getting back to the present motif, it occurred to me that I could use the element to create overlapping or interlaced chains instead of single lines! So off went my shuttles to confirm. 

Now this post is only about the adapted motif - process, pattern, and tips/tricks. I have pics for a pictorial, along with the background and explanation, terminology and history. Part of it is already explained in the link above (https://tipsaroundthehome.blogspot.com/2022/01/bridging-gaps.html). The rest will be shared in a few days to avoid stepping on Judith's class despite her permission. For the curious, we know the technique as split chain, which is a misnomer and limiting, meant mainly for climbing out.  

My first attempt. I ran out of thread and also realised that if I continued around there would be cupping (I had increased the count in some parts). Moreover the thread had a tendency to unravel, even though it is Anchor mercerised cotton. Cut my losses and started over.

Design Tip starting with a magic circle: Since I wasn't sure how big the central ring should be, I preferred to use the  magic circle (the multiple threads are to make the picot large enough to join to later). Wrap the thread around the magic circle and start the first inner chain. End each chain with a lock join around the circle. 
TIP to keep last half-stitch flipped: The marker on the right - since each bridge is a long chain, by the time it was completed, the last half-stitch often unflipped and locked the core thread below. This temporary marker on the core thread prevents it from happening. 
After a few repeats, I pulled on the magic circle to see whether it was working well. Successful; no cupping or ruffling.

Bridging Flower Motif pattern
  1. Only 2 shuttles are used with continuous thread and the entire motif is worked in one pass. 
  2. 8 repeats and all chains in this prototype. No space for a central ring. In Anchor mercerised crochet cotton size 20 (equivalent to Lizbeth size 10), the motif measures 6.5cms in diameter.
  3. In the image above, I have split the sequencing (A to F) to indicate where there is a change of direction , shuttles, or element. 
  4. The entire motif is worked clockwise from the front.
  5. Chains C & E are bridging chains aka bridge, bar. 
  6. I used a 2cms folded picot gauge to measure the bare thread for bar/bridge before lock joining it to a picot on the previous element.  TIP:  I found that making a lock join by pulling the loop down instead of up through the picot makes a neater start to the bridge.
  7. These bars are covered with Dora Young's Knotless Method or tied stitches worked from left to right. I worked them all from the front, though there are several variations of the method. 
  8. NOTE: The arrows for bridges indicate where the thread from shuttle2 goes, not the direction of working the stitches. 
  9.  While making each subsequent bridge, keep it in FRONT of the previous chain so that the overlapping is synchronised.  
10. For the bridges on the last rosette chain, TWO each had to be made! The above image shows the first pair done and the 2nd pair is being bridged.
After working the first bridge exactly like ch-C, then one more bridge is made joining to the first rosette on the right, at the base of the very first bridge. The stitches are then worked using the Australian method. This, too, is worked from the front, but in the opposite direction (right to left). Repeat this for the 2nd pair of bridges. 
Important: To maintain overlap, pass the shuttle under and over the last bridge both times.

11. After the motif is finished, and both threads are in the center, I threaded them together and inserted the needle through the picots held open with the magic circle, and kept removing the threads from the circle. Final tie, cut, and hide ends.
Option: One can use metallic thread or colour-coordinated thread for the magic circle and leave it be after tightening the slip knot. Then hide all ends - from the motif as well as the circle.

 
Possible Variation: However one can use a central ring of 10 small picots separated by 1ds and make a 10-repeat motif. 
Future Idea: Can we use this bridging technique to work block tatting over or across an element?

I will try to write the pattern in a more lucid form when I share the pictorials and other details. Here I wanted to focus more on the process.

Technique Option: Also, instead of the bridges going from right to left, we can move forward. Thus from chain A we can work the 'bridge'  like a floating chain or single shuttle split chain, leaving a picot open with a paperclip to join to later. 

Bridge tatting or bridging encompasses a lot more, not all of which is outlined here. In this post and motif, the bridges are ornamental - a design element; they can be functional too. Hopefully I will be able to cover it all in the pictorials post. 

I cannot thank Judith enough for her valuable mentorship and guidance since we 'met' at InTatters a decade ago! We may not always agree but the discussions are always lively and passionate!

Tuesday, 16 April 2024

gaming bookmark

Pin It now!

 An insertion as a bookmark is my entry for the two 2024 games I am playing.

Main body is from 'Tatting Techniques' by Elgiva Nicholls (p27, 1976) and the charm is from Rebecca Jones (fig123, 1985).

I have too many variegated Lizbeth, mostly with shades of pink/magenta. Difficult to always use for fear of eclipsing the pattern. But I took the leap and it came out okay I think. Lizbeth size 20. 

Learning from my past experience, where my chains are usually tighter/shorter than vintage patterns, I increased the chain stitches beforehand and it worked out well.

Pearl Tatting tail for the bookmark using Anchor perle cotton size 8. I didn't use any picot gauge since my main aim was to enjoy uninhibited tatting on International Tatting Day, 2024.
In order to avoid sewing in ends, I ended with two heavily picoted folded rings, hiding the other colour within each.
Pearl tatting is one of the blocks in Natalie Rogers' PICOT Bingo game which you can join here - https://www.patreon.com/posts/picot-bingo-95729145?  This is my fifth submission so far. Need to speed it up a notch!

The tail was attached to the #123 medallion from Rebecca Jones , shared here - https://tipsaroundthehome.blogspot.com/2024/03/happy-itd-2024.html

Turning an insertion into a bookmark is nothing new or unique. Bookmarks, being short, are a good way to enjoy a pattern with a different use. 
The large rings are linked through a common picot. I think the colours are doing fine together.


And the bookmark is also my entry to splocik's Small Decorations game that was first announced here - https://splocik2.blogspot.com/2024/01/mae-dekoracje-galeria-grudniowa.html
She shared the March entries here - https://splocik2.blogspot.com/2024/04/mae-dekoracje-2024-galeria-marcowa.html

Many thanks to all mentioned here for lovely patterns and fun games!

Thursday, 21 March 2024

counts

Pin It now!
A bit of mixed media card for my March 2024 Small Decorations entry. My heartfelt thanks to splocik for graciously accepting the earring I made in February and I hope this card meets the requirements of the game. 

This is where it all started with a counting error I frequently make, despite my cautious counting! Notice that one daisy has an extra petal.

Pattern for the classic daisy is from 'The Complete Book of Tatting' by Rebecca Jones  (Fig. 122 page 47, 2011). Worked in Olympus size 40 (equivalent to Lizbeth size 20).  

Elgiva Nicholls calls this medallion a Classic Daisy formation, made with a single thread/shuttle, in 2 rounds. Olympus size 40). 

The more modern style  (coloured motif) is worked in one go, using two shuttles to throw rings off a mock center. I used the exact same pattern for the petals, but added 2 ds in the SCMR between each petal. 

Which version do you like? The Classic or the Modern?


A few more pics of the card ---


Actually when I opened my box of watercolours, I found most of the jars empty! Hubby quickly ordered a box online and while I waited for the delivery (about 15 minutes), I doodled this with the watery remains. And was too impatient to wait for the leaf to dry, hence the smudging.

Probably the last time I painted was 15 or 20 years back! 


I painted the leaves, then glued the daisies. The little orange florets are from my 2022 flag project (link below). After trying out a few arrangements, I painted the brown twigs and glued the florets. Added a few more twigs, leaves, .... and finally the diamonds. Can't even remember when or where I bought those highlights!
TIP: I deliberately glued the orange flowers on the frontside, coz the backside is more dimensional- the picots curve up a bit.
You can easily see how amateurish my painting is! Nevertheless, it felt good to hold and reacquaint myself with my brushes. This was a very hasty project - probably a half hour from start to finish. Hopefully it has opened the gates to some more doodling in the future. 

Check out the Feb gallery here - https://splocik2.blogspot.com/2024/03/male-dekoracje-galeria-lutowa.html


Related Posts
https://tipsaroundthehome.blogspot.com/2017/10/meddling-with-medallions.html
https://tipsaroundthehome.blogspot.com/2022/08/har-ghar-tiranga.html   https://tipsaroundthehome.blogspot.com/2025/01/last-and-first.html

Saturday, 7 October 2023

rosettes

Pin It now!

 In tatting, we often come across different names for the same technique/effect and the same name for different techniques! (jot it down to various reasons - historical, linguistic, ignorance, non-standardization, ....).  One example of the latter is Rosette. This historical term refers to at least three different styles as evident in the collage below!

Our newest game in the Endrucks 1920 Project FB group involves the third motif and it seemed a good opportunity to address this situation and refresh my knowledge.


They are arranged along evolutionary lines -

1. Single ring with picots aka central ring. Tatted with a single thread. This was a common starting medallion in numerous antique patterns, and the thread was tied and cut after each! Now, we climb out with a mock picot or if possible, we work it as a thrown ring for continuous tatting.

2. Outward facing rings, often called a daisy or flower. Again, tatted with a single thread and the rings are joined to each other to create beautiful medallions. It helps that joining on the go was discovered. The number of rings can determine the shape and size.

Rosace is a term used by several non-English speaking tatters, to address this formation. eg. Maria Papia's earrings (https://www.youtube.com/watch?v=wbqLn8xTaGU) and Lilas Lace's pictorial of Edwige Renaudin's Double Rosace (https://lilas-lace.fr/blog/2014/02/28/diy-a-double-rosace-diy-une-rosade-a-double-rangee-danneaux/)

3. Concentric chains around a central ring. Each chain segment is joined to the picot below from the previous round. The entire medallion is worked continuously, but requires two threads. Obviously this came into existence after the discovery of tatted chains.

In the sample above, the consecutive chain rounds are niched closely into a compact circle - like a dartboard. However, if the chains are made slightly longer, with more of an arch on each chain, it gives the appearance of a flower - a Rose or wild rose as Sharon Briggs calls it (https://sharonstattedlace.blogspot.com/2008/05/tatting-wild-rose.html).


This is all I have. Have you encountered the term for another formation? Please do share.

My main references for the above, besides online resources already listed (including Craftree), are - Elgiva Nicholls' 'Tatting: Technique & History' 1984, and Judith Connors' 'An Illustrated Dictionary of Tatting'. And all three tatted samples above are from derivatives of Endrucks' (1920) patterns 42, 20, and 37.

UPDATE: (9th Oct 2023) - Perhaps I should've spoken about the origin of the word rosette, etc. But here's a comment by Stéphanie Mc (Tattimic) on my FB post and quoted here ---

I'm pretty sure it comes from French.
In French, the word "rosette" can take about 10 different meanings. It usually refers to something circular with a circle in the middle, but not necessarily.
Also, when the suffix "-ette" is added to a noun - let's say "rose", haha-, it refers to a smaller version of that noun. So a "rosette" is supposed to mean "a small rose", at least in some interpretation of the word, of course.

 Well, she is absolutely right! 

My sincerest thanks to all mentioned!

Thursday, 21 September 2023

happy Endrucks 1

Pin It now!

 Frau Endrucks would certainly have been a happy, satisfied designer to see what one tatter has done with merely one pattern from her collection of 44! Following is only part 1 showcasing what Krystyna Mura has accomplished with pattern #31 from the German book ‘Die Schiffchen-Spitzen’,1920, by Frau Eleonore Endrucks-Leichtenstern. 

Krystyna worked on the doilies and numerous derivatives from 2021 to 2023. Since the original pattern tended to cup, she worked on alternatives to flatten out the doily. All these patterns are now compiled in the following pdf - 
Endrucks' pattern #31 in modern format by Krystyna Mura - Doily of Modest Hearts - https://drive.google.com/file/d/1lcQrl0f6PdLYApe4YVM2ZVorLsHToAm1/view

The cupped original pattern was turned into a parasol for a doll. It also works well as a bowl or a basket! https://drive.google.com/file/d/1I7EEuylPwp5pqIvgI1yAUYlULukV0D8Z/view
Or even a lantern or lamp shade!

Krystna shares her thoughts and options to make the doily lay flat without compromising on the pattern per se. Above is Option 1,

Option 2, and
Option 3.
As you can see in her pdf, there are even more doilies she tatted than the 6 shown in the collage!

Further play with sequence and colours resulted in the above version. The possibilities are endless!

Of the 6 rounds, working only the first two rounds gives this cute motif.

Rounds 1 to 3 result in this gorgeous rendition, and

Rounds 1 to 4 result in another decorative motif or coaster.

Rounds 1 and 2 covering a cabochon.

And finally a heavily embellished doily as a window decoration which she calls Stained Glass Rosette.


Following the theme of this post, we would like to inform you that we have renamed our Coasters and Doilies directory to Circles and Doilies in order to cover all circular motifs and medallions alongside larger models. (https://docs.google.com/document/d/1Xc1hiwrg5yPEvi77jj2uxWqlkECuyZjFjuCJ08VcoLA/view)

So, please stick around for the next two posts showcasing more derivatives and applications of pattern #31 by Krystyna Mura!
...... to be continued .....

Monday, 9 May 2022

single motif bonanza

Pin It now!
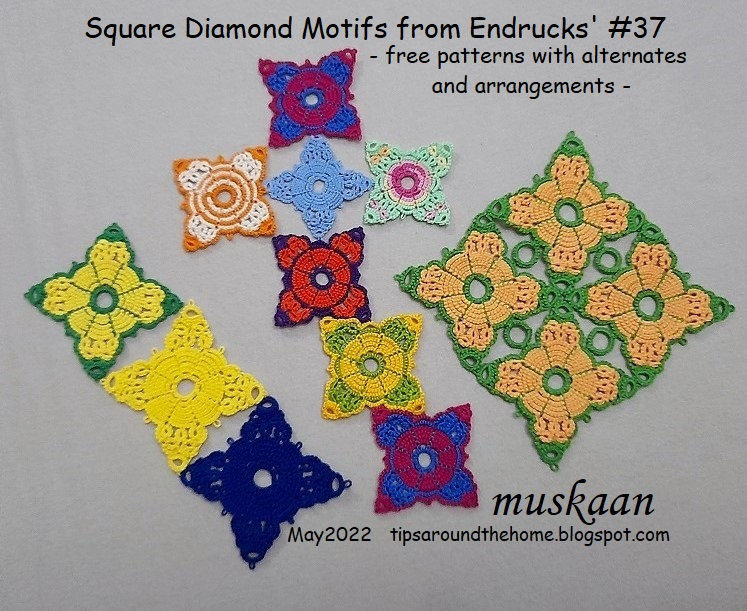
Square diamond motifs and mat with pattern 
from endrucks (1920) doily #37

pattern pdf (click to download) : 

My love affair with this motif started a long time back and the tatting started in November 2020. It is the central motif of a doily - pattern #37 from Endrucks' 1920 book. What caught my interest as I tatted, was the versatility in terms of sequence/paths resulting in diverse colour and directional effects.
For the most part I kept the inner Rosette unchanged, focusing on the arms.

1. Original: This is the original unaltered pathway from Endrucks. The 2 small middle rings (lateral) face the same direction - to the right. The asymmetry is not too visible since the rings are tiny. However it intrigued me, and as a study in design, I decided to go ahead with my variations....

alternate pathways and variations ---
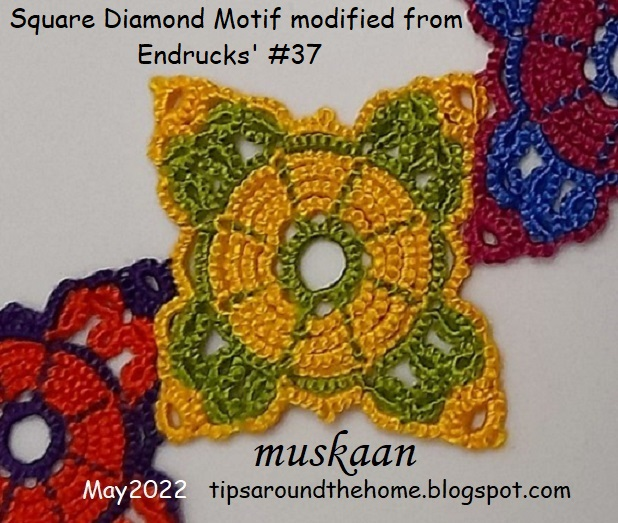
2. Modified: My modified pathway where the 2 small lateral rings face each other for symmetry. This is used to present the stepwise pattern, loading 2 shuttles with contrasting colours.
In Anchor size 20 (~ Lizbeth 10), it measures 5cms sides and 6.5cms diagonally.

3. Trefoil Version: This entire motif can be worked with one shuttle and ball, except for the single thrown ring at the tips, provided we decide before working the penultimate round. 

4. Flipped Ring version: While following Endrucks' original pathway, I merely swapped the direction of the thrown ring at the tips, working it on the way up rather than on the way down. Look closely to see that I alternated the flip.

5. Colour medley 1: Using Lock Join Plus aka Repositioning methods, I alternated the colours/shuttles within the rosette. (https://drive.google.com/file/d/17zsM3JaLO7r0ajg8VOnv5IcJ-kLNqEiU/view). You can choose any method you like, including changing colours between segments rather than rounds.
6. colour medley 2: I started with ball and shuttle for the rosette and added the green thread later, using False CTM, and snipping off the ball thread. (false ctm tutorials Part1 ; Part 2).
In Lizbeth 20 (with one less rosette round), it works to 3.5cms sides and 5 cms diagonally.

7. Reduced Round: If you remember my travails with cupping, this motif was my solution by removing the final rosette round and increasing the size of the 4 joining picots.
In Anchor Pearl cotton size 8 (~ Lizbeth 20), this works out to 4cms sides & 5,5cms diagonally.

8. New Motif for Doily: While the doily worked fine with the above modifications (in #7), I needed to make sure it will hold up in crochet cotton thread. Hence started this new motif (but forgot to reduce the round!). I'm still a bit apprehensive about continuing .... let's see.
In Anchor size 40, this works out to 3.75cms sides and 4,5cms diagonally.

arrangements and tessellations ---
The motif can be used as a square or a diamond and joined for various arrangements. Several arrangements and ideas have already been showcased here - https://tipsaroundthehome.blogspot.com/2020/11/arranging-motifs.html

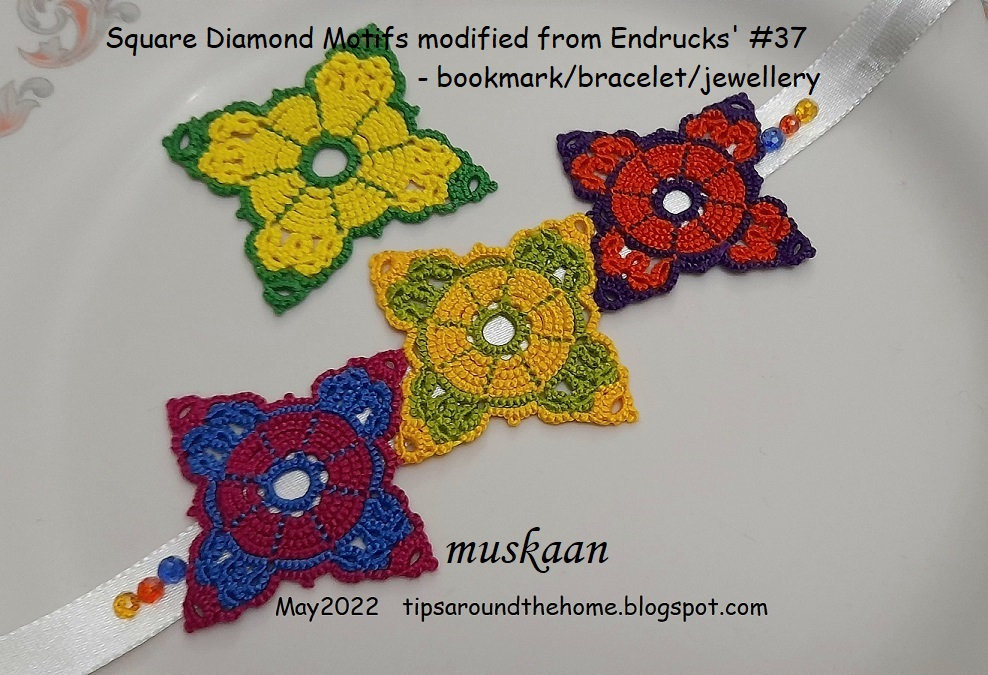
bracelet, bookmark, jewellery, charm, ....: Above is the bracelet idea. I really like this offset arrangement! Bookmark with a single motif as charm at the end of a tail is another practical idea. 
Single motifs with beads and findings can become jewellery pieces,...in fact an entire parure can be tatted.
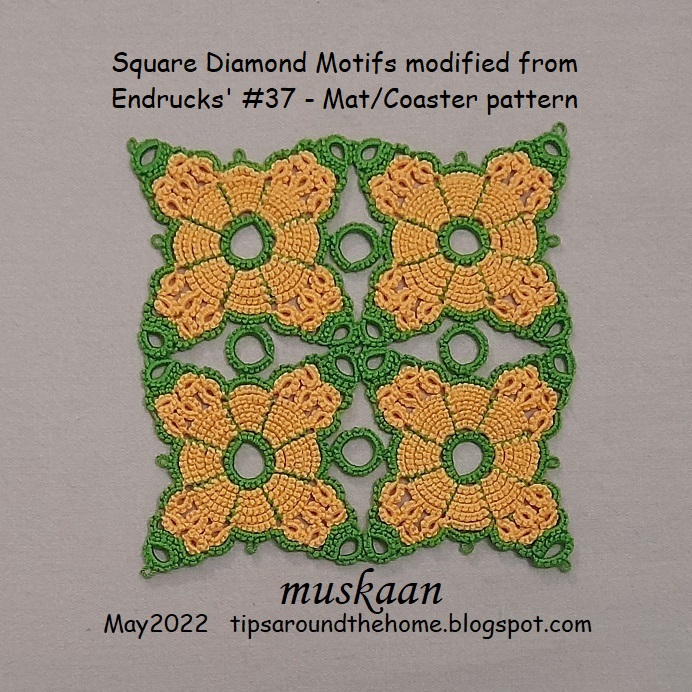
9. Modified for Mat: The single lateral ring at the tips are larger here (7+4-4), and used for the Mat (below). 
Hubby had chosen this yellow and blue combination for the mat/coaster I wanted to make him. But the solid colours didn't work out (the 2 joined motifs can be seen in the topmost group pic). However, after seeing the cute 3D Flower Cube by Lillian Yeung, I hope to convert it into one, too!

mat/coaster/table runner/table cloth ..:  I was tired of working with yellow, hence chose this peach colour and the green went nicely with it. One can increase the tatted fabric to deserved size by joining as many motifs as required.
In Anchor size 20 it measures 10cmsx10cms.

Wondering whether we needed to cover up the blank space a bit, the sequins were hubby's idea and he got the blue he'd had in mind! One can use buttons in place of sequins.

For the purpose of sharing the pattern, I decided to see how large a ring would be required and worked these 4 rings in later. However, they can be worked as thrown rings. I was prepared to snip off the rings, but hubby liked it just fine and is using it!

alternate tessellation or cross: If a size 40 motif is joined like a diamond to the 4-motif open arrangement (worked in perle size 8 or Lizbeth size 20), we get another variation for a mat or fabric with alternating squares and diamonds!
In the above, if we join a couple of motifs to the orange one for a longer arm, we get a cross!

So there it is - a bonanza of choices and effects from one single motif!!!
All pattern notes and/or diagrams are included in the pdf (click to download): https://drive.google.com/file/d/1wqAPnOUZwLJ9tEUk55wDZhAMw2qCNFSj/view

All pattern pdfs and more, in modern style as well as links to the original book can be found in the Endrucks 1920 Project doc here -