Showing posts with label E37. Show all posts

Saturday, 16 May 2026

itch scratched

Pin It now!

 From April 2019 to May 2026 - took all of seven years for me to put up the pictorial for curled ring connectors! I had a one-page graphic prepared in 2019 but kept putting it off. The 7-year itch proved advantageous because now I am sharing a comprehensive tatted ring connectors presentation which includes two main types of connectors as well as numerous applications and variations along with tips and options! You no longer need to rummage through your stash of motifs wondering what to do with them, or to worry about finding the right findings for your tatted jewellery! No preplanning, no joining picots needed!

Since this is an image-heavy post, I will try to keep the text to a minimum. You can read all details in the PDF and the links provided below.  

Tatted Ring Connectors
Two main types are the Curled Ring Connector (CRC) and the Tatted Ring Connector (TRC) as seen above.

Curled Ring Connector
All you need is a single shuttle to tat picoted rings and a lock join to curl each either individually or simultaneously at the end. 
Curled Ring Connector in progress. These are single shuttle rings curled around desired motifs to connect them.
Collect all your motifs or lace and arrange as desired.

My CRC SOUP bracelet. Here, I have added beads in the center of the 3-way CRCs. 
The large ring at the bottom left will be curled and will act as a toggle for the bracelet.

Detail of the beaded CRC.

This is my Italian Connection bookmark made by linking Patty Castagno's Square Motifs.
Notice the 3-way CRC decorating the tassel and its 'empty' counterpart at the other end.

Not merely tatted motifs, these connectors can be used to link sequins! There are even 4-way connectors here tatted with metallic thread.
First sneak peek here - https://tipsaroundthehome.blogspot.com/2019/04/pattys-square-pattern-and-peeks.html
Ninetta Caruso's E37 Iris Pendant uses a triple onion ring to curl around the necklace. And on the other end she worked a curled ring to link to the tatted motif with a split ring between the CR and OR!

Tatted Ring Connector
All you need is a single shuttle to tat picoted rings and a picot join between them, encapsulating  two motifs/pieces. 
Some of my E37 Eye Spy Hearts #2 motifs left over from my trials and prototypes are now linked with TRC or tatted ring connector. More hearts here - https://tipsaroundthehome.blogspot.com/2025/09/timeline-and-play.html
Detail of a TRC in progress.
My E37 SOUPy Vine bookmark with E37 Eye Spy Hearts #1 has a variation of the tatted connectors where the two rings are not joined to each other but to the motifs! More details here - https://tipsaroundthehome.blogspot.com/2023/07/soupy-vine.html
My E1 Happy Hands Linked Bookmark uses the main motif 'hands' to link the tail to the body! More here - https://tipsaroundthehome.blogspot.com/2022/03/linked-hands-trial.html 

My E1 Happy Hands Linked Bracelet has two motifs and the linkage to the body is made with the crossed long beaded picots. https://tipsaroundthehome.blogspot.com/2022/08/a-bonanza-of-happiness.html  
Detail of the crossover picots between the two motifs.

Ninetta Caruso's E1 Happy Hands Necklace uses 3 individually tatted interlocking rings to link the clasp to the lace! Lots more pics and details here - https://tipsaroundthehome.blogspot.com/2022/10/not-just-edging.html

Ninetta uses a similar technique to attach the clasp to the lace in her E2 Fishbone Bracelet. Her pattern pdf also has a detailed pictorial of the process and she has shared two important tips for our presentation as well.

I hope you are sufficiently impressed by the variety and will want to assemble your practice and prototypes pieces to create useable articles and jewellery!

Many thanks to Ninetta for her feedback, input, tips, and proofing!

Tuesday, 6 February 2024

going wide

Pin It now!

 Remember when I posted the E37 flower flake and star and was not very happy with my wide picot? I couldn't always get the stitches under/within the picot to stay consistent and neat. So, I explored some more which I should've done at the beginning, having the links in my Tatting Resources page already! Well, my oversight gave me a chance to study it better.

Download my pdf of Wide Picot Pictorial here - https://drive.google.com/file/d/1Ejb7tVOk15VQHV0omhUt-HIb1CzYAI7I/view 

All tuts I referred to had the wide picot on a ring. This means there is the ring loop besides the loop(s) for the picot, etc. Unnecessary confusion. I decided to do the steps on a chain where I could employ two colours.

This is the main step that differs in different online tutorials. As always, we have options to choose from and see what works best for us.
In all tuts, the wide picot is encapsulated only in the 1st half-stitch while the 2nd half-stitch is worked normally.

The oldest tutorial I found was by Dan Rausch (tatmeister, 2003) - http://pages.suddenlink.net/tatmeister/widepicot.html?  However I found it difficult to follow his written instructions, oops.
Now this was a technique that Georgia loved to ask every new batch in her online classes.
Shannon (mytattingplace, 2011) had uploaded a video based on her understanding of Dan's technique and it is so clear to follow - https://www.youtube.com/watch?v=qONlAylfXIQ

In this method (above pic), one needs to hold the loop on the left hand and make the 1st hs on this loop.

This is a little rosette I made using the wide picot and am fairly happy. Lizbeth size 20 used.
One can make smaller picots inside the wide picot, too. A floating Josephine ring would look good too! See Claudia's pictorial linked below.
 
Added leaves and stem in order to show that the picot in not merely decorative, but functional as well.

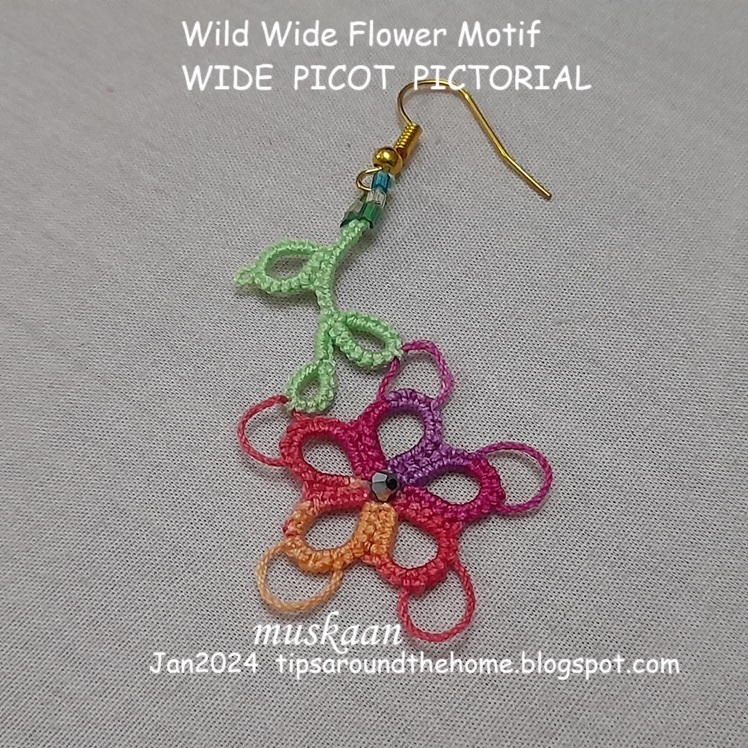
Added beads and findings for an earring.
TIP: After making the number of stitches encapsulating/within the wide picot, it is good practice to tug on the picot to remove any slack.

One can add pre-strung beads on the wide picot, too, but I don't see the point. I would much rather make a double picot, loading beads at the time of joining.  

When I showed Ninetta Caruso my pictorial, she shared her own method which involves simply twisting the loop for 1st half-stitch once before inserting the shuttle and snugging. She even made a video to demonstrate it - https://drive.google.com/file/d/1XsqlFZHcVpopvRFBhTgR6_oQWqf98Bw7/view

For the E37 flake I had used Karen Cabrera's Lesson #34 video (kcabrera74, 2011) which is the easiest to perform - http://www.youtube.com/watch?v=IaT-Pktx9nw . It is like making a normal join!

And just to complete the list, there are 2 pictorials by Claudia Meza (2010) in Spanish - https://howtotat.blogspot.com/2010/04/wide-picot-picot-ancho.html and https://howtotat.blogspot.com/2010/04/lochness-monster-picot.html?

So, each method is good. It is up to the tatter to practice and work them properly.

Ninetta has used the wide picot, aka Monster picot, quite often, including with treble tatting - https://ninettacaruso.blogspot.com/2018/09/a-wide-choice.html. Her Falbalà doily is a marvelous play with wide picots - https://ninettacaruso.blogspot.com/search/label/falbal%C3%A0 .

This time again, I am using the Wild Wide Flower earring as my entry for both Natalie Rogers' PICOT bingo (the Tat Earrings box which makes 3 boxes in a column) and splocik's Small Decorations.
Check out what others sent in as small decorations for Jan 2024 here- https://splocik2.blogspot.com/2024/02/male-dekoracje-2-galeria-styczniowa.html .

I haven't really played with the wide picot, satisfying myself with a very basic motif. Hopefully some day ....

Many thanks to all for sharing their knowledge, skills, and ideas so people like me can widen our own repertoire!

Monday, 29 January 2024

E Hearts

Pin It now!

 We have quite a collection of hearts derived from Endrucks' patterns and even more patterns where these hearts have been applied such as bookmarks, coasters, butterflies, etc. There are even more I have spied in other patterns that will hopefully come to life in thread some time. Or I might just share the idea for others to work out.

The above is only a fraction of the hearts/applications I tatted. Found these easily in the two nearest boxes I rummaged through. But there is not a single heart from pattern #1 here, nor butterflies, etc.
It was spur of the moment and I hastily put this collage together.
The above hearts are from E3, E5, E28, E32, E37.

The patterns have been derived by many members and you can download all patterns from the Hearts Directory here - https://docs.google.com/document/d/1MpYw9XMB8Asz8zusj1ZpHvX8A8Ww424-rEVORtxcL1w/view
And don't forget to look at the eye candy and other pattern directories listed at the end.

If you complete tatting your first pattern from our Endrucks' Collection and show us a pic, we will be happy to send you a little gift! 

💖 Happy E Tatting ! 💖

Sunday, 21 January 2024

what a killing

Pin It now!

I actually could've said 'killing two birds with one stone' but its not an idiom I like when birds are so cute. In this case I have made a killing in more than two ways. Read on ...

There are always tons of inspiring allurements and distractions in Tat Land. But I do my best to avoid or choose only those I can weave into my own jam-packed life. This year, I came across two such almost non-structured games which I should be able to manage through the year. 

And this is my submission to both games simultaneously - the E37 Flower Flake and Star derived and adapted from Frau Endrucks' pattern #37 from her 1920 book, ‘Die Schiffchen-Spitzen’ and the modern reworking of E37 Square Diamond Motif. I had shared the prototype flower flake pattern, but it did not lay flat (https://tipsaroundthehome.blogspot.com/2023/10/wanna-multiply.html).

I killed my wide picots, sadly, with untidy stitches beneath the arch. I have now learned the correct method and will share in a future post. The twist in some picots is merely because I drove the pin in too deep when blocking, LOL, and didn't bother to correct it. The patterns will be shared, too. after I make an ice drop version with nicer wide picots.

Splocik announced a new game for 2024 'Small Decorations' wherein we can tat any kind of decoration per month. Easy enough. This snowflake and star are my decorations for January.
Details can be found here (scroll to end of post) - https://splocik2.blogspot.com/2024/01/mae-dekoracje-galeria-grudniowa.html 


Simultaneously, I started with Natalie Roger's (Tat Your Own Adventure) PICOT Bingo. You can download the game here - https://www.patreon.com/posts/picot-bingo-95729145?. Uh-oh, I seem to have missed a crucial point! I thought this one bingo card would last for the year. Looks like it is only for the month. If so, I won't get any bingo this time. Must confirm with Natalie.
UPDATE (22 Jan 2024) - Phew, Natalie tells me the card remains same for the entire year. However if we complete it, we can request for a new card.

The above is for 'Tat A Snowflake'. For 'Tat Flora' I am submitting the E15 Ear of Maize Doodle I posted here - https://tipsaroundthehome.blogspot.com/2024/01/barely-in-time.html 


I am also entering this for the 'Graduated Picots' box. See what a killing I'm making here?!!!
Hey, I can add earring findings and enter them in the 'Tat Earrings' box as well, hehehe. Oh my, I'm devious! That's 3 in a column; the 4th can be done quickly enough, but the doily has me stymied I believe. Time will kill me this time!

Many thanks for hosting these exciting games, Natalie and splocik! See you again next month 💕

Sunday, 12 November 2023

multiply me roundup 2

Pin It now!

 I enjoy doing roundups, despite the time it takes to collect, notate, organise pics. The reason is that I get to see them up close and often notice something I had seen before. Little tweaks, embellishments, etc. Occasionally the tatter gives us some details when they post; most often they don't. Hence, roundups are an eye-opener. 

Continuing from my previous post (https://tipsaroundthehome.blogspot.com/2023/11/multiply-me-roundup-1.html), here are the remaining models for #MultiplyMeEndrucks Oct2023 game.

7. Margaret Davies - 3  We have another regular player in Margaret, always with her own take. 

Inspired by the bead placements in my earrings, Margaret tatted this lovely parure! I'm sure she will share more details when she blogs about it. (https://margaretsdesignercards.blogspot.com/)

8. Michelle Forclaz - 3 also tatted 3 motifs but just look ---
Now isn't that one super cute turtle! It is great to see what another tatter sees.

Her second, and
third motifs in soft shades while playing with options and effects. Notice how she inserted a single round of beige in the pink rosette!

9. Paola Bevilacqua - 3  Paola is never far behind either!

The Iris pendant complete with a 2-colour split ring braid. It appears like she used 3 shades in the pendant.
Her 5-point adaptation to cover the top of a bauble ornament, and
a 6-point adaptation at the lower end! Both motifs are sewn together with the same thread.

10. Silvana Buonvino - 3  Always happy to see Silvana's regular and enthusiastic participation in our games!
Her first motif in metallic threads and a few beads sewn in later.

Iris pendant in gold with white seed beads and a lovely cord for the necklace.

This came in a yesterday as a wonderful surprise. The Multiply Me Flower Flake where she shortened the chains between the arms to (2 - 2) and used long decorative picots instead of wide picots.  

11. Alicia Fullana - 2  Our new member

She appliqued the first motif on a bow neck shirt. Notice the colour switch in the rosette. And  she clearly did not use lock joins.  

Her second motif is appliqued on a short sleeve shirt!

12. Antonia Lai - 2   loves to participate regularly, too!

Her first Iris pendant, and
her second Iris pendant! She started tatting with metallic threads quite recently.

13. Cynthia Dooley - 2  is one of our needle tatters. She tatted both these bookmarks a while back, but we asked her to enter them in the game. 
Her first motif as a square with a lovely ombre effect, and an interlocking SR braid as tail, ending with a 3-layered flower charm.
Her second motif is displayed as a diamond with the tail emerging from a tip. Here the charm is a 2-layered flower. 
It's a great way to use motifs and also to learn techniques.

14. Debra F. Cox - 2  an enthusiastic learner-tatter

Lovely shade of blue, and I love the addition of grey. She says she's working on a multicolour mat. Waiting to see how it turns out!

15. Mariola Siwek - 1  I got to see her beautiful tatting when she participated in the DAL Celtic Snowflake 'challenge'.
She took up the task of flattening the Multiply Me Flower Flake (https://tipsaroundthehome.blogspot.com/2023/10/wanna-multiply.html) and used double picots instead of wide picots.
She shared her simple solution - start with an increased count in the rosette and reduce the number of rounds! Beyond this, she did not change anything. It's a beautiful variation.
I will try to upload the final pdf including these variations as soon as possible. 

16. Martina Reinhold - 1  our first-time participant and hopefully a regular.
This vibrantly coloured motif with alternating colours in the rosette, is her submission.

17. Reiko Akamatsu - 1   our hugely talented volunteer and participant!
She tatted the Iris pendant as a motif. She actually worked a half-finished prototype/trial before making this lovely version.

18. Riva Nudelman - 1  We are getting to see more of her tatting ...
A beautiful rendition in two colours!

And with that, we come to the end of the roundup for or October game. There are always a few straddlers that I show in a separate post. 

In this post we have 12 tatters with 24 models including variations. 
This brings us to a total of 18 participants and 66 models, with numerous variations and adaptations! [UPDATE 17th Nov 2023: 5 more models have been received, taking the grand total to 71!]
All the images are uploaded to our FB album and the variations are uploaded to respective Directories. Links are at the top of the right panel in this blog.

Many many many thanks to all our participants for multiplying the joy
of tatting an Endrucks pattern and creating more derivatives!