Showing posts with label tatted earrings. Show all posts

Sunday, 21 June 2026

multiple celebrations

Pin It now!

Yesterday I wrote about two celebrations of which one is actually a week away. Turns out we have a full house today. International Yoga Day, Father's Day, World Music Day, and our very own International Lace Day all came together on this June Solstice! 

These are my tatted motifs for the day - two from our Endrucks Project and the other a better version of my recent unhappy trial.

My name badge from the ILD FB page. 
Letter E from E41 derived by Manju Talekar.
This letter was tatted a few days back when I was doing the presentation for this pattern to ensure that the correct shuttle and instructions were presented.

And if I rotate the E by 90 degrees, we get M!!! A wee bit of tweaking for it to look better is all that's needed.

Letter E cursive from E32 derived by Paola Bevilacqua.
This one I tatted today! However instead of captured picots I used beads. I wanted something festive.
TIP: Although it called for 2 shuttles, I used a shuttle and ball with beads pre-strung on both! Using SCMR (mock rings) and reverse join as well as any relevant reposition method, I managed to avoid the 2nd shuttle!

Earrings with Interlaced Onion Rings designed by Lauretta Tondelli.
This time her onion rings comprised of true rings and not chains as in the unhappy trial post. I like this Much better!!! Of course since the 2nd and 3rd rings were large, I left a core thread loop (2 in case of the 3rd ring) midways so that the ring could be closed in 2 (or 3) phases. Pretty happy with the result, though I do see the need for improvement.
Also, I had to un-tat and re-tat with 2 less double stitch in each segment of the inner chain to get the proportions right.
The two Es together. Both pattern links are in my previous post. I wonder if I can tat all 6 versions during our celebratory week?
All motifs tatted in Anchor or Red Rose size 20.

So, how did you celebrate the day? 

Tuesday, 6 February 2024

going wide

Pin It now!

 Remember when I posted the E37 flower flake and star and was not very happy with my wide picot? I couldn't always get the stitches under/within the picot to stay consistent and neat. So, I explored some more which I should've done at the beginning, having the links in my Tatting Resources page already! Well, my oversight gave me a chance to study it better.

Download my pdf of Wide Picot Pictorial here - https://drive.google.com/file/d/1Ejb7tVOk15VQHV0omhUt-HIb1CzYAI7I/view 

All tuts I referred to had the wide picot on a ring. This means there is the ring loop besides the loop(s) for the picot, etc. Unnecessary confusion. I decided to do the steps on a chain where I could employ two colours.

This is the main step that differs in different online tutorials. As always, we have options to choose from and see what works best for us.
In all tuts, the wide picot is encapsulated only in the 1st half-stitch while the 2nd half-stitch is worked normally.

The oldest tutorial I found was by Dan Rausch (tatmeister, 2003) - http://pages.suddenlink.net/tatmeister/widepicot.html?  However I found it difficult to follow his written instructions, oops.
Now this was a technique that Georgia loved to ask every new batch in her online classes.
Shannon (mytattingplace, 2011) had uploaded a video based on her understanding of Dan's technique and it is so clear to follow - https://www.youtube.com/watch?v=qONlAylfXIQ

In this method (above pic), one needs to hold the loop on the left hand and make the 1st hs on this loop.

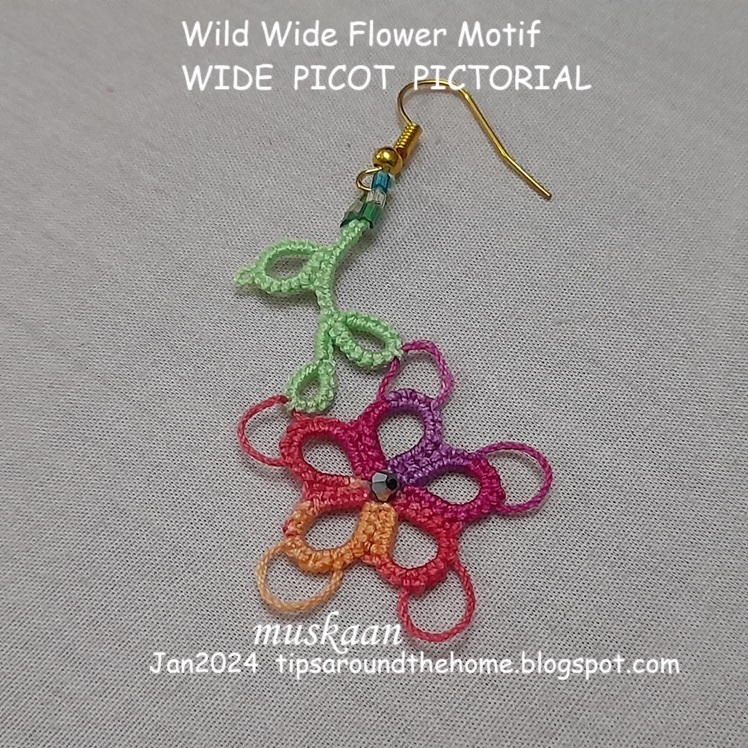
This is a little rosette I made using the wide picot and am fairly happy. Lizbeth size 20 used.
One can make smaller picots inside the wide picot, too. A floating Josephine ring would look good too! See Claudia's pictorial linked below.
 
Added leaves and stem in order to show that the picot in not merely decorative, but functional as well.

Added beads and findings for an earring.
TIP: After making the number of stitches encapsulating/within the wide picot, it is good practice to tug on the picot to remove any slack.

One can add pre-strung beads on the wide picot, too, but I don't see the point. I would much rather make a double picot, loading beads at the time of joining.  

When I showed Ninetta Caruso my pictorial, she shared her own method which involves simply twisting the loop for 1st half-stitch once before inserting the shuttle and snugging. She even made a video to demonstrate it - https://drive.google.com/file/d/1XsqlFZHcVpopvRFBhTgR6_oQWqf98Bw7/view

For the E37 flake I had used Karen Cabrera's Lesson #34 video (kcabrera74, 2011) which is the easiest to perform - http://www.youtube.com/watch?v=IaT-Pktx9nw . It is like making a normal join!

And just to complete the list, there are 2 pictorials by Claudia Meza (2010) in Spanish - https://howtotat.blogspot.com/2010/04/wide-picot-picot-ancho.html and https://howtotat.blogspot.com/2010/04/lochness-monster-picot.html?

So, each method is good. It is up to the tatter to practice and work them properly.

Ninetta has used the wide picot, aka Monster picot, quite often, including with treble tatting - https://ninettacaruso.blogspot.com/2018/09/a-wide-choice.html. Her Falbalà doily is a marvelous play with wide picots - https://ninettacaruso.blogspot.com/search/label/falbal%C3%A0 .

This time again, I am using the Wild Wide Flower earring as my entry for both Natalie Rogers' PICOT bingo (the Tat Earrings box which makes 3 boxes in a column) and splocik's Small Decorations.
Check out what others sent in as small decorations for Jan 2024 here- https://splocik2.blogspot.com/2024/02/male-dekoracje-2-galeria-styczniowa.html .

I haven't really played with the wide picot, satisfying myself with a very basic motif. Hopefully some day ....

Many thanks to all for sharing their knowledge, skills, and ideas so people like me can widen our own repertoire!

Sunday, 14 May 2023

crown jewels

Pin It now!


No wonder it is called 'Embellishment Tatting'! What a difference adding bling makes to a tatted piece, especially if it is to be used as a piece of jewellery. I shared the red prototype in my previous post (https://tipsaroundthehome.blogspot.com/2023/05/wear-me-endrucks.html) and using the very same counts but with beads and crystals, it got transformed.

It looks like a crown, doesn't it?! Obviously the base needs to be lengthened but still .... Hence I christened it 'Crown Jewels' since it can be used as pendant, brooch, or earrings, or a bride's tikka!

This is closer to how it looks in person - golden and shiny.
Because of the add-ons, this version is tatted with one shuttle and ball, ctm, with small gold beads on both threads.

I owe the idea for the crystals within the top rings to Jill McTats. My own idea had been to add a string of gold beads either as a straight line or as a circle to fill the empty space within. She left a comment suggesting "... sew beads in the two large rings to match the drop you plan ....".

Loved the idea and loved the effect! I tried other colours but this midnight blue seemed to really uplift the piece.

Though not discernible, I combined two metallic threads - Red Heart gold and Sanbest #34 for extra sparkle. Very smooth to work with and no trouble closing the large rings.
Some of the beads and crystals have been sewn in later since it is difficult to estimate the size of the tatting and the gem stock I have. 

Embellishing one's tatted lace is exciting and rewarding, but comes at the cost of time. It took me but a few minutes to tat the plain prototype despite being my first 'trial'; this piece took me every moment I could spare the entire day! At the end I was so 'tired' that the final tails at the base weren't even hidden properly, LOL. 
Hats off to all you wonderful tatters who seem to belt out beaded projects at the drop of a hat!

Future Idea - tweak pattern into a heart, crown, angel.

Many thanks, Jill, for your excellent suggestion!

Monday, 15 August 2022

pretty me heart fun

Pin It now!

Now that all the main patterns from Endrucks' 1920 book are in modern format, barring 2, Ninetta and I decided to start holding occasional events in our FB group. The first such official event or Game of the Month is a simple heart that tatters need to embellish or use to embellish something. We also decided to open it up to our non-FB tatters, if you wish to participate.

pretty me aug 2022 - Endrucks 1920 Project Facebook group event

Do you remember this maroon heart I shared here (now updated with diagram and written pattern for alternate path) - https://tipsaroundthehome.blogspot.com/2022/06/to-and-fro-inspiration.html

We chose it for the event in our FB group and are throwing it open to all tatters. 
Download the one-page pattern pdf with diagram, model, and written pattern and begin decorating - https://drive.google.com/file/d/1t3DhpAeXUBi4oZegOty-q5Ux-zfntdYf/view

There are several paths one can take to tat the heart, including starting from a different point. While only the basic path is shared in the pdf (which should be easy for needle tatters and relative new shuttle tatters), I updated my blog post with diagram and written pattern for the path shown there initially. Check it out if you prefer to tat clockwise all from the front - https://tipsaroundthehome.blogspot.com/2022/06/to-and-fro-inspiration.html

This is my tricolour earring prettification. We are celebrating 75 years of Independence today and I see the Tiranga (our Tricolour) everywhere! 
Worked in Anchor Pearl cotton size 8.
I didn't have time (or the right size/colour beads) to decorate further.
A small ring 8ds was added in the topmost heart to hold the hook.
I used my Floating Beads method to attach the teardrop without stringing it on the shuttle.

UPDATE - The following explanatory para is added in response to a couple of queries - 
How to interlink the hearts - 
Each heart was interlaced in a very simple manner through the final chain. Start from the topmost heart, then work your way down. So, tat the 2nd heart till the very end but leave the last chain unattached. Cut off tails and then insert the 'free' chain through the 1st heart, join to the base of the starting rings, tie and cut and hide ends. 
Repeat the same when interlinking 3rd heart to the 2nd.
NOTE: For fs/bs tatters, start the 2nd heart with backside rings so that the final chain is on the right.


There were other ideas such as decreasing the heart sizes (hut didn't have colours in required sizes); joining at the tips (but I kind of preferred this free-style effect with a bit of twisting when worn)....

The heart is Eye Spy Heart from Endrucks' edging #3 which I spotted when tatting the square derived from the edging. 

Use beads, decorative picots, tatting effects or techniques, or colour-play to make the heart pretty or use it to make enhance the beauty of something else.

We have already received several variations of the heart pattern, besides beautification, and those patterns are also being shared! You can join our FB group with your version of the heart, or simply send the pic to either Ninetta (https://ninettacaruso.blogspot.com/ ) or to me, with your name and any project details you might wish to share. 

There is a special album (pretty me aug 2022) to collect all pics though at present it is missing a lot of the pics which members have shared on the Home page; and a hashtag for a focused search - #prettymeEndrucks.

So are you ready to participate? This is such a quick little pattern that needs very little thread! Come join the fun. Remember the butterfly beautification project where I received a thrilling response - https://tipsaroundthehome.blogspot.com/2018/04/make-me-pretty-please.html ? Can we expect a similar response this time, too? 

All patterns from Frau Endrucks (main and derived) can be found here - https://docs.google.com/document/d/17LEVftXweztBIOWh4sL4BB7bX65ssoOsOn4oXIgCepY/view


Saturday, 6 November 2021

fooled by the tool

Pin It now!
It is always such a thrill to see my pattern crop up and even more so when it comes in such wonderful versions with impeccable tatting. So which tool did these talented artists use to tat?

I have chosen a very small selection of the many that are gladdening my heart and eyes; these are presented here in chronological order. They are all needle-tatted from my patterns that were presented for the shuttle.

needle-tatted by Gloria Nelson, June 2019

Gloria Nelson's modification of the Paisley Snowflake with graduated picots has brought more character to the flake, and the design and variegate fell in sync! But can you tell it is needle-tatted?

New tatters often ask which tool is better or easier - needle or shuttle. Valid question but no easy or straightforward answers. There are tatters who spent their life using one tool and muscular ailment forced them to change to the other because their love for the craft overpowered their discomfort. On the other hand a tatter may stick with the first tool s/he learned on, for their entire life without any curiousity to try another. Then there are those who deliberately learn tatting with the other tool (&/or hand as Eliz Davis did) in order to become more proficient at teaching and diversify their knowledge.

Ninetta Caruso said it best - hand is the tool. 

We could take this quite literally, too! Teri Dusenbury used finger tatting a lot. Hey, where's that tool now? And for the truly determined one hand will get the task done as Marilee Rockeley has demonstrated.

needle-tatted by Amarilys Cwb, Sept 2021 
Amarilys Cwb made some mistakes in this first attempt (not that I had noticed any) and worked it a 2nd time below with minor adjustment to picot size on chains.  
needle-tatted by Amarilys Cwb, Sept 2021

Second attempt of the Silver Linings Snowflake by this tatter from Brazil who can work with both needle and shuttle.

For some reason, probably starting with it being a late entrant, the needle has been looked down on as the stepsister in tatting. To date some purists consider only shuttle as the legitimate tool for tatting. 

Why? Look at the numerous patterns Nicola Gooday Bowersox has shared with us for free. I could never identify from only seeing her model that it was needle tatted! Could you tell? 

needle-tatted by Amarilys Cwb, Oct 2021
What about this gorgeous rendition of the Floating Beads earrings?! I had to ask Amarilys whether it was done with a needle or shuttle! Those cute beads really transform my simple pattern with 'boring' pearl beads, into something fun and enticing.

Elena Kozinenko is proficient with all tools be it shuttle, needle, or a cro-tatting hook. Even a netting needle! And unless she points out, one would never guess whether she used a needle or shuttle. I asked her which tool is her favourite and this is what she says - 
'I have absolutely no choice. It all depends on the idea that needs to be implemented and even on the mood!'
Oh, to have that kind of flexibility! She has such a range of patterns and frequently uploads videos that demonstrate a technique using each of the 3 tools - https://fairylace.kozinenko.com/three-types-of-tatting/

needle-tatted by Lella Loops, Nov 2021
Lella Loops is yet another needle-tatter who has such finesse with her needle! Besides this recent Frost Flower Snowflake, she has tatted a few more of my patterns earlier and wowed me every time!


Returning to Gloria Nelson, she needs no introduction! She frequently shares her expertise with her Facebook group for needle tatters. If we follow and apply her tips, the usual 'visual identifiers' of needle tatting will disappear! 
But here are a few of her must-read articles, shared in her Sparkling Light Creation Studio page - https://m.facebook.com/story.php?story_fbid=1774052256037040&id=724059564369653
  • Needle and Shuttle – What’s the Difference?
  • Can a needle tatter follow shuttle videos and tutorials
  • Patterns - Can a Needle make shuttle patterns
So any tool in the right (or left!) hands, combined with the passion to lace, is ultimately what matters. And the journey's enjoyment for accompaniment...


As an aside .... I have wondered for years how needle tatters feel when shuttle tatters collectors display their collection of shuttles? There is such a Vast range to choose from, with new designs, materials, and decorations coming out frequently. Now a tatting needle can be so boring in that sense, except perhaps for the material used? 
 
At the very least, why can't the needles be colour-coded for size at the eye end? eg these tapestry and chenille needles from Pony - https://tipsaroundthehome.blogspot.com/2018/08/needle-tips.html 
Or can some kind of fortified coloured plastic needles for tatting? 
Can needle-tatters come up with ideas to share with suppliers and manufacturers to make the needles prettier and more of a collectors' item?

I'd like to thank each of the tatters mentioned in this post for all their dedicated and inspiring work. 
I want to stress that they constitute a very thin slice of the talented multitude,
all of who I cannot name or might not even know of. 


All patterns mentioned in the post are free and can be found here - https://tipsaroundthehome.blogspot.com/p/patterns-designs.html

Monday, 12 July 2021

every day is lace day

Pin It now!

This is the first time I have posted a pattern elsewhere and not in my blog first. But it was crazy busy this weekend and I was simply too knackered to write out a proper post and share my notes, despite having uploaded a few pics yesterday morning. 

So, without much ado, here's the Lace Day earring/pendant pattern - click to download diagram-only pdf. Eventually I will write out the pattern and add it to this, including a pic of the beaded model. 

It all started when I thought of making a corner for Frau Endrucks'  pattern #17 by extracting one of the lovely motifs from it. Here you see it attached to the 2 sides in order to estimate that it would work. After snipping it off and turning it around, it looked lovely as a possible earring motif!

 
Found out it was International Lace Day on the 11th of July and I registered with a Facebook group and decided to quickly tat and create the pattern to share. The above 2-coloured model is worked in Lizbeth size 20.
TIP : Pattern starts with a chain. In order to avoid too many tail ends at the beginning and also to position the autumn leaves colour for the top ring, I used False CTM! Pull out enough length of thread from the shuttle (Sh2 in this case), work the first chain, and add the 2nd colour in that ring which I worked as a SCMR in order to avoid knots.
Getting ready to start a beaded model on ILD. I used Anchor pearl cotton size 8 along with metallic thread in a darker shade. Size 16/0 beads and earring hook, along with 2 shuttles wound ctm.

work in progress ...
TIP : If one adds bead(s) at the start of the first chain, there is no need for a paperclip to hold the picot. There is sufficient space to make a join later! I started with 3 beads at that corner (seen at the bottom center in above pic).

NOTE: In order to add beads, I made the short chain 4ds instead of 3ds. This is how it now-  (2ds, 3 beads on picot, 2ds, lock join).
Here it is all finished. Unfortunately the metallic thread and beads do not sparkle in the pics. However, if you are on Facebook, check out Anita Barry, Krystyna Mura and Ninetta Caruso's beautiful beaded models. Anita and Krystyna's models can be seen in my FB page and hopefully Ninetta will blog hers. 
This measures 3.5 x 6 cms

In another event organised in the Italian group for the same event, there was a spiral tatted/Josephine chain for eye glasses. I took the opportunity to simply add a short beaded length to make this a necklace.
This pendant measures 2.5 x 6 cms.

Download Lace Day Earrings pattern pdf here.


This is my ILD 2021 badge. There were almost 4,500 participants worldwide and many tatters, too! I'll be looking forward to it next year and hoping you will also join lace makers in our passion for lacing!
Please accept my belated wishes for a Happy Lace Day.... for lacers, everyday is a lace day 💖

Friday, 25 June 2021

fumble fingers

Pin It now!

 I swear if you watch me do beaded tatting you will forget how to tat with beads! My fervent wish is that a beading friend sit beside me and help me use the tools and materials I have effectively and efficiently. I simply fumble my way through, taking a ginormous amount of time even for simple patterns. And nothing comes simpler than this earring pattern!

Remember I told you about receiving many gift patterns around ITD this year? This simple one-shuttle earring pattern is a special gift from Jill McLean! Here is my journey ....

1. My first trials with new metallic thread (Natvarlal brand) failed. The single thread broke soon after starting my 1st attempt. 
So I used 2 threads above, but while closing the ring, one thread broke. Had to be abandoned.

2. Played safe on my next trial, using size 20 metallic thread.  
My only variation was using 2 different coloured beads. The yellow ones (up beads) went around the hand on the ring loop, while the blue ones (down beads) were pulled from the shuttle. 
Stringing beads didn't require too many brain cells - load all of one colour, then all of the other!
TIP : One can work the small ring as a SSSR hiding the tail without any sewing! (Miranda pictorial ; Marilee video)

3. Friends urged me to use my silk threads. So here's one Opella silk skein (all 6 strands) along with faceted bicone crystals in 2 colours - the inner green are a tad smaller than the outer silver crystals. 
I used metallic silver thread to make jump rings for the 2 teardrops. Huh, they don't look too bad in the pic, but I had a tough time getting them into shape, especially doubled up. 
Here the large ring took patience while closing - had to slide the stitches to the left in batches till the ring finally closed. 
This time the small ring on top is a split ring, sewing in tails on either side after making an overhand tie. 
TIP : But there's a way to end on a SR without sewing, too.

4. How would it look if the size of beads was inverted? So, large black wooden beads on the inside and small seed beads (17/0) on the outside! 4 seed beads per wooden bead. 
This time I decided to make a mock ring and was going to make onion rings, but switched to a red Swarovski crystal surrounded by seed beads instead. Both used Floating Beads methods.
The black beads are strung through 5 strands of Anchor silk thread on shuttle1; and silver metallic thread with seed beads on shuttle2. 
My idea was to have the red colour show up in the stitches between the black beads. How wrong was I! Unless I used reverse (unflipped) stitches, the red is hidden. Felt like a fool, but didn't feel like undoing the first few stitches, so continued.
QUICK TIP : Tatting with Metallic thread 
This metallic thread is pretty much a wire with silver thread wrapped around it and it was difficult to get a flipped stitch, especially the first half stitch.... till I hit upon a little movement!
1. Floating beads at the start, and an open chain in progress which will be joined back into a mock ring using a lock join.
2. Making the 1st half stitch. The silk thread does not have enough strength to make the metallic thread flip. With any free finger/thumb, gently push the loop indicated by arrow ... push it upwards and it's a Flip!!!
[The inset shows how direct tatting would've worked.]
3. And there it is - the 1st hs. The 2nd half stitch poses no problem. 

And that's it for now. Other ideas percolating in my head will have to wait for another day.
Isn't it amazing how simple variations and combinations can create a range of effects?!
Design TIP : The size of the down/inner bead, besides the size of thread used, affects the size of the earring as is evident above. The up beads do not affect size of ring. 
The double layer of beads adds stability of shape and structure, besides the visual effect.
And this is such an easy but versatile pattern that one can make a pair for every dress!

Many many thanks, Jill, for your gracious, exciting, and enjoyable gift ...
made me push my beading boundaries 💖