Showing posts with label Teri Dusenbury. Show all posts

Saturday, 6 November 2021

fooled by the tool

Pin It now!
It is always such a thrill to see my pattern crop up and even more so when it comes in such wonderful versions with impeccable tatting. So which tool did these talented artists use to tat?

I have chosen a very small selection of the many that are gladdening my heart and eyes; these are presented here in chronological order. They are all needle-tatted from my patterns that were presented for the shuttle.

needle-tatted by Gloria Nelson, June 2019

Gloria Nelson's modification of the Paisley Snowflake with graduated picots has brought more character to the flake, and the design and variegate fell in sync! But can you tell it is needle-tatted?

New tatters often ask which tool is better or easier - needle or shuttle. Valid question but no easy or straightforward answers. There are tatters who spent their life using one tool and muscular ailment forced them to change to the other because their love for the craft overpowered their discomfort. On the other hand a tatter may stick with the first tool s/he learned on, for their entire life without any curiousity to try another. Then there are those who deliberately learn tatting with the other tool (&/or hand as Eliz Davis did) in order to become more proficient at teaching and diversify their knowledge.

Ninetta Caruso said it best - hand is the tool. 

We could take this quite literally, too! Teri Dusenbury used finger tatting a lot. Hey, where's that tool now? And for the truly determined one hand will get the task done as Marilee Rockeley has demonstrated.

needle-tatted by Amarilys Cwb, Sept 2021 
Amarilys Cwb made some mistakes in this first attempt (not that I had noticed any) and worked it a 2nd time below with minor adjustment to picot size on chains.  
needle-tatted by Amarilys Cwb, Sept 2021

Second attempt of the Silver Linings Snowflake by this tatter from Brazil who can work with both needle and shuttle.

For some reason, probably starting with it being a late entrant, the needle has been looked down on as the stepsister in tatting. To date some purists consider only shuttle as the legitimate tool for tatting. 

Why? Look at the numerous patterns Nicola Gooday Bowersox has shared with us for free. I could never identify from only seeing her model that it was needle tatted! Could you tell? 

needle-tatted by Amarilys Cwb, Oct 2021
What about this gorgeous rendition of the Floating Beads earrings?! I had to ask Amarilys whether it was done with a needle or shuttle! Those cute beads really transform my simple pattern with 'boring' pearl beads, into something fun and enticing.

Elena Kozinenko is proficient with all tools be it shuttle, needle, or a cro-tatting hook. Even a netting needle! And unless she points out, one would never guess whether she used a needle or shuttle. I asked her which tool is her favourite and this is what she says - 
'I have absolutely no choice. It all depends on the idea that needs to be implemented and even on the mood!'
Oh, to have that kind of flexibility! She has such a range of patterns and frequently uploads videos that demonstrate a technique using each of the 3 tools - https://fairylace.kozinenko.com/three-types-of-tatting/

needle-tatted by Lella Loops, Nov 2021
Lella Loops is yet another needle-tatter who has such finesse with her needle! Besides this recent Frost Flower Snowflake, she has tatted a few more of my patterns earlier and wowed me every time!


Returning to Gloria Nelson, she needs no introduction! She frequently shares her expertise with her Facebook group for needle tatters. If we follow and apply her tips, the usual 'visual identifiers' of needle tatting will disappear! 
But here are a few of her must-read articles, shared in her Sparkling Light Creation Studio page - https://m.facebook.com/story.php?story_fbid=1774052256037040&id=724059564369653
  • Needle and Shuttle – What’s the Difference?
  • Can a needle tatter follow shuttle videos and tutorials
  • Patterns - Can a Needle make shuttle patterns
So any tool in the right (or left!) hands, combined with the passion to lace, is ultimately what matters. And the journey's enjoyment for accompaniment...


As an aside .... I have wondered for years how needle tatters feel when shuttle tatters collectors display their collection of shuttles? There is such a Vast range to choose from, with new designs, materials, and decorations coming out frequently. Now a tatting needle can be so boring in that sense, except perhaps for the material used? 
 
At the very least, why can't the needles be colour-coded for size at the eye end? eg these tapestry and chenille needles from Pony - https://tipsaroundthehome.blogspot.com/2018/08/needle-tips.html 
Or can some kind of fortified coloured plastic needles for tatting? 
Can needle-tatters come up with ideas to share with suppliers and manufacturers to make the needles prettier and more of a collectors' item?

I'd like to thank each of the tatters mentioned in this post for all their dedicated and inspiring work. 
I want to stress that they constitute a very thin slice of the talented multitude,
all of who I cannot name or might not even know of. 


All patterns mentioned in the post are free and can be found here - https://tipsaroundthehome.blogspot.com/p/patterns-designs.html

Thursday, 27 August 2020

locked in play

Pin It now!

Continuing from my previous post where 2 methods of Interlocking split rings (chain maille style) were uploaded. Again, I follow Ninetta's post to share the 3rd method based on Kathy Niklewicz's method and then its further application in the tatted rope chain.

I first tried Kathy's single-shuttle IR method (along with other methods) in 2014 here. Ninetta took it a step further by using it to create a truly 3D effect. This variation is photographed stepwise below.

C. Interlocking Split Rings - Chain Maille

ref : Kathy Niklewicz's Interlocking Rings and Ninetta's Method 3 variation

Red is shuttle 1 with cream thread ; yellow is shuttle 2 with variegated thread.
All split rings are 8/8.

 
C-1 : Unlike the earlier methods (refer previous post), in this case we can safely close the split ring. 
C-2 : Through the closed ring, insert a hook from the back and hook it to shuttle1 thread.

 
C-3 : Pull a loop front to back through the ring, as seen.
C-4 : Pull out enough of the loop and note the position of each thread(s). 

 
C-5 : Wrap the loop around your hand just as in the earlier methods. The static end of loop is is to the left (where stitches will start) and the moving shuttle part goes around, emerging toward the right.
C-6 : Leave some bare thread (indicated by hook) and start tatting the stitches for 1st side of SR.

 
C-7 : Wrap loop around hand for 2nd side of SR; leave some bare thread (notice the yellow segment) and begin unflipped stitches. Note that the 2nd shuttle thread is within the loop.
C-8 : Stitches complete on both sides.

 
C-9 : Close split ring. 
C-10 : Repeat steps to make as many interlocked split rings as desired.

The advantage of this method is that one does not have to remember to insert the shuttle before closing ring. The disadvantage is that bare thread can be visible from some angles.
A very small variation of this method is used to create the rope chain.

Jane McLellan has used the same method to create a chain maille with a single shuttle and regular rings.
Ruth Perry probably pioneered the modern technique and has created beautiful effects using only chains or 4 shuttles where the bare thread can be eliminated. Teri Dusenbury has instructions for the same using 2 steps and finger tatting here.
This method of pulling a loop through a previous element to tat a ring has also been demonstrated by Patty Dowden to make wonderful rings on picots. 
And don't miss this recent video by Edda Guastella who creates a variation of the chain maille using single shuttle.


Unfortunately, this series will run into a 3rd post dealing with the rope chain, to avoid an avalanche of pics. Instead let me show you my very first chain maille trials.

Above are my Day 1 trials, in Anchor size 20 threads. On the left sampler are my trials of the 3 methods and variations. 
Can you spot the rings that do not look interlocked? Although I do not fully understand why that happened, I think the following TIP might help avoid such mistakes, because there is a tendency for the loop to get stuck at the base of the previous ring -

TIP : 1. After completing 1st side, tug at the core thread that is on the lower right (where you would start the 2nd side stitches). You will notice that the 1st side moves towards the right under the previous ring. 
2. In the 2nd image, the 1st stitch of 1st side, is visible on the right. So you are now sure that your ring is interlocked correctly, and can continue to tat the 2nd side.

3. Tat the 2nd side of split ring and continue with the chain maille method you are using.

Part 3 will be the final post for the present. Of course there will be more projects in the future when I try out the several methods and effects listed above.

Thursday, 20 August 2020

dandy options

Pin It now!
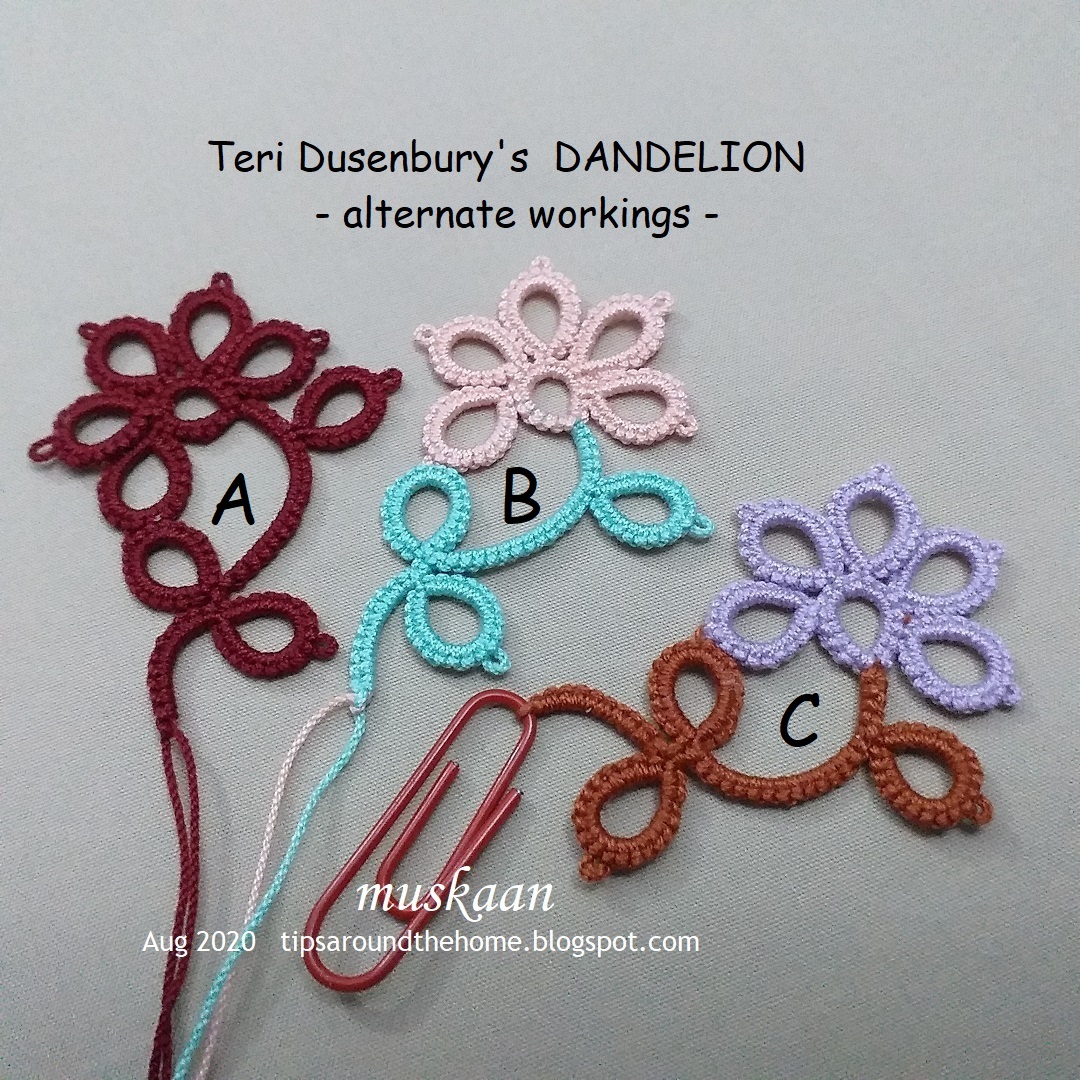
 Solai S asked for help with Teri Dusenbury's Dandelion Chain Link Bookmark after seeing a few recent versions inspired by mine. I needed to refresh my memory by reading the pattern and my blog notes. Huh, turns out I already had the SCMR in place of SQDR idea back then. Time to test it!

SQDR = split quadruple directional ring. It is basically a split ring but has only 1ds on the first side and the rest is worked on the 2nd side, using reverse (unflipped or larks head knot) stitches. Working moves counterclockwise. Rings thrown off the center are worked with same shuttle without any switch. 
If shuttles have different colours, there will be 1ds (on 1st side) that will of one colour and the rest in 2nd colour.

SCMR = self closing mock ring. This is a chain that closes into the shape of a ring. Working moves clockwise, and rings can be thrown off by switching shuttles.
It makes no difference if shuttles have 2 different colours - the entire SCMR with thrown rings will show the same colour stitvches.

The post is long because I am showing 3 alternate methods of working the Dandelion motif, all using the SCMR instead of SQDR. A lot of tips are also thrown in, giving the tatter an opportunity to pick and choose steps as desired. Feel free to skip the working you do not intend to make. 
And for even more options on ways to tat a central ring with several thrown rings, read the article, and download the tabulated pdf. 

 
Note that since thrown rings in SCMR are worked from left to right (a to e, in above left image), the start and end stitches of the SCMR are as notated. It may also be a good idea to make the motifs first, then make the chain link surround (the black rings in above bookmark), joining on the go.
Please follow the original pattern for stitch count and instructions, making necessary adjustments. The following is merely a depiction of alternate methods of working and/or using 2 colours. And knotless starts.


A. Single colour, 2 shuttles, wound ctm (continuous thread), SCMR with thrown rings.

Red - shuttle #1 ; Yellow - shuttle #2

 
A-1 : Loop Sh2 as if starting a chain. Bring Sh1 around the pinky once .... 
A-2 : ... to hold open a loop of Sh1 and start SCMR with 5ds.

 
A-3 : Making the 1st thrown ring with Sh2.
A-4 : Closing the 1st thrown ring off SCMR

 
A-5 : Follow pattern to make 4 more thrown rings, finish SCMR with 3ds, and close the open loop after passing Sh1 through it. Continue with stem using Sh1 as core and throw off the next ring.
A-6 : Follow pattern to complete the motif. Notice there are 2 tails that can be hidden in the chain link later.  
TIP : For a standalone motif, and to avoid sewing in tails, hide one tail in the last stem ring, and tat the final segment (10ds) of the stem as a floating chain as I did here for the rose. 
Tutorial -  https://tipsaroundthehome.blogspot.com/2015/03/dead-end-start-to-split-chains.html

The tails in above motifs are not hidden in order to keep my options open for future.

B. 2 colours, 2 shuttles, SCMR with thrown rings    

Red - shuttle #1 with teal thread ; Yellow - shuttle #2 with pink thread  

  
You can start by knotting the threads. I prefer a knotless start, tatting over tails in separate elements.
B-1: (left image) I usually cross the threads as seen in left image. Each tail is hidden in a separate element.
(right image) This time I simply placed the tails one above the other and continued as below.

 
B-2 : Wrap the threads as above, holding a loop of Sh1 open.
B-3 : Work 5ds of the SCMR, tatting over tail.

 
B-4 : Switch shuttle and work the st thrown ring, switch shuttle to work the SCMR stitches,....
B-5 : and continue to make the rest of the thrown rings and 3ds to complete the central ring.
TIP: Notice how I inserted the pink tail inside the open loop, and also passed Sh1 through the same loop.
 
B-6 : Now close the loop/SCMR. But for Version 2 of pattern, we need switch threads for green stem stitches.
B-7 : The most common solution is SLT (showlace trick). I prefer to avoid it. Instead I did TwW (twist work) as in this bookmark. With Sh1, make an unflipped half stitch, but while tensioning, ensure that the shuttle moves to the top, thus repositioning threads and shuttles into desired positions.

 
B-8 : Work the chain with Sh2 core (hiding the pink tail), thrown ring with Sh1, and chain with Sh2 again. At the end of this segment, TwW to switch shuttle positions.
B-9 : Continue and complete the motif. The tails can be hidden in the chain link later.


C. 2 colours, 2 shuttles, SCMR with thrown rings, starting from bottom, ctm 
Red - shuttle #1 with brown thread (and later with lavender) ; 
Yellow - shuttle #2 with brown thread 

C-1 : Wind Sh1 with stem thread; pull out a length from the ball and cut. Pass this end through the respective chain link ring (if you make this frame first, as per original pattern), and wind the rest on Sh2. Thus, we have joined, with no tails to hide at the start. 

In my standalone model, a picot space is held open with a paper clip (dead end start). Thus, if the motif is worked first, this paperclip picot can be used for joining to the chain link frame.
Work the stem and leaves.
C-2 : Snip off the Sh1 thread, leaving a tail (the shuttle at the bottom of pic) which can be hidden under any element. Sh2 becomes the core thread shuttle for SCMR. 
Wind lavender on a shuttle, tat over tail to hide end and work the SCMR with thrown rings as per pattern. (add thread on chain)
C-3 : Close SCMR and hide ends.


It's been over a week since I heard from Solai, and have no idea whether she has started the bookmark and has any issues. But this seemed like a good opportunity to try out the substitution idea and share with you. 
So, pick up your shuttles and get started :-) What colours will you use?

One more question - do you like the size of the images? Any changes you would like to see in the presentation?

Friday, 15 November 2019

silver linings playbook

Pin It now!
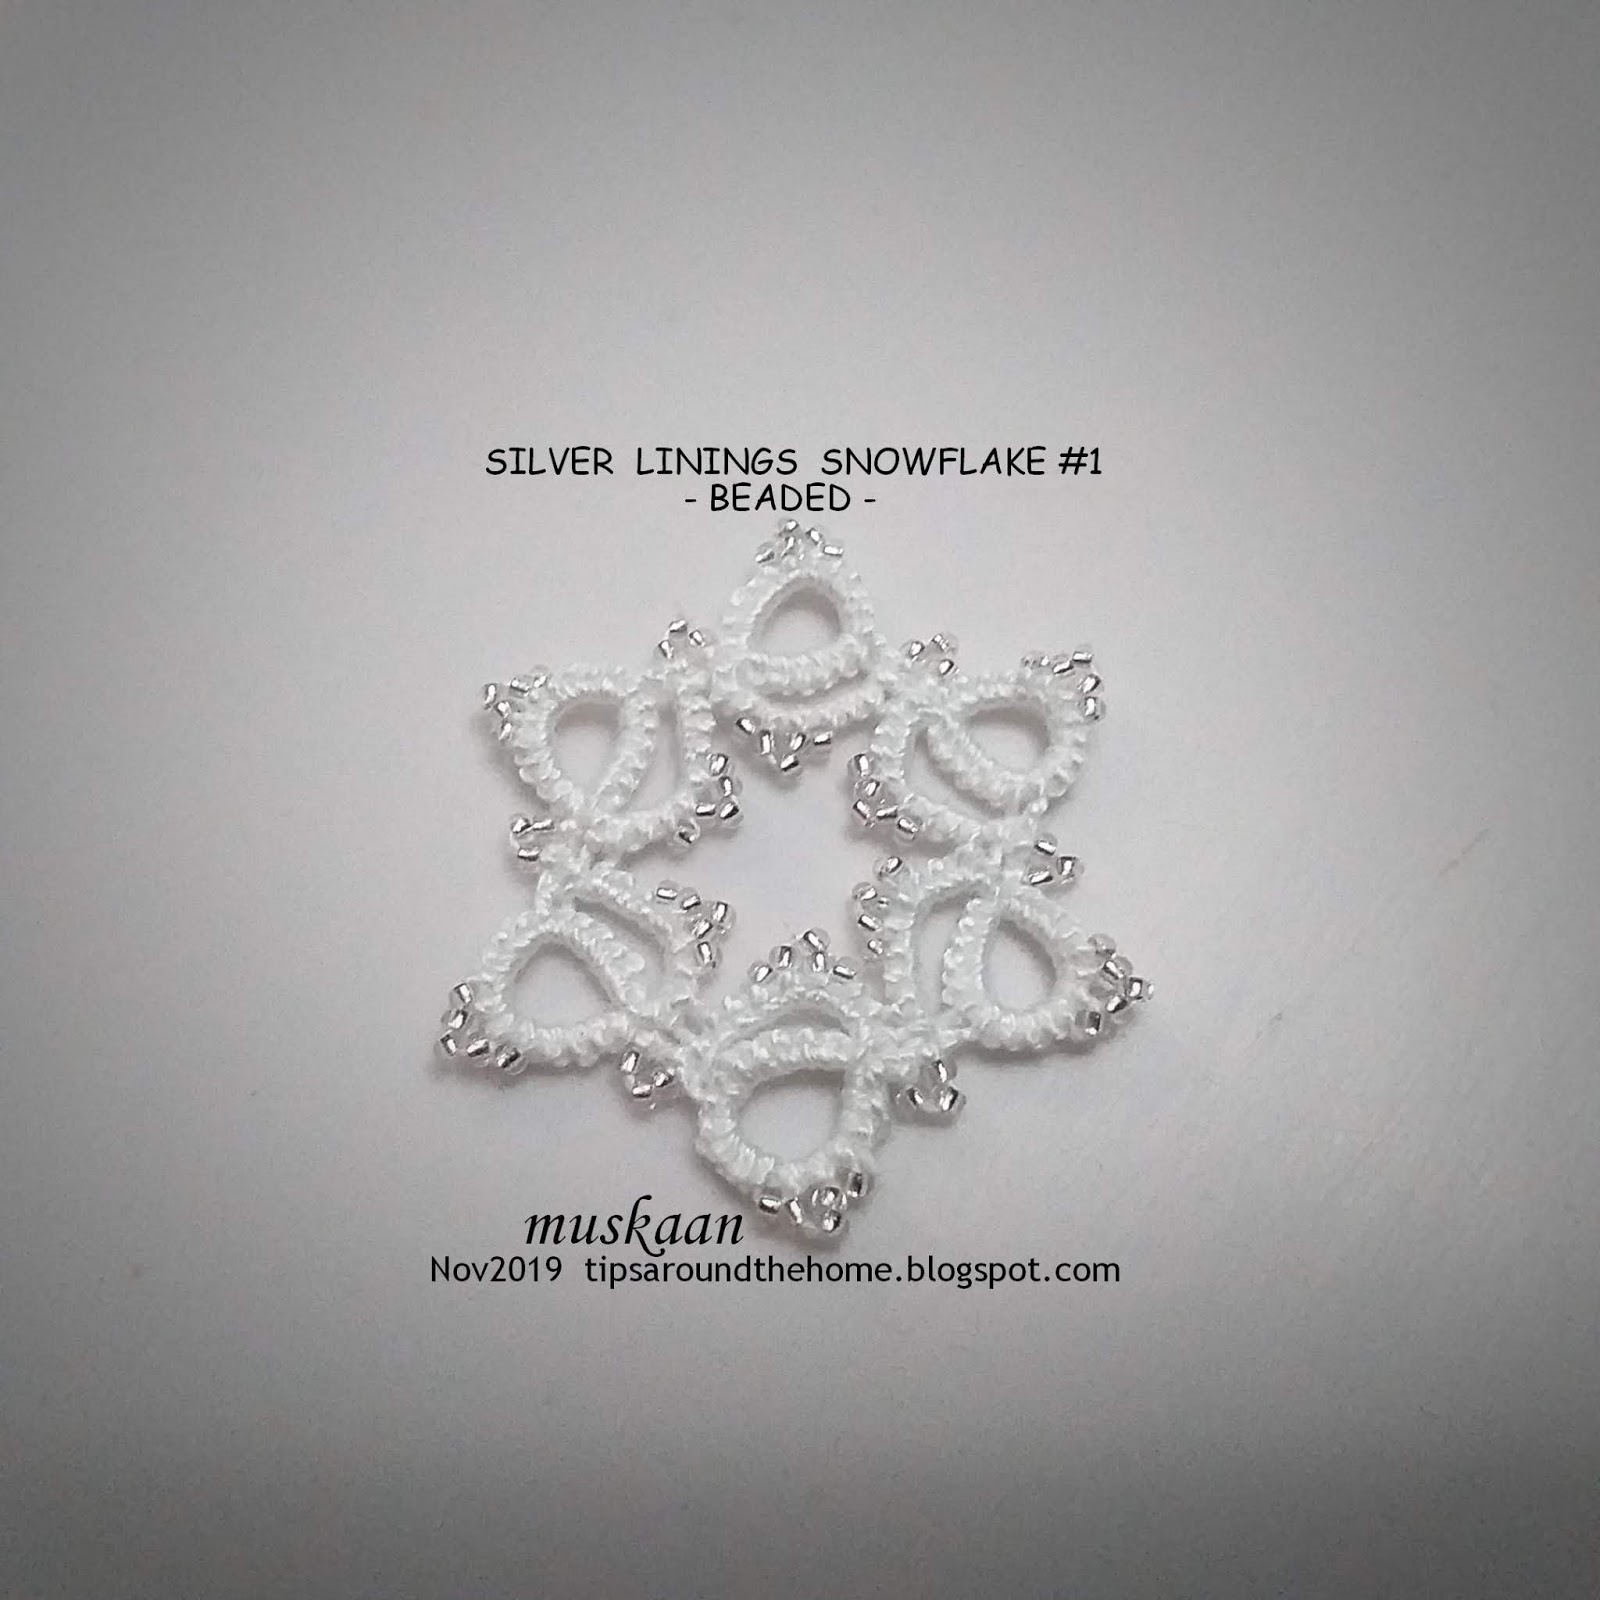
Snowflake #18 in Land of Laces’ 25 Snowflake Project

The playbook contained strategies for a different game. I tried to convert a square motif into a snowflake but the punch was missing, the huddle too wide. I asked on facebook and received many good responses. Linda Reiff suggested lengthening the inner chain, which led to the following versions (thank you, Linda!). And when even beads have ‘silverline’ in their title, there is no other name better suited than ….

Silver Linings snowflakes.
UPDATE : this is now a single-page pdf with legend


The brown models are tatted in Anchor size 20, without beads.
The short chain can be worked with reverse/unflipped stitches. In such case, the 2nd shuttle can be replaced with a ball. See options on how to change chain curves here.

I thought both these designs look fairly basic. But I’d like to stress that I did not copy anybody’s pattern. It emerged from my motif to snowflake conversion (to be shared next) and the ensuing discussion.

The beaded models are worked in Anchor Pearl cotton size 8. I used size 13/0 Miyuki Transparent Silverline Round Seed Beads.
Beads are pre-strung on both shuttles, and the colour of beads tells you from which thread/shuttle the bead comes.

Beads on the line indicate ‘down beads’ ie. they are moved on the core thread from the shuttle in hand.
Beads above the line indicate ‘up beads’ which are already in the ring loop or on the chain thread.
For right-handers, the former come from the right hand thread, while the latter from the left hand thread.
The snowflakes range from about 1¼” to 1 ¾”.
 
I have used a different format for the pattern in order to save time - I have 7 more patterns to create in this project! Feel free to ask in case of any doubts. Only the first motif/repeat pattern is diagrammed. Remember to join the inner chain to it’s previous counterpart, and also the last to the first.