Showing posts with label Craftree. Show all posts

Friday, 6 June 2025

bridge tatting

Pin It now!

 Like I said in my recent posts, expert and experienced tatters have graciously come to my aid whenever I asked for it. And some have gone a step further by sharing their work and/or discussing techniques and terminology even before I asked.  One such is Judith Connors who has been instrumental in guiding and inspiring me through this past decade. My presentations have been influenced by her despite not being a perfect student.

Early last month, Judith sent me her article on 'Building Bridges' along with a pic of her Fan motif (If you are a member, you can see her model in the Queensland Tatters 2025 group post here - https://craftree.com/forum/threadfs/40423?page=1#258577). We had discussed bridging some years back, too. I was in a state of tatting inertia when this motif instantly spurred me to wind my shuttles and tat since this decorative/functional bridge had been on my trial list since 2019 (https://craftree.com/forum/threads/39159), but never got down to actually applying it. I did do the Rose Motif from Priscilla Tatting Book No.3!   

Bridging Flower Motif - based and adapted from Judith Connors' Fan motif
sharing my process, pattern, and tips/tricks

How many rounds does this motif have? 
Do we cut after the inner 'rosette' round?
Were Celtic shuttles or needle used for the Celtic effect?
Or were 4 shuttles used for the interlaced/overlapping chains? 

Getting back to the present motif, it occurred to me that I could use the element to create overlapping or interlaced chains instead of single lines! So off went my shuttles to confirm. 

Now this post is only about the adapted motif - process, pattern, and tips/tricks. I have pics for a pictorial, along with the background and explanation, terminology and history. Part of it is already explained in the link above (https://tipsaroundthehome.blogspot.com/2022/01/bridging-gaps.html). The rest will be shared in a few days to avoid stepping on Judith's class despite her permission. For the curious, we know the technique as split chain, which is a misnomer and limiting, meant mainly for climbing out.  

My first attempt. I ran out of thread and also realised that if I continued around there would be cupping (I had increased the count in some parts). Moreover the thread had a tendency to unravel, even though it is Anchor mercerised cotton. Cut my losses and started over.

Design Tip starting with a magic circle: Since I wasn't sure how big the central ring should be, I preferred to use the  magic circle (the multiple threads are to make the picot large enough to join to later). Wrap the thread around the magic circle and start the first inner chain. End each chain with a lock join around the circle. 
TIP to keep last half-stitch flipped: The marker on the right - since each bridge is a long chain, by the time it was completed, the last half-stitch often unflipped and locked the core thread below. This temporary marker on the core thread prevents it from happening. 
After a few repeats, I pulled on the magic circle to see whether it was working well. Successful; no cupping or ruffling.

Bridging Flower Motif pattern
  1. Only 2 shuttles are used with continuous thread and the entire motif is worked in one pass. 
  2. 8 repeats and all chains in this prototype. No space for a central ring. In Anchor mercerised crochet cotton size 20 (equivalent to Lizbeth size 10), the motif measures 6.5cms in diameter.
  3. In the image above, I have split the sequencing (A to F) to indicate where there is a change of direction , shuttles, or element. 
  4. The entire motif is worked clockwise from the front.
  5. Chains C & E are bridging chains aka bridge, bar. 
  6. I used a 2cms folded picot gauge to measure the bare thread for bar/bridge before lock joining it to a picot on the previous element.  TIP:  I found that making a lock join by pulling the loop down instead of up through the picot makes a neater start to the bridge.
  7. These bars are covered with Dora Young's Knotless Method or tied stitches worked from left to right. I worked them all from the front, though there are several variations of the method. 
  8. NOTE: The arrows for bridges indicate where the thread from shuttle2 goes, not the direction of working the stitches. 
  9.  While making each subsequent bridge, keep it in FRONT of the previous chain so that the overlapping is synchronised.  
10. For the bridges on the last rosette chain, TWO each had to be made! The above image shows the first pair done and the 2nd pair is being bridged.
After working the first bridge exactly like ch-C, then one more bridge is made joining to the first rosette on the right, at the base of the very first bridge. The stitches are then worked using the Australian method. This, too, is worked from the front, but in the opposite direction (right to left). Repeat this for the 2nd pair of bridges. 
Important: To maintain overlap, pass the shuttle under and over the last bridge both times.

11. After the motif is finished, and both threads are in the center, I threaded them together and inserted the needle through the picots held open with the magic circle, and kept removing the threads from the circle. Final tie, cut, and hide ends.
Option: One can use metallic thread or colour-coordinated thread for the magic circle and leave it be after tightening the slip knot. Then hide all ends - from the motif as well as the circle.

 
Possible Variation: However one can use a central ring of 10 small picots separated by 1ds and make a 10-repeat motif. 
Future Idea: Can we use this bridging technique to work block tatting over or across an element?

I will try to write the pattern in a more lucid form when I share the pictorials and other details. Here I wanted to focus more on the process.

Technique Option: Also, instead of the bridges going from right to left, we can move forward. Thus from chain A we can work the 'bridge'  like a floating chain or single shuttle split chain, leaving a picot open with a paperclip to join to later. 

Bridge tatting or bridging encompasses a lot more, not all of which is outlined here. In this post and motif, the bridges are ornamental - a design element; they can be functional too. Hopefully I will be able to cover it all in the pictorials post. 

I cannot thank Judith enough for her valuable mentorship and guidance since we 'met' at InTatters a decade ago! We may not always agree but the discussions are always lively and passionate!

Tuesday, 28 May 2019

accidentally

Pin It now!
a happy design accident
Remember the butterfly that wished to become pretty and my dear tatter friends obliged? And the subsequent Butterfly edging? The origins of that pattern accidentally emerged from this 2018 Design Round Robin (DRR) doily …. Read on.

HEXAFLOWER 
Design Round Robin 2018 , Craftree
Coretta,  muskaan, Tim, Kathleen
Pattern (unedited) link

Coretta Loughmiller designed the center or Round 1 of the Hexaflower doily. Notice how the small rings are left unattached! I love the shape of the inner rings despite the fact that mine didn’t turn out as neatly as hers. They are mock rings made with a shuttle & ball. 
TIP: Working with 2 shuttles, ctm, I threw the central ring from 1st mock ring, making a mock picot. 
Worked in Anchor size 40.

I was next in line. These are my various trials (with numerous elemental tweaks) trying to get a design going. I had intended to work an all-white doily. But the thread didn’t agree with me and I switched to the yellow above.

I got valuable feedback & suggestions/insight from Craftreans which finally led to this. Notice that I did Not set out to incorporate butterflies. But as I tweaked the count during trials, the butterfly emerged. I’ve already shared my tips here on how the colours were switched to highlight shape. 
The orange chains (worked in 2 strands of embroidery thread, but yellow size 40 core) were added to anchor the free rings. 
TIP : Kathleen made a lovely variation by joining directly on the central ring to look like stamens.
This beautiful 3rd round was designed by Tim Kaylor. Clever use of split rings!
Considering it’s shape, I chose to continue with yellow so that the piece looks like a large flower.
Kathleen Minniti designed the final round. A bit of denseness to hold down the openness of the previous round. Well, in my version, it is perfect as foliage. A sober shade of green keeps the focus on the flower.
Final measurement in size 40 - 4½”.
Techniques used : mock rings, lock join, split rings, colour placement.

I snipped off the orange from below, shifted it above, and added a new calyx at the back.
As seen from the back. Inward facing chains topped with a ring for calyx.
All except Tim's round can be tatted with single shuttle and ball.
I’m very happy with the way this floral story in tatted lace developed, doing justice to it’s name.

In size 20, the doily measures 5½”. Considering it is small, Coretta has designed another round. I am waiting to see how it develops and will participate only if I think the flower story can continue.

The pattern is free to share. However, since it is not ‘cleaned up’, for now it is accessible only within Craftree. Hopefully Coretta will convert it into a pdf soon.

UPDATE (July 2019) : The pattern link is shared, though still unedited, and you are invited to continue the design round robin. You can contact Coretta on facebook, Craftree, or her blog. 

Related Posts

Friday, 20 April 2018

retreading the path

Pin It now!
magic squares, doilies and magic/infinite pathways - common threads VI.

This post is an exploration to satisfy the researcher in me. There is no absolute right or wrong – it is my perspective or thought experiment. Fair warning - walk away while you have the chance; or stay to humour me? ;-P A new thread in Craftree inspired me to retread the path.


So yes, the pathways in this earlier post were all just that – pathways – a sequence of working and joining motifs continuously without having to tie and cut after every motif. And for this we can use bridging elements or tweak the design to allow us access to next motif.
The magic pathways moved straight along column/row or moved in a concentric spiral. Therein lies one of the major difference with the magic square.

Ia.  Magic Square

I explained the magic square concept in my 2014 post here. All the magic squares till then had been based on the original Ann Orr triangular corner design. Someone found that one could work continuously from one triangle to the next to create an ever-increasing square – hence the term ‘magic square’.

Last year new interest was generated with the incredible series of new magic square patterns that Robin has spawned, including the reverse/inverted squares. She adapted an existing square into a magic square by ‘breaking’ the square into triangles for a workable continuum. 
She shared her deconstruction of the concept and process in detail, inspiring others to join in with their own magic squares (eg., Jane McLellan and Ninetta Caruso). These also followed the original style of working and the original triangular pathway.

Thus the magic square, characteristically, is made of repeatable square motifs that work as “…building blocks…” (Robin) and follow a diagonal path (triangulation) resulting in as large a square as one desires. The square will get “…opened out just by turning the direction of tatting” (Grace Tan), not by the application of bridging elements.


Ib.  Open-ended Motif or Transitioning Elements in Magic Square

There is one aspect that needs to be highlighted before I begin the next segment – the slight ‘asymmetry’ of each motif within the fabric. While working, one corner remains ‘open-ended’/different in order to change direction and continue to next segment. 

For instance, in the old magic square motifs, while 3 corners have chains, the 4th corner is made with rings in order to continue to the next section. Only the final fabric will have all 4 corners completed/identical (chains, in this case).  
Similarly the new squares needed some slight adaptation to transition into a continuous working path as in Konior's original square motif, and the Onion Ring magic squares.  

The reason this happens is clarified in Robin’s own words : You start with a formula (triangular pathway for magic square, or up and down columns for the table runner) and make the design work for that path. A one round square can be redesigned into a magic square, and now I’ve found a bookmark can be redesigned into a table runner.
(Notice that the bookmark is essentially a rectangle. It doesn't strictly adhere to the magic square definition since it follows the straight column/row magic pathway, and well, it is not a square to begin with). 

These transitioning elements are not merely functional, but visually appealing and create lovely patterns to break the monotony.

TIP : Incidentally, Jane’s magic square can be worked as a magic pathway, with each motif intact. Robin’s 2nd Onion Ring magic square can also work along a magic pathway with complete & symmetrical motifs because of the single outward ring which can be worked as a split ring. Clearly, a ring in the corner is an asset!


IIa.  Magic or Infinite Pathways 

During my Quatrefoil polygons, I discovered other pathways which would allow the tessellation to continue uninterrupted and create large fabrics in the same shape as the original motif. Thus I could trace paths for a triangle, square, pentagon, hexagon; and recently the Fortuna Square, by climbing out/in using split rings.

With so many shapes, Magic ‘Square’ seemed like a limiting term to me, hence I used the term Magic Pathways - there is magic in figuring out an infinite route :-)
At the end of the day, though, it is just continuous or one-pass tatting which can go on forever (hence Robin uses the term ‘Infinite Pathways’). During the writing/researching of this post and some recent discoveries, perhaps ‘Infinite Pathways’ is a better term than Magic Pathways. Yet I’d like to spell it out …

IIb.  Rationale for the term Magic Pathways : 

When we have shapes other than a square as a building block; use bridging techniques (climbing out/climbing in); and follow paths other than along the diagonal, then I like to call this one-pass or continuous tatting a “Magic” Pathway, because ….

1. it creates an immediate association to the essence of a magic square – that a large fabric can be worked continuously from the same repeatable pattern

2. it is magical that a simple substitution (eg. 2nd shuttle instead of ball, split ring/chain instead of regular ring/chain, perhaps simply switching shuttles, etc.) can allow us to tat infinitely

3. the straight/zigzag and/or spiral pathway is not limited to a square – depending on the pattern of the motif any geometrical shape/polygon can be tessellated into a large lace fabric. eg. the quatrefoil triangle, pentagon, hexagon and Robin’s mat and hexagon from Dillmont’s triangle. 
  
4. it is magic to puzzle over and trace out a continuous sequence keeping the original motif intact - without changing, tweaking, or redesigning an original motif or creating any transitioning motif.

Future idea : 2 different motifs tessellated alternately/side-by-side through a magic pathway. Note that the transitioning part of the magic Squares tend to automatically create a different motif in the center of 4 motifs.

I hear you ask - If a magic pathway is simply one-pass tatting then wouldn’t a doily worked in one pass also qualify? Hmmm….

IIIa.  Is the magic pathway different from a One-pass doily?

We frequently use climbing out techniques (split rings, split chains) when working on a doily, even if not specifically designed. So if we can complete a multi-round doily in one pass, does it become a magic pathway? After all we are moving in a spiral pathway whether the doily is circular or angular.

I don’t have a clear-cut answer for this. But my guess is ‘not exactly’?

To me, part of the difference lies in tessellation : motif v/s medallion. Each row of a doily comprises of repeatable motifs while the magic pathway is for medallions that we use as motifs. Medallions are standalone complete designs, and the magic pathway allows us to join them continuously and repeatedly to create a large fabric in the same shape as the original medallion and the same pattern as the constituent.

Further, even if we use the same motif in All rounds, we may have to change the stitchcount to prevent cupping or ruffling especially in a round/oval doily. In magic pathways, there is absolutely no change in stitches.

Future idea : It will be interesting to convert a circular medallion into a magic pathway.

IIIb.  What about more elaborate one-pass doilies?

Remember these doilies that are specifically designed to be worked in one pass such as Iris Niebach's TIAS doily and tattingweed's Crinoline Doily?
These take a long serpentine and circuitous route through multiple ‘tiers’ with each repeat, to complete the tatting in one pass. German tatters such as Endrucks designed elaborate one-pass doilies. These do appear magical to even design, let alone tat! 

But these are logistically and practically limiting. Inevitably, there comes a full stop. It cannot go on or be tessellated infinitely. So while magical in itself, it does not conform to the above concept. Or perhaps it is a 'magic' pathway, but not an 'infinite' pathway !!!  


To conclude :

  • Magic Squares and Magic/Infinite Pathways allow us to tessellate infinitely to form larger and larger lace fabric working continuously without snipping off.
  • Almost any square medallion can be modified/redesigned into a magic square, but not all medallions will allow a magic/infinite pathway.
  • In the magic square, one first selects the formulaic diagonal path and ‘fits’ a square medallion to tessellate infinitely; in magic pathway, one selects a polygonal medallion and then figures out a continuous pathway. 

I was amused to read Robin’s comment here. How far she's travelled, now leading the way :-) And only a few days back I rediscovered her Dillmont inspired mat & hexagon where she has already outlined the pathways that I spoke of during the Quatrefoil series and diagrammed in the Fortuna Square!

If you have, thanks for reading. It validates my effort ;-)
I invite you to share your views.


All paths lead to Tatting !

Saturday, 15 July 2017

tatting in my pocket !

Pin It now!

Yesterday I came across this thread on Craftree, started by Grace. She shared this link to a global compilation of tatting-related verses. Here’s what she says :

It was on e-tatters, and it grew for quite a while, with more and more people adding verses. Maybe we can add some more verses? The only rule is, the third line must include "tatting in my pocket".

There were already some excellent verses there and I jumped right in. All through the morning verses kept popping into my head. I’m just relieved it didn’t lead to any sugar/salt mix-up in the kitchen ;-P
Meant to be stand-alone, I’m sharing them all together here and would love to see you pick up the gauntlet :-)

No pocket, yet a pocketful of verses –
None the worse for want of a pocket ;-)
Okay cheesy, but I can't resist puns :-D

Except for the 1st and last verse, all the rest have at least one tatting technique or term in it. I have edited a couple of lines to fit into the meter. Hope you enjoy ...

Tatting In My Pocket !

Chores are physically stressing
Global news is so depressing
But the tatting in my pocket
Is always very refreshing ! 

My head is in a swirl
Shuttles ‘n’ threads are in a twirl
And the tatting in my pocket
Is full of rings in a Curl

Non-crafters may think I'm daft
They might call me a loony
But with tatting in my pocket
I won't just stop at a Cluny !

'I'm going through a designers block'
One often hears this talk.
Use the tatting in your pocket
To unlock with a Block !

The hegemony of a Trefoil
I fully intend to spoil
Since the tatting in my pocket
Is creating shapes from a Quatrefoil !

Husband rrrrrolls his eyes hiding his smiles
When I ask for more supplies
He Knows the tatting in my pocket
Will make lace for miles and miles !
                            - ©muskaan  July 14 2017


With exciting Center Court matches, not much tatting accomplished. But here's a glimpse ...

Four shapes derived from the initial design hack ! Tatted in size 40.
I’ve now tatted all 4 shapes in size 20 to determine picot size before I present the final pattern. Will share those pics with the pattern.

These are the various Quatrefoil Triangle trials. I was too lazy to block them for a proper pic, but these generally lay flat.

Arranging the triangles into a hexagon – it makes a nice coaster in size 40 and can be tatted in one pass. Magic Triangle, you say ?! Hardly ;-P

Why waste, right ?
Retrieved #4-6 from the hexagonal scrapyard – sewn in layers, added a bead, etc. I didn’t spend time shaping or curling the ‘petals’.
Noticed the 3 leaf rings enclosing the stem ? Kinda cute, no ? I'm going to use this in future!

That’s all from me for the present …
Have a great weekend
and

let there always be tatting in your pocket !

Tuesday, 27 December 2016

a free pattern fluttering in

Pin It now!

October to December – a long journey for this little butterfly pattern !

Remember the sneak peek of this joint project on Craftree? Claudia was asked by someone to locate or correct a tatted butterfly pattern. It had been tatted ages back and the original pattern was lost. When we couldn’t find the designer online, Claudia did the stitch count & I diagrammed and christened it. Finally, the pattern is shared here.

Together We Fly Butterfly
a joint project on Craftree 
designer – unknown ; stitch count – Claudia Huber
diagram & pdf - muskaan
If tatting with single shuttle and ball, pull out a 12-15 inch long tail from the shuttle before starting head. This tail will be used to complete the 2nd half of split ring which constitutes the body.
This is how the butterfly can be tatted in one pass, using split ring and mock picot to climb out.
Claudia’s TIP shared here : “The butterfly had to be made wet and putting in the final form as the body should be oval, and not round, but it laid flat already before, now it looks nice, without fixing and blocking etc.”  
I like the slightly oval look. Also, I found it easier to pull the ring After starting the chain, so as not to hamper the ring closure. 
The butterfly can be worked in opposite direction to that notated in diagram (see below), as seen in this 2-colour version using single shuttle and ball. In this case, the split ring body will be worked as:
        SR-B : 4 – 3 – 4 long picot 4 / 4 – 3. Mock Picot to climb out for wing.

Also, in above model, I made the 2 rings, then joined the solid purple thread for chains, tatting over tails. Unfortunately, the variegated thread soon broke and this model was discarded.

After completing Wing #1, we need to cross over across the neck, to continue with Wing #2. This can be accomplished using an over-under or alligator join. On trying it, I did not like the horizontal bar it makes.
I opted for 2 lock joins in same picot, but on either side. It stabilized the head as well.

TIP : If desired, the 2 stitch chain on either side (seen in blue in diagram above) can be increased to 3 double stitches. With only 2 stitches, the head is nestled too close and the wings have to be pulled outwards to finish.

The single colour version, using 2 shuttles, CTM

I tatted a new model, this time using 3 colours. Head & body are tatted in brown (4054-0359) and tails hidden. Then I joined the maroon (4054-00022) and golden yellow (4054-0307) for the wings.
Twisted picots make perfect antennae ! But a double picot works well, too, snipped later.
TIP : Add beads for eyes and/or antennae.

One and three colour versions. In size 20 Anchor mercer, they measure 2¼” x 1¾”  

The 2-page pdf consists of a full-body diagram with notations, and one page written pattern.
Hope you give these cuties a tat and enjoy them as much as I did ! 

Many thanks to Claudia and the unknown designer !

happy tatting always with a ☺ 


Related Posts 

abcd


Friday, 7 October 2016

a mixed bowl

Pin It now!
First things first…
I was going to post some of these along with the answers to my Set I questions. But This Way or Tat? (see all related posts at end for all links) has been lapped up by Georgia Seitz for her Online Tatting Class on Oct 10th (wait for the official announcement, though, just in case!) :-P  Thanks Georgia! Makes no sense in giving out answers at this stage. Plus, it struck me, why should I give answers ? It is the interested reader who should be sending in the answers if they wish, right ?! However, I will share some of the links later next week.
And now, ladling out …..

a mixed bowl of  tattiness :-P

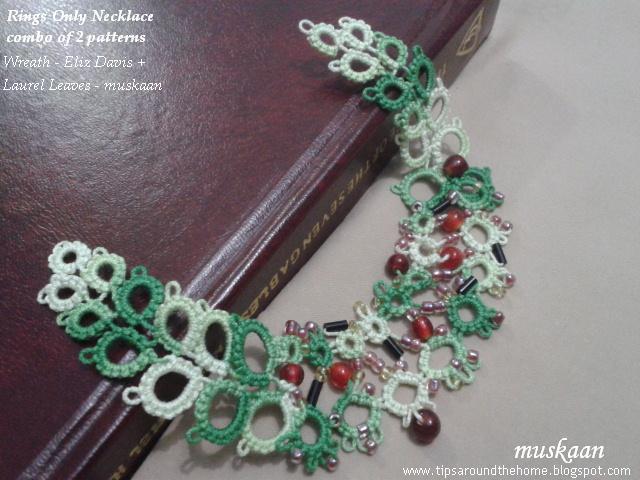
Eliz Davis’ Ring Only Wreath – beads in the soup !

Decided to make the wreath  more Christmasy with beads for bling and ‘red cherries’ for a crunchy topping. Strung all these beads (and more) while thread was still on the ball, and then realized it was a short leftover thread :-( Restarted. 
Wound the beaded part on to shuttle but left thread attached to ball (the dark green on left side). It was a good decision coz I ran out of thread midways and could continue from the ball end, by stringing in more beads.
With beads adding some nice weight, it looked like a potential paazeb (broad anklets here) . (this video is of a Hindi movie song. It is a very decent song - don't get all excited by the first glimpse! I added this link because the song is all about the paazeb as a metaphor and as a bond between the 2 lovers. They are the Romeo-Juliet couple of Indian folklore). Of course, it would need a few ghungroos too!
Instead, wary of bead-stringing, I took the easier route – sewed in the two laurel leaves from previous post (mirror images).
Can be used as a necklace/choker with some stiffening & the right materials, and a chain added. Or as a frame around an oval daguerreotype.

My Butterfly Liberated - can't escape now, booked for a serving !
Wherefore did this daguerreotype emerge ?  The House of the Seven Gables – that’s where.
I’d read this long back, but picked it up again by mistake, and decided to read again. I love these leatherbound editions (although there are always some typos) with their attached satin ribbon bookmarks. However, the ribbon is short & tends to fray. It s also difficult to actually find the page coz there's no long ribbon end to hold on to. Here’s my instant solution (and expect many more such for all my other books in this publication)
My butterfly prototype with ribbon inserted & glued. Added just the right weight & stability, too.
TIP : My idea is also to try to string a few more butterflies & flowers along the entire length…..must rummage through my stash of old motifs !

Rachael Mohler’s Hen n Chick Square Motif – a mini coaster to set the bowl !
Intending it for a mini coaster, I used thick thread – a size 7 perhaps.
My first time trying out the Dora Young Knotless Method (DYK) on a Ring ! Loved it! Opens up more possibilities. UPDATE: video link - https://www.youtube.com/watch?v=4SoGklhCqL0
Unsure how the DYK rings would turn out, I had started with leftover threads. Hence the numerous tails.
TIP : Adding new thread to a bare thread pattern : Leave about 4-5" tail of previous ring. Start new ring with new thread by grabbing the old tail within the new thread loop, and tatting over the new tail for few stitches. This takes care of one tail. Later, sew in the old tail in this new ring. No Knots !!!

And I misspelled Rachael's name in the Set I pdf . So I took the plunge into Doc Hubs and figured out how to edit it, YAY! New downloads will have the correction, but those who have already printed it out, please make the correction.
It was also my very first Hens n Chicks working.

But my MIL had made several handkerchief edgings using this pattern back in the 90s for gifting, etc.. Sorry about the blur - the original pics were small.


Together we fly butterfly – it’s all in the mix !
A small butterfly project on Craftree. Unknown designer, stitch count & prototype by Claudia & diagram by me. Many others have shown interest in test-tatting. That’s why I called mine ‘Together We Fly”. The diagram is not finalized – waiting for more feedback. This is my working. All in one pass. Can easily be made in 2 colours, using single shuttle and ball. Will share more details eventually. It’s such a pretty butterfly.


tattingweed’s Crinoline Doily – keep stirring in all directions !
This gorgeous doily pattern by the talented Korean, Hamigyeong, was added to the Craftree database yesterday. And the moment I saw the pattern, I just Had to give it a go. See all the directional changes it incorporates ? Wow ! Started in size 40, aiming for a glass window effect . This has given me so much more thought for the TWoT series. Will share working details later; this is just a quick peek ….

I enjoyed this multi-project bowl tremendously ! Hope you enjoyed my serving :-)


happy tatting always :-)

Related Links :
This Way or Tat? (TWoT) Series - Preface (Quo vadis) ; Introduction ; Set I - Rings Only
Eliz's left v/s right hand tatting effect on direction