Showing posts with label triangular motifs. Show all posts

Tuesday, 21 July 2020

she's all heart

Pin It now!
Certified Master Tatter, Anita Barry, shares 2 of her latest creations with Tat Land! And I am honoured that she graces my 600th post!
What could be better?! It took a full community and some extra special friends to get me to where I am today.
So first, her Rainbow Coin Tatting Purse. It has several interesting features.
Notice the mock toggle in the center? This knotted chain was taught by Karey Solomon.
The main body uses a picoted lock join that Dora Young used effectively in recreating crocheted doilies in tatting in her book ('All New Knotless Tatting').

Such a thrill to see the new intruding picots being used in the foundation row with all subsequent rows worked around and above. Alternating regular and intruding picots allowed the initial single chain to have joining picots along both edges. Clever!

This tiny purse has a wealth of knowledge stored within! Will certainly tat it ...

click to download the pdf (with detailed instructions) - https://drive.google.com/file/d/1bW9PEKLdbh9KgexmIehU2c3G3u8chfgr/view?usp=sharing


I Love You More Necklace and earrings patterns! I see Karen Bovard Sayre's influence here, with all these split rings ;-D
I was hoping to tat the heart while posting, but it will have to wait for another day. Wonder if I'd be able to flesh out the necklace heart a bit - more curvaceous ;-P

click to download pdf - https://drive.google.com/file/d/1p-Visi8RyqgMD6AWMxTo__9cArDYvjxt/view?usp=sharing

Hope you enjoy all these patterns. I know these are on my to-tat list!

Many many thanks, buddy , love you !

Tuesday, 25 September 2018

Usha's motifs

Pin It now!
PLEASE NOTE : The sequence of posts has altered when I was updating my posts yesterday, causing my newest post in the Cluny tatting series - hitch the loom - to mover 2 posts down, in case you were wondering or missed it. Blame it on Blooper's (err Blogger's) whimsies.

  
For the last few days I’ve been tatting up a mini-storm of Blossoms Motifs while working on the numerous pictorial presentations. A quick break was in order when Usha’s Split Ring triangle motif turned up.
The near-perfect circular rings attracted me in the first place. And circles that formed an equilateral triangle. It is certainly impressive to successfully convert such a shape into actual tatting.
Large rings - whether normal, split, or scmr - often close into a circle rather than teardrop.


In Lizbeth size 40, the sides measure 1½”.
Having mistakenly made a picot at the corner of the first ring, I repeated it for the other 2 corner rings.
In the pattern all rings are split rings. However, one can start the motif with a normal ring, and add new thread for the 2nd ring and onwards.
I ended with a normal ring, sewing in the tails. But one Can hide tails in the last split ring without sewing.
Future Idea : It would be interesting to see this motif repeated as a magic pathway to form a larger lace fabric! And notice how one can form a diamond by removing 2 and adding 1 ring ?!

Many many months back, I had also attempted Usha's Fringed Petals motif but worked only the first 3 rounds. What I liked about this is how the clever designing of 3rd round lifts the rings of the previous round, ending in a raised and curved textural effect! Notice how they are ‘normal’ in the 2nd round (above pic), but suddenly acquire that 3D look when the next round is worked (pic below)?

However, the working was fiddly and I was not quite happy working through it. I would definitely like to see more of that curving effect, though !! 
My apologies for not completing the motif - I intended to, but never got around to it. I might some day when I find where it's run off to ;-D
This motif also uses long picots with CWJ (lp_cwj), notes for which I shared here and again in the beaded version here.

An enjoyable break, thanks Usha :-))) Now back to some more pictorials - I'm on a roll and want to make the most of it while I can (but can I beat my own record of 15 posts in Sept 2017?!). I hope you will be tolerant through it all :-D

Thursday, 19 July 2018

treble with an M

Pin It now!
Yup,  I treMble in fear of how Ninetta will react to my crochet reference. But I get ahead of myself ....

First, a lovely triangular motif with both tatting stitches – the old ds and new tds.
Ninetta sent me a pic of her new treble triangle and I helped in writing the pattern. 

There are 3 rounds worked continuously in one pass. However I used different colours in each round to make it easier to demarcate stitches and counts.

I had to pause when joining a treble to an earlier element. After a couple of tries, I figured it out. I’m not sure if it is the right way, though it came out fine. I will share it in my next post where I dissect this new tatting stitch.
Ninetta Caruso’s
Triangular Motif (treble tatting)
(with pattern below)
A tad over 4 cms in Anchor size 40
The written instructions are for one-pass motif as in Ninetta’s model, climbing out with split ring. Or each round can be tatted separately as seen in the 3 colours I used in my model.

Abbreviations  (in order of appearance):
R – ring ; ds – double stitch ; vsp – very small picot ; tds – treble ;
BTS – bare thread space ; + - picot join ; - - picot ; SR – split ring ; rw – reverse work ; 
SS – switch shuttle ; TR – thrown/floating ring ; lj – lock join.

Notes :
  • Use ball and shuttle for each round is worked separately; use 2 shuttles, ctm, if working continuously.
  • BTS - since tds is ‘higher’ than a ds, leave enough bare thread space between rings.
  • How to make a tds video ; For all posts/info on Treble Tatting start here.
  • For how to join treble to a previous element (round 1) pull up thread through both picots – the vsp for tds as well as the picot on small ring. Stepwise pictorial in next post.
Pattern :

ROUND 1: (moving clockwise)

R1:  1ds vsp 1ds, 8tds, 1ds. BTS
*R2: 3 +(between before last tds) 3 – 3 – 3. BTS
R3:  1ds vsp 1ds, 1tds +(R2), 7tds, 1ds. BTS]*
Repeat from * to * once.
SR6: 3 + 3 / 3 + 3. mock picot

ROUND 2: (moving clockwise)

SR: 3 / 3,
*Ch 4 rw
R:   5+(after 2nd tds) 5 rw
Ch: 4 – 4 – 4.  SS
SR: 1ds vsp 3tds 1ds / 6 +(after 4th tds) 6. SS
Ch: 4 – 4 – 4 rw
R:   5 +(after 6th tds) 5 rw
Ch: 4 rw
R:   3 + 3 SS
TR:  3 – 3 SS*
Repeat from * to * around Round1.
Climb out with a split thrown ring (3/3). Mock picot.

ROUND 3: (moving counter-clockwise)

SR: 3 / 3. mock picot
R:   7 +(nearest picot on chain) 9. rw    
Ch: 2 – 4 – 4 – 2  lj(same picot) 4 – 4 rw
*R: 4 +(vsp) 4. rw    
Ch: 5 rw
R:   4 +(after 1st tds) 4. rw   
Ch: 5 rw
R:   4 +(after 2nd tds) 4. rw  
Ch: 5 rw
R:   4 +(after 3rd tds) 4. rw 
Ch: 4 – 4 lj rw
R:   7 +(picot on TR) 9. rw    
Ch: 2 – 4 – 4 - 2 lj rw
R:   7 +(2nd picot on chain) 9. rw    
Ch: 2 +(previous chain) 4 – 4 – 2  lj(same picot) 4 – 4 rw*
          Repeat from * to * till end. Tie, cut and hide ends.
******************

A visual study of ds and tds

I learned how to do the treble in these earlier motifs.
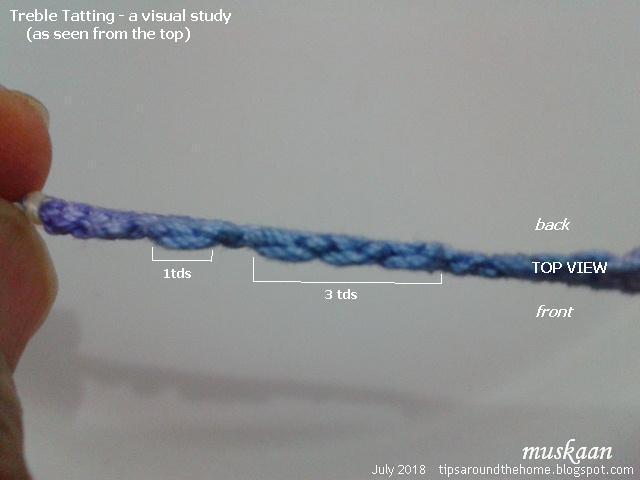
But while tatting this triangle more questions arose especially along design lines. I wanted to put these observations to the test. So, choosing thick threads, I set about trying to compare normal double stitches with treble tatting and a few variations. I think the pictures, with notations speak for themselves.
Both double and treble stitches are made of 2 half stitches, though constructed a bit differently.
However, a ds has only 2 ‘legs’ or threads on the core thread, while a treble has 3 ‘legs’ or threads around the core. 
Reason - the first half of a tds is actually a normal double stitch (2 legs) at the base.
This makes the tds wider than the ds by a thread. 

Moreover, a single tds, or a row of tds will start with [1ds,vsp,1ds] and end with [vsp, 1ds].
UPDATE: After further evolution, Ninetta has shown that there is no need to end with [1vsp, 1ds]. We can easily end after the 2nd part of the treble tatting stitch. Automatically a hidden picot becomes part of the structure for future joining. For all links and updates -   https://ninettacaruso.blogspot.com/p/blog-page_95.html
When I showed Ninetta this pic, she shared her precision-based tip; something I had merely observed as explained in the above para.
NINETTA'S DESIGN TIP :
“... one treble takes the place of 1 and half ds, and the contour is spaced as a normal height picot, ...”

While tatting the motifs I sometimes made a mistake in joining to a tds. I had to count each tds to establish which ‘picot’/space was the right one. Given my recent foray into the top view, I wondered how the treble looked from top. 
The trough is one long arc while there are 2 crests within/offsetting it !!! Wow.
In the 3tds segment in above pic, the small crest between the long trough is where the 'picot' is - where we join a future element.

Now here’s where I go into ‘crochet’ mode and treMble to use crochet terms. But I think it will help, so here goes.

A treble starts by pulling a loop through the vsp and again through this loop (1 crochet chain formed). Then we pass the shuttle through this 2nd loop and wind or wrap the shuttle thread 3 times around it before snugging tight.
I altered the number of loops pulled as well as the wraps made to see whether we can create viable variations of the tds. Yes, it works. (please note that Ninetta’s method is slightly different from the one I used here. A pictorial in next post will show the steps better).

So, from left to center the graduated tds –
1. like the single crochet (sc) –1 loop (no chain) thru vsp and 1 wrap with shuttle.
2. like a double crochet (dc) – 2 loops (1 ch) and 2 wraps
3. like a treble (tr) – 2 loops (1ch) and 3 wraps
4. like a double treble (dbl-tr) – 3 loops (2ch) and 4 wraps
This sequence was repeated in decreasing order. 

We can see the height changing clearly, as well as the number of ‘coils’ around the 2 halves of the treble stitch and its variations.
Please note that this is NOT a crochet stitch as Ninetta has explained in her posts. I have merely used it as a reference for visualization.

If all this is confusing, take a step back and the pictorials will soon reveal all. I have actually gained a whole lot of minute & detailed understanding even as I wrote out this post, and am truly amazed at Ninetta's brilliance especially the 1st half of a treble stitch! For the 2nd half of the treble, the closest similarity I could find was with her Vapor Picot.

to be continued - how-to pictorials

UPDATE : Stepwise pictorial ;

in helping a friend, one helps oneself
  

Saturday, 29 July 2017

tatted triangles pattern

Pin It now!
I had to start somewhere sometime! Already much delayed. Instead of putting all 4 shapes in one document as previously stated, I will be releasing them separately. This will give us all time to work. 
Quatrefoil  Triangle  Medallions


The Quatrefoil Series starts with the smallest medallion, the Triangle - a good, quick way to familiarize oneself with the sequence, general pattern, etc. 

In order to make them ‘universal’, I’ve used Lizbeth threads and whatever else went with it in size. Hence a paucity of options, since my Lizbeth stash is limited to 3 balls ;-P
Size 40 Model – Lizbeth , 2 strands of Anchor embroidery thread. Each side measures 3cm.


Size 20 Model – Lizbeth , vintage Anchor Mercer. Each side measures 4cm.

Note :
Picot length between the split rings plays an important role in keeping the piece flat. The mock picot should be double the size of the inner ring picots. These, in turn, need to be of normal size - err towards small. This will keep the inner circumference small, giving sufficient room for the longer mock picots to span the distance.


Instead of mock picots, one can make a small 2/2 split ring. It creates a solid well-defined outline and changes the shape of the inner colour, too.
Version 2 worked in size 40 Anchor Mercer. Each side measures 3cm.

I hope you enjoy working this triangle. Go crazy :-)
And please don't hesitate - ask questions or leave suggestions.

It is indeed a blessing to have friends who step in to help. I can’t thank Jane McLellan (janemactats) enough for her valuable feedback & suggestions on the pdf presentation. (((Hugs)))

UPDATE (Aug 2, 2017): Jane is joining the motifs into a hexagon.
Below is the pic I had posted here to show one possibility arranging my trials. It can be done in one pass, to be shared ....One path is spiral and easy to work out ... game anybody ?

As for the Quatrefoil Magic Square – I am working on it at intervals and it is throwing up some interesting patterns (and difficulties) because of 2 colours.
Here’s how far I reached with the triangulation method – I’m sure you must’ve already seen Robin’s excellent tutorials on the same.
I could retrace my steps around the pink corner to continue, leading to a much larger piece. But I have cut off the threads for now, in order to work on the simpler sequence of squares. I definitely intend to return to the former, once I can upload more patterns in the series.


Here there are 4 squares, creating one complete magic square using the 'easier' pathway of working entire squares rather than triangles. Since I did not think too far ahead, there is a horizontal pink line on the right which can be corrected easily enough. 
But notice how the inner ecru has created rectangles in this pathway, with a short connection in the center. Also, I have exited in the 'centre' instead of corner and I haven't had time to work further on this. 
I ran out of pink thread here. Instead of continuing with this piece, I have started yet another, using this pathway, but keeping the pink out of the way. Not enough progress to show.

happy tatting everybody :-)

Saturday, 15 July 2017

tatting in my pocket !

Pin It now!

Yesterday I came across this thread on Craftree, started by Grace. She shared this link to a global compilation of tatting-related verses. Here’s what she says :

It was on e-tatters, and it grew for quite a while, with more and more people adding verses. Maybe we can add some more verses? The only rule is, the third line must include "tatting in my pocket".

There were already some excellent verses there and I jumped right in. All through the morning verses kept popping into my head. I’m just relieved it didn’t lead to any sugar/salt mix-up in the kitchen ;-P
Meant to be stand-alone, I’m sharing them all together here and would love to see you pick up the gauntlet :-)

No pocket, yet a pocketful of verses –
None the worse for want of a pocket ;-)
Okay cheesy, but I can't resist puns :-D

Except for the 1st and last verse, all the rest have at least one tatting technique or term in it. I have edited a couple of lines to fit into the meter. Hope you enjoy ...

Tatting In My Pocket !

Chores are physically stressing
Global news is so depressing
But the tatting in my pocket
Is always very refreshing ! 

My head is in a swirl
Shuttles ‘n’ threads are in a twirl
And the tatting in my pocket
Is full of rings in a Curl

Non-crafters may think I'm daft
They might call me a loony
But with tatting in my pocket
I won't just stop at a Cluny !

'I'm going through a designers block'
One often hears this talk.
Use the tatting in your pocket
To unlock with a Block !

The hegemony of a Trefoil
I fully intend to spoil
Since the tatting in my pocket
Is creating shapes from a Quatrefoil !

Husband rrrrrolls his eyes hiding his smiles
When I ask for more supplies
He Knows the tatting in my pocket
Will make lace for miles and miles !
                            - ©muskaan  July 14 2017


With exciting Center Court matches, not much tatting accomplished. But here's a glimpse ...

Four shapes derived from the initial design hack ! Tatted in size 40.
I’ve now tatted all 4 shapes in size 20 to determine picot size before I present the final pattern. Will share those pics with the pattern.

These are the various Quatrefoil Triangle trials. I was too lazy to block them for a proper pic, but these generally lay flat.

Arranging the triangles into a hexagon – it makes a nice coaster in size 40 and can be tatted in one pass. Magic Triangle, you say ?! Hardly ;-P

Why waste, right ?
Retrieved #4-6 from the hexagonal scrapyard – sewn in layers, added a bead, etc. I didn’t spend time shaping or curling the ‘petals’.
Noticed the 3 leaf rings enclosing the stem ? Kinda cute, no ? I'm going to use this in future!

That’s all from me for the present …
Have a great weekend
and

let there always be tatting in your pocket !

Wednesday, 3 August 2016

hits and misses

Pin It now!

Early last year I had bought variegated thread online, and though the colours were gorgeous & thread good to tat with, it turned out to be thicker than even size 10 – probably a size 7 or 3? Nevertheless, I was impatient to tat with it, having used only one of the 5 variegation thus far. Both coasters were tatted in 2015 & some parts of the post may appear dated due to my subsequent learning. I have given away all my circular coasters (tatted up until July 2016), so I don’t have exact measurements or photos after blocking.


Marilee Rockley 
Started : 15 Feb 2015
Challenges come in many forms, when/where least expected !

I was so happy when Marilee posted & shared her latest Melt Into Spring Snowflake pattern here. Daisy Picot was on my to-learn list. So the snowflake came at just the right time. Also, since it is a 6-point pattern, it could work well with the Chicken Wing Coaster I had recently made. So off I went & printed it out.

Materials : Bliss (India) variegated thread (no colourway, dye details or size mentioned). Probably a size 7 or 3.
South Maid Mercer Cotton (USA). Art. D-54, White. Size 10.
2 shuttles
Techniques : directional tatting, daisy picot, thrown rings (Josephine knots/rings)
Now, one would expect all the challenge & difficulty to lie in the daisy picot round. But that went off quite nicely ! What with her instructions & pics, as well Riet Surtel’s technique posted by Jane Eborall here, it was a very smooth & enjoyable round. No mistakes, no unpicking & retatting. Perhaps working with a large thread helps when doing a new technique.
The 2nd round is simply rings & chains ….beginner level. Yet, I kept making mistakes in stitchcount, joins, horrible thread sensation, you name it ! Finally, very frustrated with all the unknotting & retatting, I snipped it off. Glad Jane had gifted us these scissors ;-)


Started the 2nd round afresh the next morning & it was a breeze. But I learned something else about my own tatting….
The pattern indicates that the 2nd round is worked counterclockwise. Hence the chains are tatted on the front/right side, but the rings after RW, on the reverse/back side.
I found that my shuttle movement is such that the already tatted trefoils interfered with the shuttle, coming in it’s way. That’s when I realized that perhaps I tatted more easily, more smoothly if it is clockwise ?
So, when I started again, I went round clockwise, with FS/BS tatting & it Did work ! Must keep this in mind for future.
I anchored the JRs, by adding picots on either side & decreasing the stitchcount to compensate.  
Marilee kindly permitted me to make any changes I wanted, but I am deeply unsatisfied & ashamed with what I did in Round 3. That was the reason I hesitated to post it for so long….
I loved the curves of the outer chains, but wanted the trefoils at the tips to be smaller or different. All I came up with was to make daisy picots like a corona/outline around the central ring.
Someday I will tat this again, in smaller thread. 


Anne Bruvold
tatted on 20th July 2015
Spot the Odd One out !!!

My notes reveal that I had taken a hiatus from tatting last year as well, for a week. I think I was sewing during that time. Anyways, this simple but lovely doily was my ticket to get back into tatting mode. It was quite a rage on Craftree at the time, where I first came across the pattern.

Materials : BlissIndia.  Variegated thread (no colourway, dye details or size mentioned). Probably a size 7 or 3.
South Maid Mercer CottonUSA . Art. D-54, Color 430, Cream. Size 10.
2 shuttles.
Techniques : directional tatting, thrown rings (trefoils)
 
Started with this colour placement, but switched to the other because of thread size mismatch & also it seemed like the central flower effect was being lost.
This is one of those easy, almost generic, triangle motifs that can be used to create large fabric when joined in different ways. 
Very quick tat, joining individual motifs as one goes.
One realization about working with variegated threads in directional (fs/bs) tatting dawned. I had started the 1st motif with normally tatted inner rings, & RODS for the chains & trefoils. Since this latter was a larger chunk of working, in next motif I switched to RODS for the inner rings & normal sequence for outer ecru part. This reversed the colourway (from clockwise to counterclockwise)!!!
Can you spot the odd one out ?

Again, many thanks to both designers, and my apologies to Marilee. 
Hope I can do a better job next time.

happy tatting :-)

Saturday, 8 November 2014

Deconstructing Patterns 2

Pin It now!

Triangulated Tessellation of a Magic Square !

The earlier post pulled out motifs from the magic square hat. Here, I tackle triangles.
I used the version 1 of the free pattern from here

The bold fonts are all hyperlinks to respective sites/blogs. Click on the word(s).
Abbreviations used : SR - Split Ring ; SSSR - Single Shuttle Split Ring ; SLT - Shoe lace trick

Fig 1. Magic Square in 4 colours !
Although the ultimate shape is a square, the progression of the Magic Square is in triangles, repeated to get a square,as can be seen in the above image! Jenn is currently working on it & you can see the progression on her blog.
Triangular / Corner Motifs
Triangular Motif #1
Fig 2.
Fig 2. This is how it all starts - with a single triangle – one quarter of the final square. I sewed this to the base of the neck on a dress I was sewing at the time. 
This same triangle, when folded on itself along the Y-axis, to form a ‘pocket’, can be used as a bookmark inserted in the corner of a page (from an observation by Judith Connors)!

danie7 shares her Tatted Corner & the page in the background shows how it can be used as a corner on a handkerchief, mat, etc.
Incidentally, Jon Yusoff, following the triangular pattern from “Tatting with Ann Orr”, went on to create a square from the 4 triangles, figuring it all out herself !  

In Fig 1 above, Each of these 4 triangles that go to make the square, are clearly visible due to the 4 colours used. I just went crazy coz it was the first time I’d bought & used variegated thread ! I tatted each triangle with 1 shuttle & ball.
Instead of 4 colours, though, one can only use 2 colours alternately, a single colour, variegated colours, …. 

Small Triangular Motif #2
Fig 3. Pinwheel Square

These triangles can be smaller, too, as can be seen in this ‘pinwheel’ version (drawing only). I hope to make this someday – love the effect ! 
Of course, one will have to take recourse to SLTs !!!

These 4 &/or 8 triangulated square versions remind one of quilting blocks, don't they ?! Well, wouldn’t these tatted ‘blocks’ create lovely large-sized projects !!!


Triangular Corner Motifs # 3 & #4
Fig 4.

Fig 4–A simple triangle done in one pass, using 2 colours. Can be started at any point.

Fig 4–B Also a simple one-pass triangle, but needs to be started at the ring indicated by arrow (since there is no chain to connect the 2 rings in the end).


Triangular Corner Motif #5 & Triangular Pendant 
Fig 5. Corner Motif & Pendant
Fig 5–A . Triangular Motif :Requires 2 shuttles in different colours. If this scheme is followed, then the orange rings with a white line in center are SSSRs.

Fig 5–B . Triangular Pendant. I’ve tried to show a triangle within a triangle here. It can all be done in one pass, with 2 shuttles. However, rings with black lines within, are SRs. 2 short chains have been added on either side, in order to connect to adjoining elements (rings). Beads can be added wherever desired, with the help of long picots, etc.


So, What  is  this Magic Square  ?! 
Very simply, it is a one pass motif made up solely of rings &chains, that can keep repeating itself to any desired length, weaving in & out in the form of triangles (a tessellation of triangles! It is all geometry & symmetry) to create larger square. It is very versatile, as already glimpsed through these 2 posts. It’s character can change with slight changes in the factors involved. For instance :


  • Use 2 colours – one for chains & one for rings to get a totally different look ( Halibut04 & laceladie , in InTatters*, have used this very effectively !)
  • Change the stitchcount just a tad. eg. Jenn is using Halibut’s stitchcount, which gives a slightly angular look because the chains are straighter.
  • laceladie's frivolite 14 version from “Design Burda Frivolite”, is slightly denser due to fewer chains & larger rings.  
  • Liv Strind  has created a very stylized kind of motif that is essentially the magic square with SRs. She has also adapted parts of the magic square very elegantly & stylishly to make many different projects including runner, mat, clutch purse, coaster, etc. You can also see her pins here & have fun identifying the derivatives !!!
  • Check out these two exquisitely beautiful versions called the ‘Tatting Square Doily’. She has added an equally exquisite edging in the 2nd one ! 
  • Beautiful Shawls have been made using this pattern (or a slight variation in terms of stitch count). eg. Wedding Shawl by Jean Younkin et al using extended repeats and one made by SnapDragonLace
  • Carollyn has a fantastic 3-colour version with small rings & lovely long arching chains. Would make a nice bookmark too !   
  • Kristen has needle-tatted “Star No.2” from “Tatting: Patterns & Designs” by Blomqvist & Persson. This is again the small square motif deconstructed in this earlier post.
  • Scroll down to 3rd last pic in this post. Piece #9 is pic uses small square motif to create a gorgeous pastiche colourwise !
  • Jane uses size 40 in 2 colours, & a slight variant of the pattern (as discussed in these posts, slight variations give interesting results)
UPDATE (Oct 2015) : The earliest example found so far is a triangular corner in Ann Orr, 1935 .
And there is a collated list of links for patterns, projects, discussions in Craftree titles Magic Square- Serpentine Square * I have updated all dysfunctional InTatters links ... Please let me know if you still encounter any broken links.

As to where this pattern first originated, I have not been able to gather any concrete evidence, despite seeking info, except that it has been around ‘forever’ & is in the public domain. Multiple sources have been cited by tatters, all of which I have included in appropriate places in the posts, along with the respective tatter’s name.
However, many people have tried to “decipher” the movement of the pattern through diagrams, etc. There are a few threads in InTatters* where quite some discussion has taken place. Here is all that I’ve been able to find so far.

In addition to all the links scattered in the 2 posts so far, here are some more links where this pattern has been ‘deciphered’, diagrammed, &/or discussed :
  • Alice Wolska shares her diagram here 
  • Jon Yusoff has shared her observations too (links already provided above)
  • Rachel has used the pattern from Helen Chesno’s “Tatting Made Simple”. She shared this in a discussion, along with a notated square in this thread 
  • Yet another forum thread that discusses this 
  • A diagrammed & written explanation to make it easy to tat by seesawyer here  (updated Jan 2016)

My next post, here, deals with many possible edging &/or insertion patterns, along with my thoughts on tatting the Magic Square. And in the last post in this series, I will share a Bookmark pattern derived from this Magic Square.
Hope you remain interested :-))


Related Posts Square Motifs from the Magic square
Edgings from Magic square & My tips/thoughts
Bookmark pattern from Magic Square

Update : Robin Perfetti has spawned a whole new series of brand new Magic Squares. Check out her Tutorials and Patterns pages for all links.
Her initiative inspired Jane McLellan and Ninetta Caruso to create their own magic squares.