Showing posts with label floral motif pattern. Show all posts

Wednesday, 28 April 2021

all rounded up

Pin It now!

Alibaba took all of 7 months to round up all the 40 thieves but their notoriety knew no bounds! Imagine his surprise to find one more lurking around - their leader no less. And this 41st one was an illusionist - seemingly appearing as his own reflection. Hmmm, what a dilemma - which one was the flesh and blood version?! But our hero managed to crack the mirror and nab him in a trice!

Patterns for these 6 final motifs are below. But they gather together to create a few more larger pieces that will be showcased in the next post before the final reveal. Since I've already inked April on the former, I will have to post them before the start of May. So please don't get bored as the story continues ....

Worked in Lizbeth size 20, single shuttle. My previous posts have more details and I will give an overall round-up in next post. You can find all Blossoms patterns listed under Nature 2D here.

Blossoms Motif #36  
<2½ × 1¼

 
The reason I added a joining picot between a petal segment is because the next flower can have a free picot and also a bit of layered effect. This was not done in earlier motifs.

Blossoms Motif #37  
2½ × 1¼


Blossoms Motif #38  
2¾ × 1¼

 
Why should all leaves remain at a level with the rest of the spray? I joined the leaves above a flower in a few motifs. Here I made a leaf under the spray for a bit of a natural look.
See, I was getting bolder ;-D

Blossoms Motif #39  
2½ × < 1¼


Blossoms Motif #40 
2½ × 1¼


Blossoms Motif #41 
2 × 1¼

 
I found it extremely difficult to decide which way looked better. I finally chose the former and notated the stitch count below. 

So that's it folks as far as actual patterns go for this Blossoms Project. However, as I said above, the ideas continue and I invite you back in a couple of days to see Cornucopia #2 and the constraints under which Alibaba had to work.


Tuesday, 20 April 2021

unmasked

Pin It now!

 Finally, after 3 years, when masking is almost a given globally, Alibaba has decided to unmask 5 of the 40 thieves. Dare he expose them to the pandemic without they being vaccinated? Is he cruel or is he testing their bravado? Only time will tell.

For now, whichever hemisphere you are in, let's enjoy the all-weather blooms, with these quick single shuttle sprays that can be used for appliqué, cards, tags, decorations, and so much more. 

Techniques : rosette ; picot join to the right ; luggage tag loop or larks head knot ; lock join.
All worked in Lizbeth size 20 threads (Sunkist mix) with a single shuttle.

Blossoms Motif #31  
2½ x 1½" 
  

Blossoms Motif #32 
<2½ × <1½"
 
Some joins are made between a ring segment. It helps to control the curvature of the spray besides being more stable.
 
Blossoms Motif #33 
2½ × 1¼"
 

Blossoms Motif #34 
> 2 × > 1½”

Blossoms Motif #35 
> 1¼ ×  1"

As with previous motifs, these can be arranged together in various formations to create new shapes and larger designs. I will share these after the last of the thieves are nabbed! So keep an eye out....who knows there might even be more than 40?

stay masked even if Alibaba comes calling! 😁

All Blossoms Motifs patterns are being listed under Nature 2D.


Saturday, 20 March 2021

happy sunflowers

Pin It now!

Adaptation of Endrucks' pattern #1 edging into a circular coaster/doily.

HAPPY HANDS SUNFLOWER
by Meenakshi (muskaan) Jain
adaptation of Endrucks-Leichtenstern's pattern #1 
from her book ‘Die Schiffchen-Spitzen’,1920
UPDATE (Nov 2021): pattern now in pdf... click to download -
The large one on the right is a prototype from 2015. The upper WIP is halted due to cupping. The lower left one is the final version, with pattern below.

6 years in the making! In 2015, it was tempting to convert Endrucks' #1 edging into a circular coaster. Every other year I would pick it up, sketch or tat a center and fail. For a long time I thought of it as a sun/corona. I also wanted some block tatting inside. 
Till that aging process resulted in my own maturation and this center materialised from yet another failed attempt at tatting a reflection of the happy hands, large ring facing inward (like our reflection in water). That proved too large, but led to this idea which worked! 
Design Tip: Notice the cupping in above WIP model? I believe it happened because in my 2015 model there was space at base of large ring and arms on either side. In new model there is no such space.
The lower center was tweaked with shorter chains.

ROUND 1 - center medallion pattern


Ball and shuttle, continuous thread. Joining picots are small. Start with a large ring (starred in pic). Tatting moves counterclockwise.  
    R1: 4-4-4—4-4-4. rw
    C1: 5-5. rw
    R2: 4+(R1) 4-4. rw
    C2: 5-5. rw
    R3: 4+(R2) 4 +(R1) 4—4-4-4. rw
Continue around (total of 10 rings). 
NOTE: Remember to join last 2 rings to the first ring. The red lines in
 the top right pic show the last large ring is joined to 2 previous rings on the left, and one join on the right to the 1st large ring. The final small ring is also joined to rings on either side.

ROUND 2 - circular edging/petals pattern
For stepwise edging pictorial, with sequence, legend, links, etc. refer https://tipsaroundthehome.blogspot.com/2021/03/balancing-act.html and the notes below

    2 shuttles, ctm.
    A ring: 4-4-2—2—2—2-4-4. rw
    Bchain: p 4•4•4-4. rw
    C ring: 8-2
—6. dnrw, SS
    Dchain: 4CWJ 4• SS
    E ring: 2
—2-4. SS
    Fchain: 4CWJ 5+
    Gchain: p 4•4•4-4. rw
    H ring: 8+2--6. dnrw, SS
    Ichain: 4CWJ 4• SS
    J ring: 2
—2-4. SS
    Kchain: 4CWJ 5+ . rw
    Lchain: 5+(Rnd1) 5. dnrw, SS
First Motif Complete.
    **Leave space
    Aring: 4-4-2—2—2—2-4-4. Rw, SS
    Make B,C,D as before
    Join to E above and lock join to A below. Keep Both threads on same side ( I prefer to keep them above). 
    Continue chainF
    Make picot join and continue to other side, as in 1st motif, and complete the 2nd motif.
** Repeat ** to ** till all 10 motifs are made and joined back to the first motif. Tie & cut.

Model worked in Anchor size 40 (00269 & 00302) measures 7.5 cms. Round1 medallion is 3cms. 
In Anchor size 20 (the prototype model), it measures 4cms inside and 11.5 cms final.

I sought the advice of my Endrucks 1920 Project partner Ninetta (thank you!) when there was cupping and her tips along with my own ideas helped me arrive at a model that lies flat. A very close inspection will reveal discrepancies as I implemented changes on-the-go. But I am fairly confident this is good.

NOTES / THOUGHTS
  • To work petals in 2 colours, see pictorial for colour placement options and methods.
  • All joining picots are very small.
  • CWJ is optional but gives a smoother outline.  
  • For fs/bs tatting, I did a bit of cheating with the CWJ – I made 1 less half stitch on the backside chains, and formed a normal CWJ. Thus when seen from the front, they appear as a complete stitches.
  • I did not count the CWJ as a stitch.
  • There are chain segments with 1 more or less half-stitch-a judgment call. 
  • Simple blocking on completion will give it a neat finished look. 
  • All decorative picots are deliberately kept long. Picot gauge is optional.
In my 2015 prototype I had used double and triple picots which are now changed to regular long picots. I think it gives a way better look!
If you look closely you will see the tweaks I made in the light yellow center, trying to settle on the right count.

FUTURE IDEAS :
  • For a more natural look, vary the length of the petals by adding or reducing chain segments by 2, 3, or 4ds.
  • We could try to do away with the 2 rings at the periphery, replacing them with chain segments and picot for joining.
  • Add more layers of petals for a beautiful 3D flower.
  • Add more colours. Hubby insisted on just these 2 and I obeyed (sometimes I behave ;-P).
  • I am working on a 3D 3-petal earring/pendant/brooch adaptation that I think should work - simple tatting and a beaded version.
So, keeping my fingers crossed that you remain sunny and cheerful for future posts, without ennui setting in ;-D
And I welcome somebody to test tat this and send in their feedback. I hope there is no mistake. I will convert the pattern into pdf format at a later date.
happy tatting and adapting !

Monday, 21 December 2020

embroidered motifs

Pin It now!

This is from another lifetime...so long back that I cannot remember exactly when. All I know for certain is I started embroidering these hankies in 1996. Yup, a lifetime back!

These are not my original patterns, though I might've adapted them a bit here and there. I've given them names just for fun ;-P

Orange Pansy

Hand-embroidered in single strand of vintage silk thread.
Stem stitch, blanket stitch for filling the leaves and flower, long and short stitches for center of flower, and buttonhole around eyelet.
For hanky edges I used regular sewing thread and machine-hemmed with decorative zigzags. 
This is an older image to show the sheen of silk threads.

The wear and tear is clearly visible. While the sheen does not wear off, the vintage silk thread can fray.

Blossoms' Corner
This is the only pic I have. One of my favourite hankies, I think got misplaced a few years back. I Love how even the tiny stitches are. 
Hand-embroidered in single strand of Anchor embroidery thread.
Stem stitch, satin stitch for red center, chain stitch for petal outlines, and either satin or fishbone stitch for the leaves.
This hanky had a violet hem.

Flowery Perch
This was my least favourite of the lot. Again, it's the only pic I have of it since the hanky is no longer with me.
Hand-embroidered in 1 and 2 strands of Anchor embroidery threads.
I chose to do shadow work (closed herringbone stitch) because of the parallel lines throughout the motif. Which is why it was done in 2 threads hoping for some little colour to show through. Too much work, but not the result I was hoping for.
It also has satin stitch for the bird and back stitch for center of flowers and beak.
The hanky edging was in green.

Hope you enjoyed this little foray into something other than tatting ;-P Embroidery was my first love, especially single-stranded. 

Related Posts

Thursday, 20 August 2020

dandy options

Pin It now!
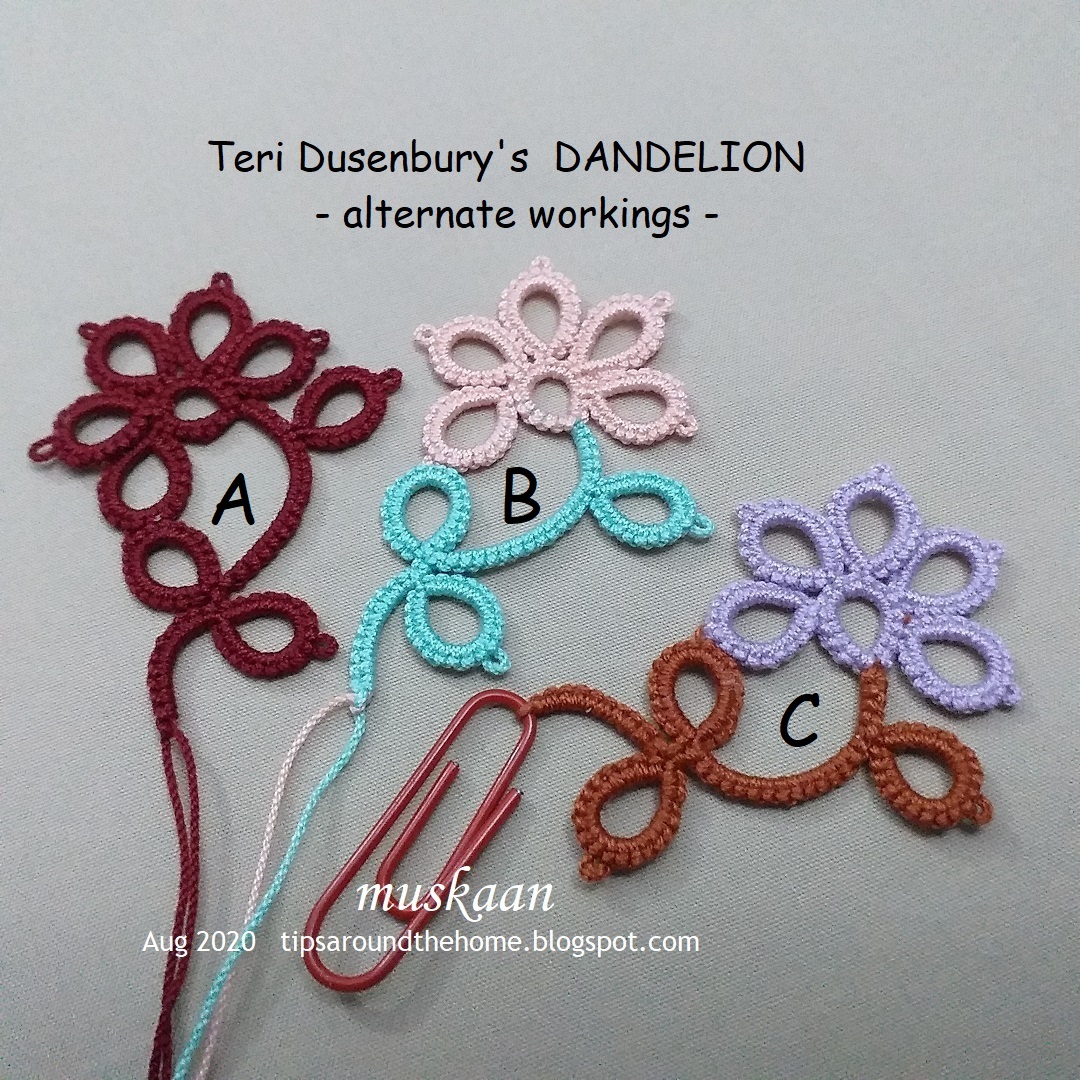
 Solai S asked for help with Teri Dusenbury's Dandelion Chain Link Bookmark after seeing a few recent versions inspired by mine. I needed to refresh my memory by reading the pattern and my blog notes. Huh, turns out I already had the SCMR in place of SQDR idea back then. Time to test it!

SQDR = split quadruple directional ring. It is basically a split ring but has only 1ds on the first side and the rest is worked on the 2nd side, using reverse (unflipped or larks head knot) stitches. Working moves counterclockwise. Rings thrown off the center are worked with same shuttle without any switch. 
If shuttles have different colours, there will be 1ds (on 1st side) that will of one colour and the rest in 2nd colour.

SCMR = self closing mock ring. This is a chain that closes into the shape of a ring. Working moves clockwise, and rings can be thrown off by switching shuttles.
It makes no difference if shuttles have 2 different colours - the entire SCMR with thrown rings will show the same colour stitvches.

The post is long because I am showing 3 alternate methods of working the Dandelion motif, all using the SCMR instead of SQDR. A lot of tips are also thrown in, giving the tatter an opportunity to pick and choose steps as desired. Feel free to skip the working you do not intend to make. 
And for even more options on ways to tat a central ring with several thrown rings, read the article, and download the tabulated pdf. 

 
Note that since thrown rings in SCMR are worked from left to right (a to e, in above left image), the start and end stitches of the SCMR are as notated. It may also be a good idea to make the motifs first, then make the chain link surround (the black rings in above bookmark), joining on the go.
Please follow the original pattern for stitch count and instructions, making necessary adjustments. The following is merely a depiction of alternate methods of working and/or using 2 colours. And knotless starts.


A. Single colour, 2 shuttles, wound ctm (continuous thread), SCMR with thrown rings.

Red - shuttle #1 ; Yellow - shuttle #2

 
A-1 : Loop Sh2 as if starting a chain. Bring Sh1 around the pinky once .... 
A-2 : ... to hold open a loop of Sh1 and start SCMR with 5ds.

 
A-3 : Making the 1st thrown ring with Sh2.
A-4 : Closing the 1st thrown ring off SCMR

 
A-5 : Follow pattern to make 4 more thrown rings, finish SCMR with 3ds, and close the open loop after passing Sh1 through it. Continue with stem using Sh1 as core and throw off the next ring.
A-6 : Follow pattern to complete the motif. Notice there are 2 tails that can be hidden in the chain link later.  
TIP : For a standalone motif, and to avoid sewing in tails, hide one tail in the last stem ring, and tat the final segment (10ds) of the stem as a floating chain as I did here for the rose. 
Tutorial -  https://tipsaroundthehome.blogspot.com/2015/03/dead-end-start-to-split-chains.html

The tails in above motifs are not hidden in order to keep my options open for future.

B. 2 colours, 2 shuttles, SCMR with thrown rings    

Red - shuttle #1 with teal thread ; Yellow - shuttle #2 with pink thread  

  
You can start by knotting the threads. I prefer a knotless start, tatting over tails in separate elements.
B-1: (left image) I usually cross the threads as seen in left image. Each tail is hidden in a separate element.
(right image) This time I simply placed the tails one above the other and continued as below.

 
B-2 : Wrap the threads as above, holding a loop of Sh1 open.
B-3 : Work 5ds of the SCMR, tatting over tail.

 
B-4 : Switch shuttle and work the st thrown ring, switch shuttle to work the SCMR stitches,....
B-5 : and continue to make the rest of the thrown rings and 3ds to complete the central ring.
TIP: Notice how I inserted the pink tail inside the open loop, and also passed Sh1 through the same loop.
 
B-6 : Now close the loop/SCMR. But for Version 2 of pattern, we need switch threads for green stem stitches.
B-7 : The most common solution is SLT (showlace trick). I prefer to avoid it. Instead I did TwW (twist work) as in this bookmark. With Sh1, make an unflipped half stitch, but while tensioning, ensure that the shuttle moves to the top, thus repositioning threads and shuttles into desired positions.

 
B-8 : Work the chain with Sh2 core (hiding the pink tail), thrown ring with Sh1, and chain with Sh2 again. At the end of this segment, TwW to switch shuttle positions.
B-9 : Continue and complete the motif. The tails can be hidden in the chain link later.


C. 2 colours, 2 shuttles, SCMR with thrown rings, starting from bottom, ctm 
Red - shuttle #1 with brown thread (and later with lavender) ; 
Yellow - shuttle #2 with brown thread 

C-1 : Wind Sh1 with stem thread; pull out a length from the ball and cut. Pass this end through the respective chain link ring (if you make this frame first, as per original pattern), and wind the rest on Sh2. Thus, we have joined, with no tails to hide at the start. 

In my standalone model, a picot space is held open with a paper clip (dead end start). Thus, if the motif is worked first, this paperclip picot can be used for joining to the chain link frame.
Work the stem and leaves.
C-2 : Snip off the Sh1 thread, leaving a tail (the shuttle at the bottom of pic) which can be hidden under any element. Sh2 becomes the core thread shuttle for SCMR. 
Wind lavender on a shuttle, tat over tail to hide end and work the SCMR with thrown rings as per pattern. (add thread on chain)
C-3 : Close SCMR and hide ends.


It's been over a week since I heard from Solai, and have no idea whether she has started the bookmark and has any issues. But this seemed like a good opportunity to try out the substitution idea and share with you. 
So, pick up your shuttles and get started :-) What colours will you use?

One more question - do you like the size of the images? Any changes you would like to see in the presentation?