Showing posts with label Elgiva Nicholls. Show all posts

Sunday, 29 March 2026

freeform fun

Pin It now!

I've been enjoying some tatting time almost daily for the past several weeks/months. One of the outcomes is this freeform sprig with 4 colours which was tatted on the go using 'branching encapsulation' to pull out the desired colour where required (scroll to end for details).

I'm not fully satisfied with the shape or rather the length of some of the stems. Also I didn't spend time in choosing colours - just picked the first 'flowery' shades that had been used in recent samples. Wound four shuttles with the different colours, some of them using leftover threads. I've always multiple shuttles very freeing despite the risk and discomfort of tangling threads. 
I didn't start with all 4 threads together. Started normally with two colours and then added the 3rd and 4th colours where needed. If you look closely you might notice the difference in the thickness of the stems.
So this is the 2nd piece I am submitting for Natalie Rogers' PICOT Bingo 2026 (Level 2) which you can find here - https://www.patreon.com/posts/happy-new-year-147124370 and the boxes crossed out with this model include ....
  • free-form tatting
  • tat a flower
  • tat nature
Huh, if only I had included a butterfly, I could've had a row bingo!!! Oh well, next time ...


A bit about Branching Encapsulation -

 The term was coined by Sherry Pence (2012) and she published a book dedicated specifically to this technique and you can scroll through her posts and samples here - https://ladyshuttlemaker.blogspot.com/search?q=branching+encapsulation. You can find Karen Cabrera's Lesson #155 - Branching Encapsulation video here - youtube.com/watch?v=2oB08uUYfzo&feature=youtu.be.

Elgiva Nicholls called it multiple dead ends in her 1962 book Tatting: Technique and History. Recently Marilee Rockeley (2024) worked the menorah from Elgiva's book using this technique and she also uploaded a video and free pattern here - https://yarnplayertats.blogspot.com/search?q=branching+encapsulation

I had used branching Josephine chains in a card here - https://tipsaroundthehome.blogspot.com/2018/05/i-love-floating.html but since they were dead end chains without any flower or bead, I used scrap threads to hold the bare thread at the desired length. You can find pictorial with options here - https://tipsaroundthehome.blogspot.com/2015/03/dead-end-start-to-split-chains.html

Tuesday, 14 October 2025

Starter Picot pictorials

Pin It now!

 Ninetta and I have been working on a resource page dedicated to the Endrucks 1920 Project. Over the years many tips and pictorials have been shared but they were scattered. In our attempt to finally gather and organise them, we discovered certain lacunae and decided to create pictorials and/or videos to address the issue. 

One such is the Starter Picot or Starting with a Chain. Elgiva Nicholls calls it the Link Loop or link loop picot. Several of Eleonore Endrucks' patterns in her 1920 book 'Die Schiffchen-Spitzen', start with a chain. She ties two threads together, and starts with a chain of 1ds, picot, and the rest of the chain. Of course most tatters now start directly with a picot and with continuous thread (CTM). Yet there are different approaches. Following are glimpses into the options detailed in the PDF which I won't repeat here....

Please note that this is a compilation sourced from various sites/blogs, some of which are no longer accessible. It is the reason Ninetta and I wanted a resource that did not have to rely on outside links, as far as feasible. The only outside link we included is for The Online Tatting Class, besides our own blogs. As it is my Tatting Resources page (tab above) lists tons of outside resources with credit. 

Starter Picot Options with Pictorials by Muskaan Oct2025 (starting with a chain) - https://drive.google.com/file/d/1vzSHMxas51Yn5iujdmror1obx27AuIhw/view

1. Starter Picot with paper clip, marker, or coilless pin.

Between the choice of spacers, I prefer the thread marker (or luggage tag loop) as you might remember from my past posts. I find it less interfering, and more importantly we can measure the picot to the exact size required - https://tipsaroundthehome.blogspot.com/2023/01/measured-picot-on-core-thread.html

2. Starter Picot with 1st half-stitch

or 2nd half-stitch
I left out this 2nd hs collage from the PDF since it is basically the same as the 1st hs pictorial.

3. Starter Picot with lock stitch


What happens when we want to work with two colours or we have leftover threads on our shuttles and wish to use them? Obviously CTM is not an option, but we do have False CTM. 

4. Starter Picot with false ctm in two-colour tatting

5. Starter Picot with false ctm in two-colour block tatting

The above collage was shared by Ninetta showing a two-coloured block in progress. And she starts the 1st chain with 1ds, picot like Endrucks. However, instead of tying the threads together, she uses the false CTM method.

For many more situations in which a False CTM comes in handy, click on the tag at the end of the post. I have two dedicated posts along with some specific projects where I used it. https://tipsaroundthehome.blogspot.com/search?q=false+CTM

Hope this is helpful in your future projects. 

Tuesday, 16 April 2024

gaming bookmark

Pin It now!

 An insertion as a bookmark is my entry for the two 2024 games I am playing.

Main body is from 'Tatting Techniques' by Elgiva Nicholls (p27, 1976) and the charm is from Rebecca Jones (fig123, 1985).

I have too many variegated Lizbeth, mostly with shades of pink/magenta. Difficult to always use for fear of eclipsing the pattern. But I took the leap and it came out okay I think. Lizbeth size 20. 

Learning from my past experience, where my chains are usually tighter/shorter than vintage patterns, I increased the chain stitches beforehand and it worked out well.

Pearl Tatting tail for the bookmark using Anchor perle cotton size 8. I didn't use any picot gauge since my main aim was to enjoy uninhibited tatting on International Tatting Day, 2024.
In order to avoid sewing in ends, I ended with two heavily picoted folded rings, hiding the other colour within each.
Pearl tatting is one of the blocks in Natalie Rogers' PICOT Bingo game which you can join here - https://www.patreon.com/posts/picot-bingo-95729145?  This is my fifth submission so far. Need to speed it up a notch!

The tail was attached to the #123 medallion from Rebecca Jones , shared here - https://tipsaroundthehome.blogspot.com/2024/03/happy-itd-2024.html

Turning an insertion into a bookmark is nothing new or unique. Bookmarks, being short, are a good way to enjoy a pattern with a different use. 
The large rings are linked through a common picot. I think the colours are doing fine together.


And the bookmark is also my entry to splocik's Small Decorations game that was first announced here - https://splocik2.blogspot.com/2024/01/mae-dekoracje-galeria-grudniowa.html
She shared the March entries here - https://splocik2.blogspot.com/2024/04/mae-dekoracje-2024-galeria-marcowa.html

Many thanks to all mentioned here for lovely patterns and fun games!

Thursday, 21 March 2024

counts

Pin It now!
A bit of mixed media card for my March 2024 Small Decorations entry. My heartfelt thanks to splocik for graciously accepting the earring I made in February and I hope this card meets the requirements of the game. 

This is where it all started with a counting error I frequently make, despite my cautious counting! Notice that one daisy has an extra petal.

Pattern for the classic daisy is from 'The Complete Book of Tatting' by Rebecca Jones  (Fig. 122 page 47, 2011). Worked in Olympus size 40 (equivalent to Lizbeth size 20).  

Elgiva Nicholls calls this medallion a Classic Daisy formation, made with a single thread/shuttle, in 2 rounds. Olympus size 40). 

The more modern style  (coloured motif) is worked in one go, using two shuttles to throw rings off a mock center. I used the exact same pattern for the petals, but added 2 ds in the SCMR between each petal. 

Which version do you like? The Classic or the Modern?


A few more pics of the card ---


Actually when I opened my box of watercolours, I found most of the jars empty! Hubby quickly ordered a box online and while I waited for the delivery (about 15 minutes), I doodled this with the watery remains. And was too impatient to wait for the leaf to dry, hence the smudging.

Probably the last time I painted was 15 or 20 years back! 


I painted the leaves, then glued the daisies. The little orange florets are from my 2022 flag project (link below). After trying out a few arrangements, I painted the brown twigs and glued the florets. Added a few more twigs, leaves, .... and finally the diamonds. Can't even remember when or where I bought those highlights!
TIP: I deliberately glued the orange flowers on the frontside, coz the backside is more dimensional- the picots curve up a bit.
You can easily see how amateurish my painting is! Nevertheless, it felt good to hold and reacquaint myself with my brushes. This was a very hasty project - probably a half hour from start to finish. Hopefully it has opened the gates to some more doodling in the future. 

Check out the Feb gallery here - https://splocik2.blogspot.com/2024/03/male-dekoracje-galeria-lutowa.html


Related Posts
https://tipsaroundthehome.blogspot.com/2017/10/meddling-with-medallions.html
https://tipsaroundthehome.blogspot.com/2022/08/har-ghar-tiranga.html   https://tipsaroundthehome.blogspot.com/2025/01/last-and-first.html

Saturday, 7 October 2023

rosettes

Pin It now!

 In tatting, we often come across different names for the same technique/effect and the same name for different techniques! (jot it down to various reasons - historical, linguistic, ignorance, non-standardization, ....).  One example of the latter is Rosette. This historical term refers to at least three different styles as evident in the collage below!

Our newest game in the Endrucks 1920 Project FB group involves the third motif and it seemed a good opportunity to address this situation and refresh my knowledge.


They are arranged along evolutionary lines -

1. Single ring with picots aka central ring. Tatted with a single thread. This was a common starting medallion in numerous antique patterns, and the thread was tied and cut after each! Now, we climb out with a mock picot or if possible, we work it as a thrown ring for continuous tatting.

2. Outward facing rings, often called a daisy or flower. Again, tatted with a single thread and the rings are joined to each other to create beautiful medallions. It helps that joining on the go was discovered. The number of rings can determine the shape and size.

Rosace is a term used by several non-English speaking tatters, to address this formation. eg. Maria Papia's earrings (https://www.youtube.com/watch?v=wbqLn8xTaGU) and Lilas Lace's pictorial of Edwige Renaudin's Double Rosace (https://lilas-lace.fr/blog/2014/02/28/diy-a-double-rosace-diy-une-rosade-a-double-rangee-danneaux/)

3. Concentric chains around a central ring. Each chain segment is joined to the picot below from the previous round. The entire medallion is worked continuously, but requires two threads. Obviously this came into existence after the discovery of tatted chains.

In the sample above, the consecutive chain rounds are niched closely into a compact circle - like a dartboard. However, if the chains are made slightly longer, with more of an arch on each chain, it gives the appearance of a flower - a Rose or wild rose as Sharon Briggs calls it (https://sharonstattedlace.blogspot.com/2008/05/tatting-wild-rose.html).


This is all I have. Have you encountered the term for another formation? Please do share.

My main references for the above, besides online resources already listed (including Craftree), are - Elgiva Nicholls' 'Tatting: Technique & History' 1984, and Judith Connors' 'An Illustrated Dictionary of Tatting'. And all three tatted samples above are from derivatives of Endrucks' (1920) patterns 42, 20, and 37.

UPDATE: (9th Oct 2023) - Perhaps I should've spoken about the origin of the word rosette, etc. But here's a comment by Stéphanie Mc (Tattimic) on my FB post and quoted here ---

I'm pretty sure it comes from French.
In French, the word "rosette" can take about 10 different meanings. It usually refers to something circular with a circle in the middle, but not necessarily.
Also, when the suffix "-ette" is added to a noun - let's say "rose", haha-, it refers to a smaller version of that noun. So a "rosette" is supposed to mean "a small rose", at least in some interpretation of the word, of course.

 Well, she is absolutely right! 

My sincerest thanks to all mentioned!

Friday, 30 June 2023

gifts galore 2

Pin It now!

 Besides all the thoughtful and practical gifts Anita Barry sent me, she also sent several excellent books. My tatting book collection just grew a whole lot! I invite you join in my pleasure .... (listed in no particular order)

Taboo Tatting - Anita Barry. 
This little booklet is a perfect example of the creative fun Anita manages to inject into all her projects. It is one A4 size page folded into four 'pages' (printed front and back) and tied with a ribbon. She had shared it with me years back and I had printed it out. But receiving it from her is special. It has tips, tricks, challenges, little projects, ....

Tatting Times - Karey Solomon. 
I'd only heard of Karey Solomon's quarterly subscription-based mini booklets/newsletters and now I hold one in my hands! She had been sending these out for 30 long years till 2022. This post is worth reading - Launching Tatting Times Online

Tea is for Tatting - Martha Ess.
Another treasure! Martha Ess holds a special place in my heart for several reasons, not least for uploading Endrucks' 1920 book, ;-D. Martha's books are eye-openers in themselves, taking a technique or theme and running with it, popularising several techniques/effects through fun patterns. And she has a new book in the offing! 

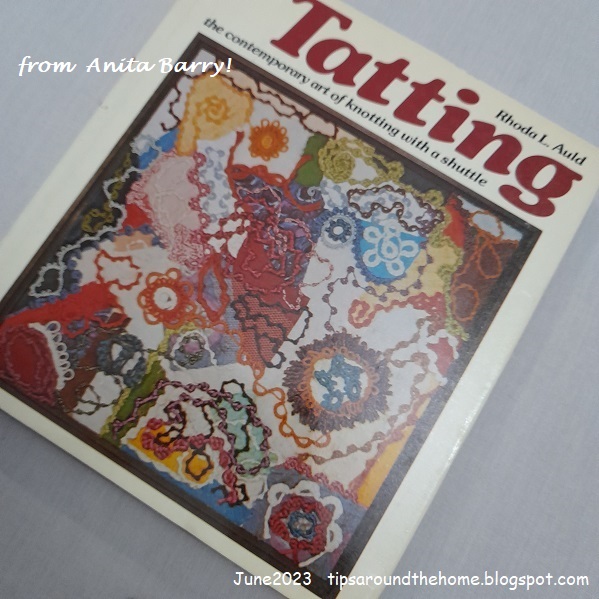
Tatting - Rhoda Auld.
A must-have in any tatting library! I have already read several pages, but haven't played with shuttle in hand yet.

Tatting Techniques - Elgiva Nicholls.
One of my all-time favourites is Nicholls' 1962 Dover publication Tatting Techniques and History, but this was also highly recommended and desired. I'll be spending many happy hours/days reading and imbibing.

Coffee Classics - compiled by Anita Barry.
Anita had told me that she was compiling her favourite coffee recipes to hand down to her loved ones. She made at least four and these are all hand-written and sprinkled with sketches. I had no idea one of the recipients would be me!

A Collection of Tatted Bracelets - Victoria Clarke.
Blogging and the online world has introduced me to so many wonderful and talented artisans. One such is Vicki who often shares her somewhat quirky but always clever designs. And holds short tat-alongs two or three times a year. This is the time for her next two back-to-back TALs - https://victats.blogspot.com/2023/06/coming-soon-very-canadian-tat-long-2023.html 

The IOLI Bulletin Fall 2022.
It often happens that my complimentary copy of the bulletin (when my article is published) does not reach me. Anita sent me her copy and she had been thrilled to see the back cover.....
...these are a few images from my 2nd of 3 articles on Endrucks and the Project!

The Complete Book of Tatting - Rebecca Jones.
Would you believe Anita sent this separately because she forgot to include it in the earlier shipment. So, her bundle of gifts actually reached me in three shipments! Another treasure in my library!

This is something she had received at one of the Palmetto Tat Days. These were all done by Phyllis Schmidt! I believe she does some sort of giveaway every year. https://phyls-handwork.blogspot.com/ 

I placed this last as the perfect way to say Thank You to Anita for all her gifts  especially the books, and not least for her solid friendship through the years!

I have made it a point to periodically read from all the books and make good use of the knowledge and perspective. Even cleared out an entire shelf from the wall cabinet in my bedroom to display all my tatting books in one place and keep them within quick reach! And each one has a lace (mostly tatted lace) bookmark.
There might not be enough time to try out stuff from the books at present, but the literature is equally interesting. And there is that beckoning light to try out patterns and experiments and ideas as time progresses!!!

Monday, 24 August 2020

hybrid tatting

Pin It now!

my musings.....

This is somewhat of a personal deliberation, contemplation - musings if you may. I haven't done a thorough exploration. So jump in with your comments, input, counter, reference, etc.

We know that any tool we use for tatting lace has it's advantages and limitations. Ingenious tatters have found ways to use the strengths of each tool Together!

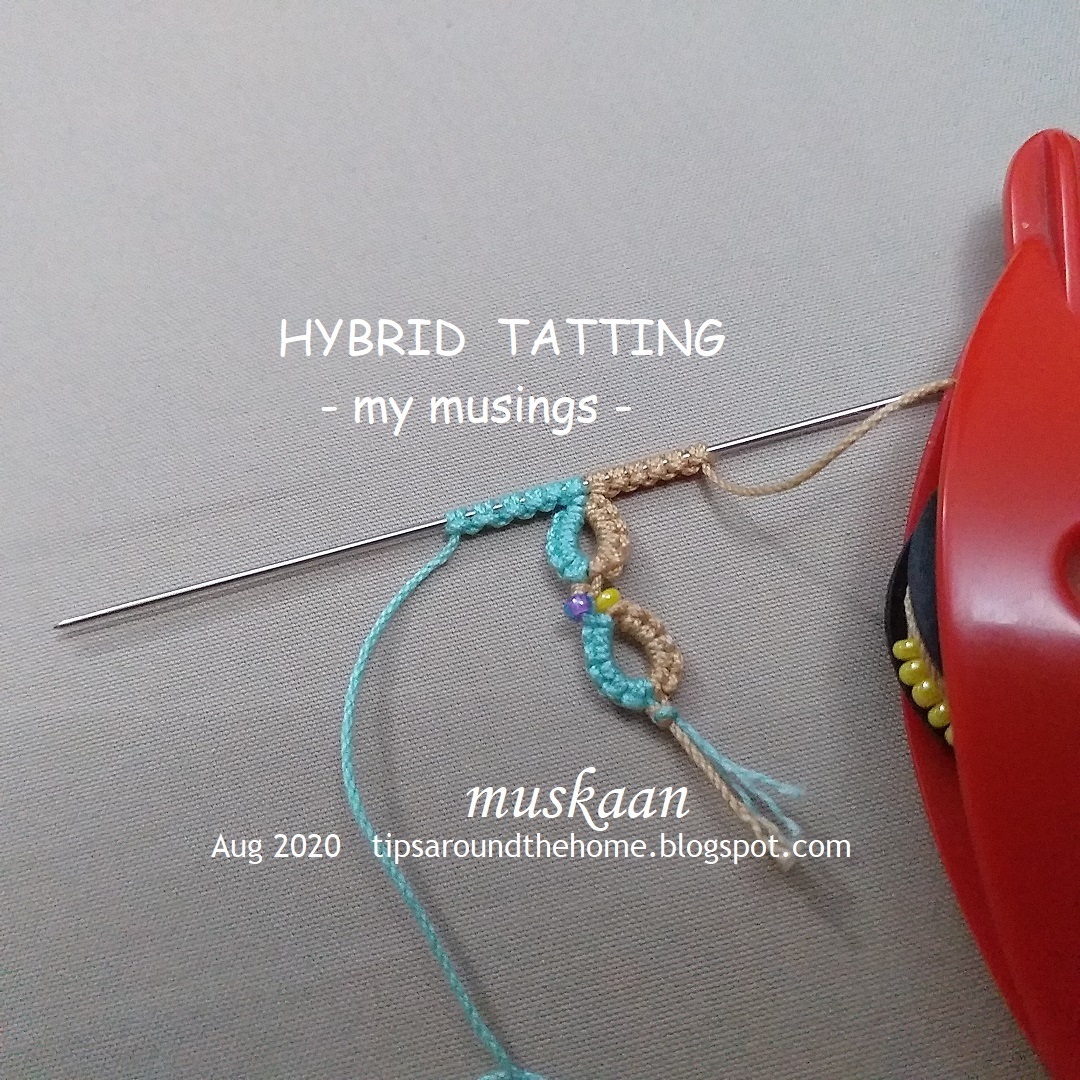
Hybrid Tatting is a tatting method that uses both needle and shuttle to work an element. It started with using them together in a split ring as seen in the image above. The term was coined by Wally Esther Sosa, for this method by Rosario Ruiz Moreno. They taught it at Palmetto Tat Days in 2017. Wally narrated the genesis -

I first came across this term and clever adaptation last year when Sharon Fawns blogged about it here. 

Recently, someone shared a video on facebook, that clearly showed how to do the split ring in hybrid tatting. It was dated 2015! It is by ChariFriv and can be accessed through this link - https://www.facebook.com/charifriv/videos/1602794246605932. Another example of how tatters independently came up with the same technique, method, or effect!

UPDATE (Nov 2022) - Wally tells me that ChariFriv is Rosario Ruiz Moreno! 

Anyway, this got me thinking. 

Should the term hybrid tatting be limited to the use of 2 tools for the same element or can it include the use in separate elements or rows within the same lace? 

A pattern that comes to mind is Frivolé's Rose and Crown motif. It has interlocking rings as the central round and several shuttle tatters use a needle to tat only this round.

And what about the SSSR (single shuttle split ring) where we use shuttle to tat 1st side and finger to tat the other?! 2 tools in same element.

Going further back in time, when the chain as we know it, had not been invented in tatting. Tatters left bare thread between rings or ring clusters. 

 
This bare thread was later covered in several different ways. Elgiva Nicholls calls this the 'False Chain' where the bare thread was covered in numerous ways using a tapestry, netting, or sewing needle (Tatting Technique and History, 1962). I am selecting only 2 where the stitch clearly imitates the half stitch(s) as we see in today's tatted lace.

Larks Head Knot (LHK) - 
  
The bare thread being covered by mock ds or LHK. The unflipped over-under movement for half-stitch is underway (left pic). The unflipped under-over half-stitch being made (right pic).


3 mock chains completed with picots.

Buttonhole Stitch - 


Those with a preference for embroidery might have used the buttonhole stitch to cover the bare thread.
Turn work (or work back to the start) and cover the bare thread with buttonhole stitches. These resemble a repetition of half-stitches as in a Josephine chain.

These are merely a small window into the use of 2 tools specifically for tatting the same element, separate elements or rows in the very same tatted lace. I deliberately omitted several other ways we use a crochet hook, a needle, or a cro-tatting tool, focusing only on how a false/mock stitch can be made with 2 tools such that once the lace is completed, the difference in tools is not apparent or discernible.

So, what are your thoughts? Where, and how would you use 2 tools to ease your tatting; and which 2 or more tools?

Tuesday, 29 May 2018

Mock Rings 1 U-O Join continued

Pin It now!
In my haste to upload, I missed adding some details to the pics in previous post. These have now been notated and updated.

Continuing from previous post ….


The following are again mock rings made using the Under and Over Join. But we now have a tiny picot at the start of the chain. When the chain is joined back to this picot, it creates a mock or false ring.


1C. Under and Over Join: With joining picot; Unattached rings

 
 Make a small picot at the base of the chain before tatting the ‘ring’ portion.
Since the mock ring is unattached, it is easy to place 
one thread above and other below the chain.

 
Pull up a loop of ball thread through the picot, pass shuttle, and snug. 
A simple picot join converts this chain into a mock ring. Continue tatting.
Note: Although we have made a picot join, this arrangement of joining an overlapping chain is included in under-over join. 

 
This time the shuttle thread is below and ball thread above.
Pull a loop of ball thread down through the picot, pass shuttle and tension the join.
Two unattached mock rings made with under-over join 

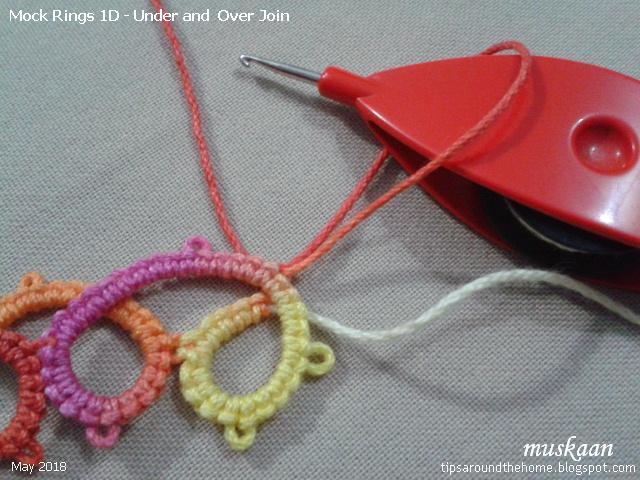
1D. Under and Over Join: With joining picot; Attached rings

 
Here the ‘ring’-chain is linked to previous ring and both threads are above the chain.
Pull ball loop down through picot, pass shuttle and make the join.
This is reminiscent of the down join.
 Continue tatting.

 
For mock ring #8 both threads are below the chain. 
Pull up a loop of ball thread through picot, pass shuttle and snug the join.
Notice the change in overlap between mr7 & mr8! Continue tatting.


as seen from the back.
This above sampler, with joining picots and overlapping chains that form loops is also known as the Running Scroll, for it’s flowing cursive style.


This join can also be used to create a line of back to back rings – called a Cord of Loops. We now prefer to work this as a split ring braid or mock rings with a flatter closure. The latter will be discussed in future posts.

Observations
  1. In all these mock ring instances, the core thread remains free to slide.
  2. They can all be worked with a ball and shuttle.
  3. All mock rings face the same side as the normal first and last rings when we reverse work after first ring.
  4. The under and over join creates a slight overlap/layer when crossing over, giving the mock ring a dimensional effect rather than lying absolutely flat.
  5. The overlap changes depending on which type of crossover we choose.

This completes the first category of mock/false rings using a join across a chain.
But there are so many more ways of joining or closing a chain to create a faux ring. While I work on that presentation, I invite you to sit back and recall all the different ways in which you may have made mock rings. It is quite an eye-opener. Please share your list in the comment box in case I have missed some.


Main references:
Tatting Technique & History – Elgiva Nicholls, 1962. (running scroll & cord of loops explanation  on p94, models on p96)
An Illustrated Dictionary of Tatting – Judith Connors, 2007.

…. to be continued 
See also -
https://tipsaroundthehome.blogspot.com/2018/05/mock-rings-1-under-and-over-join.html
https://tipsaroundthehome.blogspot.com/2018/06/mock-rings-2-lock-join.html
https://tipsaroundthehome.blogspot.com/2018/06/mock-rings-2-lj-mock-onion-rings.html