Showing posts with label Frivole. Show all posts

Saturday, 20 December 2025

Finnish finish

Pin It now!

 Oh yes, this is how Marja Jalo, from Finland, calls her way of ending on a chain. She has kindly agreed to share her method through a pictorial here - 

Finnish Finishing by Marja Jalo, 2025 - https://drive.google.com/file/d/1Kv1tc3msre8seFo58jjpPj4ON6_3XXR-/view

Can't have a post without a pic, so this is my quick version of the Finnish finishing method. I deliberately left a bit of the end tails to show where each one finally ends.  

Comparison and Thoughts -

This is a slight adaptation of Frivole's Finishing on a Chain method -https://www.flickr.com/photos/28725259@N02/albums/72157626237151128/with/5514379237  which I had tried here - https://tipsaroundthehome.blogspot.com/2015/03/hiding-ends-sans-sewing.html  and Ninetta had applied here - https://ninettacaruso.blogspot.com/2015/06/better-late-than-never.html .

  • Basically we tat the final chain as a single shuttle split chain (SSSCh) by pulling out a loop of thread from the shuttle and tatting with it. 
  • Frivole ends without any sewing while Marja sews in one end. Since I have no issue with sewing tails now, I didn't mind it. I whip stitched the green (ball) tail on the chain itself, but one can sew it under the ring or any other element to reduce bulk. 
  • My slight variation is that after passing the green (ball thread) tail through the shuttle thread loop and pulling the latter tight, I needled this green tail and only then joined it to the picot on the ring.  
  • I also find that Frivole's method requires a long enough chain to hide both tails while Marja's can work even on short chains.
I used a similar method when Ending on a Floating Chain, which was worked partially as a SSSCh - https://tipsaroundthehome.blogspot.com/2019/12/open-treasures.html 

And for a whole host of hiding ends methods, check out this post - https://tipsaroundthehome.blogspot.com/2016/11/beginning-or-ending.html

Many many thanks to Marja for sharing her method ... we are always the richer for having options! And check out her blog, if you haven't already.... besides all her other projects and experiments, I always remember her when talk of using yarn in tatting arises. https://solmujenlumoissa.blogspot.com/2025/

My next post will have a brand new join pictorial! Hope to see you then...

Sunday, 13 October 2024

off the deep end

Pin It now!

 Well, kind of! I'm certainly mad to have succumbed to temptation when there are already so many huge pies baking in my tiny oven. The heat quotient is out of the world! Yet it has been a decade-old wish to tat the beautiful Mystery Doily. I've actually been compiling resources and versions for a decade whenever I came across something .... And so can you blame me if I joined Jon Yusoff's tat-along on FB intending to tat just 2 or 3 rounds for now.

Pattern Links to the Mystery Doily Project first shared by Georgia Seitz -https://www.theonlinetattingclass.com/doilies-mug-rug-etc

I roped in my tatting buddy, Anita Barry, and she readily agreed. To date, she has Never refused me anything!!! We've been exchanging note, thoughts, angst, and progress these last few days. While I was thinking of size 80, she suggested size 40 since she wanted to use up some of her stash. It was absolutely fine by me, or so I thought!

Yes, angst. My story starts with several discards. Don't remember why I cut off the one in orange. Was it a change of colour decision? I think I decided to use it for the next round and start the first with yellow.
The rings are tiny - only 8 stitches. And while closing that last ring the tread snapped! Better to discard since the thread (Gopal) is not mercerized.
 
Wound new shuttle with Anchor size 40. Now the inner scallop of first repeat looks very different since it is unattached. I got all muddled up thinking I had made a mistake and snipped it off. Turns out it was correct, sigh.

4th start with lighter shade of Anchor yellow. While I was struggling with the chain directions (since I was shuttling between diagram and original doily pic) I thought I'd got it right. Till I uploaded the pic to a larger screen and found an error in one segment. Not a huge mistake, but still the dark brown wasn't helping my limited vision. Even managed to snag the thread at one stage and joined again. 
Overall, though, I wasn't enjoying the tat and decided it was time for course correction and snip off the size 40 altogether. 
Finally settles on Anchor Pearl Cotton size 8 (equivalent to Lizbeth size 20) and this is how far I reached after dinner last night. Tatting went smoothly and quickly, I enjoyed the thread (the shade appears darker here), and I have more of a choice of colours, too. Would've preferred a lighter brown, but turns out I am running out of greens and browns in perle cotton! Looks like some buying in on the cards ;-D
What also helped was that I sketched my own diagram and although I wrote my text version, too, I didn't need to consult it.

My visualization is to change the colour of the rings in each subsequent round, using darker shades or even different colours, to resemble a chrysanthemum or a blossoming flower. Brown remains constant throughout.

Okay, so that's the backstory. If it hadn't been for the FB tat-along and especially with my buddy, I might've discontinued the endeavour for the present. Somehow tatting with others felt like a commitment and something I needed to accomplish for myself, too. 

Now for my notes -

  1. Pattern - I referred mainly to Patty Dowden's instructions, starting with an outer ring, and also followed her count.
  2. FS/BS tatting here is in 'blocks' like in Mary Konior's Spinning Wheel Glass Mat where a set of motifs/repeats changes en bloc. So the outer scallop has frontside rings while the inner scallop has backside rings.
  3. I followed the original doily pic and Patty's Row 2 diagram for the 'S-chain' instead of her diagram for Row 1. Ultimately I drew my own sketch instead of shuttling back and forth.
  4. Direct Tatting - In such serpentine patterns (including magic squares), it is very practical to direct tat the chains instead of frequent reverse work. This also keeps the work mostly on the front side. Hence reverse stitch the chains, ensuring that you make adjustments for the sequence of the hitches when tatting backside chains.
  5. Joins - For symmetrical/mirror-image chains, including colour and direction, I used a reverse join on the right S chain and a downward picot (picot on core thread) on the left chains.
  6. Reposition - And before the picot on core thread (I wanted it to be yellow to mirror a ring picot), I used a TwW (a 2nd half-stitch which it turned to face the other way), reversed work, and then placed the paperclip on core (yellow) thread. 
  7. Colour - My first instinct was to follow Jon's variegated and solid combo scheme. However, seeing the tiny rings and my own stash, it just felt that a variegate would make the already dense design too busy. Hence I chose solid colours.
  8. Thread - Remember to use mercerized cotton for easy closure of the tiny rings.

As I mentioned above, here are some additional links - 


Can't say how far this doily will go at present reckoning, but I am committed to at least two rounds to get a good feel of this beauty! Jon has created a dedicated private group for this TAL, called Georgia's Mystery Doily Tat-Along. Join us if you can!
 
UPDATE: 
Reposition Methods (either after a lock join, a picot join, or free) to change the thread, shuttle, direction, or colour --- For convex/concave chains - https://drive.google.com/file/d/1JxcO-ubKP1KXb_CVAAfOMX6uBPkCy_gO/view 

And my completed Round 1 -
It's enticing And it's addictive!!!!!


Monday, 24 August 2020

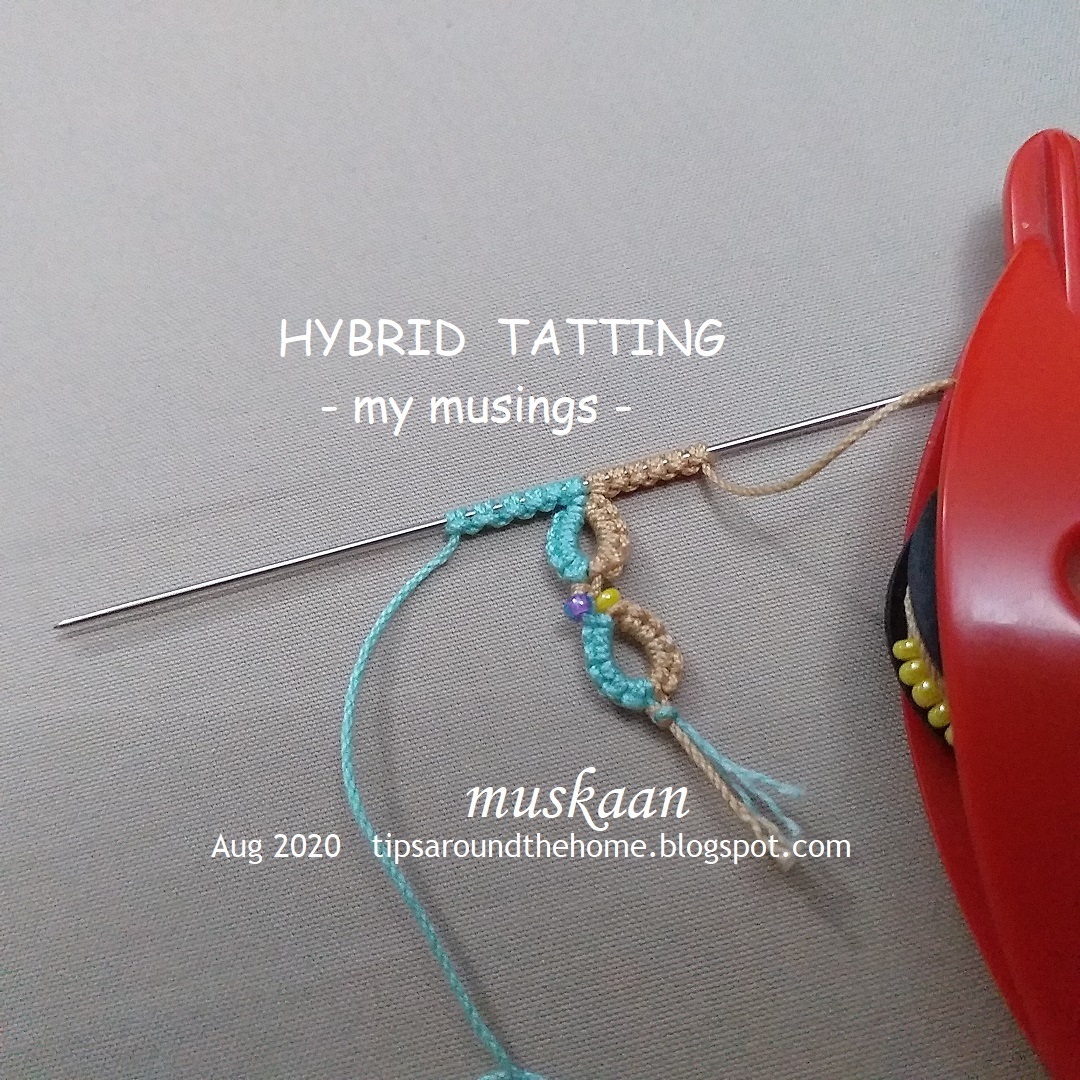
hybrid tatting

Pin It now!

my musings.....

This is somewhat of a personal deliberation, contemplation - musings if you may. I haven't done a thorough exploration. So jump in with your comments, input, counter, reference, etc.

We know that any tool we use for tatting lace has it's advantages and limitations. Ingenious tatters have found ways to use the strengths of each tool Together!

Hybrid Tatting is a tatting method that uses both needle and shuttle to work an element. It started with using them together in a split ring as seen in the image above. The term was coined by Wally Esther Sosa, for this method by Rosario Ruiz Moreno. They taught it at Palmetto Tat Days in 2017. Wally narrated the genesis -

I first came across this term and clever adaptation last year when Sharon Fawns blogged about it here. 

Recently, someone shared a video on facebook, that clearly showed how to do the split ring in hybrid tatting. It was dated 2015! It is by ChariFriv and can be accessed through this link - https://www.facebook.com/charifriv/videos/1602794246605932. Another example of how tatters independently came up with the same technique, method, or effect!

UPDATE (Nov 2022) - Wally tells me that ChariFriv is Rosario Ruiz Moreno! 

Anyway, this got me thinking. 

Should the term hybrid tatting be limited to the use of 2 tools for the same element or can it include the use in separate elements or rows within the same lace? 

A pattern that comes to mind is Frivolé's Rose and Crown motif. It has interlocking rings as the central round and several shuttle tatters use a needle to tat only this round.

And what about the SSSR (single shuttle split ring) where we use shuttle to tat 1st side and finger to tat the other?! 2 tools in same element.

Going further back in time, when the chain as we know it, had not been invented in tatting. Tatters left bare thread between rings or ring clusters. 

 
This bare thread was later covered in several different ways. Elgiva Nicholls calls this the 'False Chain' where the bare thread was covered in numerous ways using a tapestry, netting, or sewing needle (Tatting Technique and History, 1962). I am selecting only 2 where the stitch clearly imitates the half stitch(s) as we see in today's tatted lace.

Larks Head Knot (LHK) - 
  
The bare thread being covered by mock ds or LHK. The unflipped over-under movement for half-stitch is underway (left pic). The unflipped under-over half-stitch being made (right pic).


3 mock chains completed with picots.

Buttonhole Stitch - 


Those with a preference for embroidery might have used the buttonhole stitch to cover the bare thread.
Turn work (or work back to the start) and cover the bare thread with buttonhole stitches. These resemble a repetition of half-stitches as in a Josephine chain.

These are merely a small window into the use of 2 tools specifically for tatting the same element, separate elements or rows in the very same tatted lace. I deliberately omitted several other ways we use a crochet hook, a needle, or a cro-tatting tool, focusing only on how a false/mock stitch can be made with 2 tools such that once the lace is completed, the difference in tools is not apparent or discernible.

So, what are your thoughts? Where, and how would you use 2 tools to ease your tatting; and which 2 or more tools?

Monday, 1 April 2019

happy tatting with old and new

Pin It now!
A very happy International Tatting Day!

I’ve had a fruitful day – I’ve tatted a cross from a vintage edging, tried a new technique, gorged on black forest pastry (it has chocolate ;-P), and am now going public with this blog post. 

Georgia Seitz has a puzzle - can we work this vintage edging continuously? Hmm, I couldn’t, but I did convert it into a cross that can be tatted in one pass. And if the puzzle intrigues you, attend class today to see if our talented participants have answers. They always have tons of ideas !

The dark purple one was made first but felt too long, then 'improved' upon in the brown one. But I think the chains in the long arm should be shorter, leaner. That arm looks like it’s grown biceps !!!
In Red Rose pearl cotton (size 8) the brown cross measures 8½ cms x 6½ cms & the first one is longer at 9½ cms.
Techniques I used : 2 shuttles, directional (fs/bs) tatting, central picot, SCMR with mock picot and thrown ring, ring made with 2nd shuttle (like thrown rings), lock join.

I need your help in naming the cross. What should I call it?
It is edging #436 from Coats and Clark #138 Priscilla Edgings. And if you have any design improvement ideas, please do advise.


Now to the lovely new effect, Mimosa Knot, shared by Daniela Mendola to create pointed rings and chains. I tried them on rings only including half-closed rings.
My understanding of the Mimosa Knot on ring, based on movements in video :
  1. It starts off as a self-closing mock ring or SCMR (holding core thread loop at base) ;
  2. Make the 1st half stitch, but before snugging, pass shuttle front to back through open loop and adjust tension – this creates a twist in the thread just like in the treble tat stitch. Except that in treble, there are 3 twists, whereas here there is a single twist.
  3. Next make the 2nd half stitch, and pass shuttle back to front to twist, and snug.
  4. Close loop in 2 stages as we do for any regular SCMR. But my core thread did not slide freely after closing SCMR. I had to do this 5th step to ensure free movement & it worked every time ...
  5. Hold the mimosa knot in pinch and tug/pull the core thread such that the knot transfers and core thread becomes free.
Doesn’t this remind you of Frivolé’s one-stitch SCMR (for pointed chain) combined with Ninetta’s treble tat stitch (2nd half)? The SCMR lifts up the stitch to create a point (see 1 wrap tds here). 
Usha’s dot picot also creates a pointed effect and I remember doing a comparative study on pointed rings (perhaps privately?). Jon Yusoff also created pointed chains. Now I’ll have to add the mimosa knot to the compilation :-D

All links can be found in the tabs above (My Tutorials & Tatting Resources) or type in search box.

Can’t thank global tatters enough for sharing generously ! 

Thursday, 29 March 2018

tray cover wannabe

Pin It now!
Firstly before I forget, I have edited a few images showing the patterns from Vrinda’s squares. The notation was opposite to the working order. I’m aghast at my clumsiness; I guess the viral effect had not worn off :-( So please check out the revised directions when you plan on making them.

As I indicated in the previous post, I’ve started making these 3x3cms squares from the patterns sent in to Tat a Brussels’ Monument in Pink. It is my way of trying out all the lovely patterns and create a few more that I have sketched.

Worked in size 40, cream. So far, they are not all the same size and I may have to add an outer chain round to a few. I’ve made a couple more, but no pics yet.
I need to start joining the new squares to these as I go. But that will not give me enough leeway to play with arrangement. So perhaps I will hold off and make a thin insertion. Sound good?


Besides Vrinda’s squares (some are repeated), I now have Frivolé’s Reverse Quatrain ...

I started with an outer ring, throwing off the central ring with a mock picot between, and then continuing around. If we start the outer ring as a SCMR, then we can work the whole medallion with a ball and shuttle.
Frivolé also experimented without the central ring.

... and Henna J Hwang’s Fortuna Square (scroll through the album for this well-laid out pattern)

I tried one of the large rings as a mock ring but I liked the shape of the true ring better. Of course, the mock ring or chain option again allows us to work off a ball with single shuttle.


I enjoy working little patterns – quickly worked and can be used in numerous ways!
Since these pics were taken, I've worked a couple more from other patterns, but now I will share only when I have made substantial headway. I am using this project as a final hour for that end-of-a-busy day.

Tomorrow I have something exciting to show you .... so don't go far ;-P 

Wishing you happy hours of tatting always 
and 
many thanks to the designers for sharing their beautiful patterns :-)


Thursday, 11 May 2017

the bugle calls again

Pin It now!
updated on May 13, 2017

Sally’s Bugle Snowflake
Jane Eborall
Jane has been truly prolific with this lovely pattern, displaying such a range of colour combinations on her blog. When she uploaded the pattern, I had to give it a go.

The highlights of this pattern, to me, are the beads radiating in the centre and the lock chains forming a lovely petal shape. Jane’s tutorial on how to add beads that face outwards helped a great deal.

My Notes & thoughts

  • 12 seed beads (size 11) are needed for the long beaded picot (LBPbug) in center. Since my bugle beads are shorter (4mm instead of ¼ inch), I used size 8 or 9 beads in gold, thinking that these would make up for the length.
  • When loading LBPbug, make sure the loop for ring still slides.
  • Also, managing the 5 LBPbug with dangling paperclips can be a bit tough. I had to make certain each time before joining to them in next round, that they were in the correct sequence and not twisted around. I did use different colored clips for each, to keep track of sequence.
  • This technique for loading beads on a long central picot such that they radiate out, was first described by Frivole and also demonstrated here.
  • These kind of reminded me of LTRORs (loop tatted ring on rings)!
  • The central picot should’ve been more tightly snugged.
  • As in my previous forays, I again used picot gauges for the LBPbug on chains (as seen in pic above). 2 sizes were required for the beads I chose – ⅜ inch and ⅝ inch. And this time I used thread to load the beads later (one of the many ways of adding beads in Jane's tutorial).
How does one gauge the length of picot ?
Well, load beads as instructed and hold with paperclip. Tat the next couple of stitches. Then remove the clip and beads and measure. Voila . No hanging clips getting in the way and slowing one down. Once the length is known, use the gauge for future beaded picots, adding beads only at time of joining. 
And the added benefit is that one can usually use beads from one's stash rather than order new ones if the pattern calls for a size one may not have.


  • The lock chains could’ve been a tad longer for a more graceful curve as in Jane's snowflakes. One additional stitch would accomplish that for my tatting tension.
  • The split rings are another spot of genius ! They look like thrown rings, but being split rings, they become well-anchored with an ever so slight broad base.
In order to hide the space in center where some bare thread is visible, I placed a large crystal bead in center. Doesn’t it perk up the flake even more ?!

Measures 4” from tip to tip. Inner round is 2”.
Techniques used : 2 shuttles, lock chain, beads on central picot, lock join, picot gauge, beads on picots, split ring.


Many many thanks to Jane for all her lovely patterns and tutorials

happy tatting always J


Thursday, 14 July 2016

Surprises !

Pin It now!

Surprises …
One for me, one for you.
One yahoo!, one boohoo
One happy, one sad
Fifty-fifty, not too bad ?!

We never had any doubt that tatters are a generous community. Yet it was a Hugely pleasant surprise to get this in my mailbox … For Robin to send me her hard-worked Tatted Coaster pack for free ?! WOW. 
Do I hear you joining in my applause to her ?
“Thank you” doesn’t capture half the gratitude I feel for Robin . I can only try my best to live up to her expectations as a designer-par-excellence ….

We’ve been witness to her design process for these coasters. It’s a real privilege to get to tat them. Difficult to choose one. Jumped in with an eenie meenie …

Floral Coaster
Six Petals (split ring variation)
Robin Perfetti
eBook (instant download) : Tatted Coasters Pattern Pack

Materials : 2 shuttles, Anchor Mercer size 20. Art. 4054. 0289 (yellow) ; 1215 (shaded green)
Techniques : rings, chains, split rings, directional tatting.
Round 1 : 1”
Round 2 : ~ 2¾”
Round 3 : 4¾”
 
Since I don’t have shaded yellow, this is what I thought I’d do – load each shuttle with a different shade. Tried one & wasn’t sure. Played it safe & used the same shade throughout.
I forgot to join the 1st flower as per pattern, resulting in  the entire 3rd round being tatted counterclockwise.
Very quick & relaxing tat.  

And below are 2 possible variations. 
Simply by missing out a few petals strategically, we get a hexagon. 
(I’ve simply folded the rings underneath to take photos)


****************************

.... and here's the surprise for you (sorry it’s not as good as mine was)
Ever thought I'd tat one of Lené's snowflakes in white ?! teehee

The Fifteenth Day of December Snowflake
Lene Björn
from book :  “24 Snowflakes in Tatting”
for 2016 Snowflake Tat-along on Craftree 

Materials : 2 shuttles, Anchor Mercer size 40 thread in white.
Techniques I used : SCMR, directional tatting, thrown/floating rings, decorative picots
Measures 3-3/4"

Straight off, I am NOT happy with my working.
Learning from my Day 10 mistakes, I used regular picots instead of smaller picots at joins. But there were other problems as well.
I kept getting confused with the number of thrown rings & had to unknot & retro-tat a few times. Finally gave up & started afresh. Still made a few mistakes but most caught in time.
At the end, before hiding the tails, I kept tugging at the SCMR thread, hoping that the snowflake chains would fall into place better. Big mistake – a tug too many! It made the chains more crammed at the base; they were lying a bit better earlier.

My Notes
(Past tense is what I did here ; rest is what I should do in future)
  1. Started with a SCMR instead of a regular ring. I think it is Frivole’s tip that SCMR gives a more rounded ring than normal/regular rings which tend to become tear-drop shaped.
  2. Because of SCMR, entire tatting was done from the frontside.
  3. Make the 1st picot of chains even longer (~ 2DS span)
  4. Reduce the stitch count of smallest thrown ring by 1DS
  5. Mock picots added at base of thrown rings to mirror the picots on other side, thus achieving complete symmetry.
  6. Picots on the extreme rings were decorative & graduated.
  7. Kept the chains loosely tensioned to mold into shape before blocking.
the negative space can be converted into a paisley !
The lop-sidedness/unevenness of chains have given me an idea of how to change the shape deliberately to get a slight paisley effect negative space, instead of the big tear-drop, as can be seen in the pic above.

Will definitely be tatting another, working away the mistakes (hopefully).

Many thanks to Robin
&
Many apologies to Lene

happy tatting :-)


Thursday, 16 June 2016

a post about post - reposted

Pin It now!
…. where a simple doily round leads to musings & experimentation on rings and when to post a shuttle.
Wiosna 2016
A doily tat-along by Renulek
Measures 11½” in size 40 Anchor Mercer 4054-0300
Another very easy, leisurely round. I was scared of messing up the alternate floating/thrown rings – one with decorative picots, one with single small picot. But frequent checking kept me on the right path, phew.
There is one thing that has me flummoxed for a long time : the directionally tatted (frontside/backside or RODS) rings don’t close as flat as normal rings. Off & on I had experimented with many different tweaks but nothing seemed to work.
I took this opportunity, to experiment further. The rings were small and a botched experiment would not be too visible.
I was surprised at the trial result, and happy to have found a solution that works for me. And in my usual way, I didn’t stop at that. My curiosity to see how different ways of tatting & closing rings compare with each other led to this small experimentation below. The model is accompanied by a table with all details.
This may not be ‘original’, but it is part of my own learning process to make my tatting better.

Dear tatters, what is the secret to Your perfect rings  ???? 

R – ring ; FR – floating/thrown ring ; DS – double stitch ; RODS – reverse order DS ; fs/bs – frontside/backside ; fhs – first half stitch ; shs – second half stitch ;  post shuttle – pass shuttle through ring from front to back before closing ring ; . – close ring ; – – picot.

Points to ponder :
  • Base of ring at closure – in the images, point of closure of each ring lies on the right.
  • Does the core thread emerge from ‘front’ or from ‘back’ – after shs, core thread emerges from the front ; after fhs, it lies behind.
  • Size of the ring – perhaps there is a difference when closing small versus large ring ?
  • Desired shape of ring – tear drop or rounded.

All rings in the pic are 5 – 5 
Except for #1, all lower (aqua) rings are RODS (directional or fs/bs tatting)
Pink rings are thrown/floating rings.
Reverse Work before & after each lower ring.


For a long time now, I had been following Frivole’s tip in Ring 4 of adding an extra shs before closing ring, when working from the front. 
In the latter half of Round 11, where the rings were 4-4, and worked from the back (after reversing work), an extra shs and posting shuttle (as in Ring 9 above) seemed to work, making me happy.

But look what happens in Round 12 where the ring is 8-8 :
In these 'larger' directional rings, before closing, I added a 1st half stitch and posted the shuttle. They lie so much better than the first one on left which was extra 2nd half stitch and post shuttle ! I'm not sure whether size of ring is the reason ... that will require more trials to determine. 
Let's just say that we have many options to choose from as the situation demands.

What I also noticed is that the ring tends to remain slightly open, & requires one final tug to close it completely. Perhaps this is also the reason why I can open the ring much more smoothly in case of retro-tatting.

When to post shuttle ?
(Common Threads V)

I first learned about posting a shuttle through a ring on InTatters & when I tried it (then & later, too), it didn’t work for me. Don’t know why some things just take a long time to ‘click’ !
Although it hadn’t worked in regular tatting, I did find many applications where it is required – whether posting the same shuttle, the 2nd shuttle, or even multiple shuttles ; whether posting through an unclosed ring or through other elements or a loop. 
Here is my compilation (now updated) which I shared in a recent Craftree thread on posting a shuttle. Of course, now I’ll have to go back & amend my answer :-D

(Most links are to my blog posts which have further direct links to respective tutorials )

  1. Interlocking Rings using shuttle – clearly, without posting the shuttle through the previous ring (before it is closed), there will be no interlocking of rings, whichever method one adopts for the latter effect. 
  1. Interlaced Split Rings – In this 4-shuttle braid, the one shuttle from the 2nd pair is posted through the open split ring of 1st pair, in order to interlace adjoining rings. 
  2. Teri Dusenbury's SQDR (split quadruple directional rings) which are rings thrown off a split ring. These thrown/floating rings twist if shuttle is not posted. 
    Arrow points to the yellow ring where I forgot to post the shuttle. 
  3. Freeform – when the 2nd shuttle or ball is posted through the unclosed ring, the next element (chain or ring) overlaps or is enclosed by the first ring, slightly. 
  4. Cluny Tatting – one small step behind the scenes, especially for multi-Warp tallies, requires the loom shuttle to be passed/posted through the horizontal bars at back. This step allows for easy closing of each Warp , when tally is closed. 
  5. Curled Cluny Leaf 
  6. Ninetta's small Curled Rings or Alternate Methods of Curling Rings – requires the other shuttle to be posted through the ring such that it gets encapsulated within the joining picot. 
  7. Ninetta’s Tiny Tatted Beads – In her 3-shuttle pattern, she posts 2 shuttles through the tiny ring, creating a cute beaded effect. 
  8. Celtic Tatting often requires a shuttle to be posted through elements.
  9. Directional rings - for neater, flatter rings, as demonstrated in experiment above. 
  10. Interlocking Split Ring Braid – consists of a  continuous braid of split rings interlocked together in a row. Made with 4 shuttles, it requires posting one pair of shuttles through the unclosed SR of 2nd pair & so on. Also check out this chainmail-type braid by Ninetta made with only 2 shuttles and her pictorial showing 3 methods here.                                                                                                     
  11.  Enrapt rings – one can wrap shuttle 2 thread around the rings in different ways as experimented here Overlapping Picots on rings & chains 
     
  12. Overlapping Picots in rings – in order for the layered picots to become intertwined & overlap through adjacent picots, posting shuttle is required. 
    14. Intruding Picot (UPDATE) - a new way to make inward facing picots that are hugely versatile and easily applicable in a number of techniques. Simply posting shuttle through an open ring or a chain, leaving bare thread for picot, creates this picot. Numerous applications!

15. Spiral Rings (UPDATE) - Lenka's Spiral rings - posting the shuttle makes rhe ring spiral in fhe opposite direction.  https://tipsaroundthehome.blogspot.com/search?q=Spiral+ring

While 'posting a shuttle' usually refers to dropping it through a closing ring, in a sense the movement is performed when encapsulating the other shuttle thread in most joins such as CWJ, LHP, S2LHP, etc. or perhaps SCMR & LTROR when shuttle is 'posted' through a loop.

But why muddy the waters more – haven’t you had enough of this ‘post’ already ?! ;-P

If you have, thanks for patiently reading through :-D
Thanks for leaving valuable feedback/comments earlier


Related Posts : as linked above (blue text) ,
and