Showing posts with label post shuttle. Show all posts

Wednesday, 16 June 2021

using silk thread

Pin It now!

Melanie wished for some details on how to put silk threads to use, and this post is a short compilation of my projects showcasing some of the ways I've used them along with my thoughts/tips. But first step over to see the silk project she's working on here.

1. Embroidery on paper - 

So my very first project with silk thread, for which I specifically bought a spool, was for embroidery on greeting cards in 1986-87. These are some of the many I and my sis made together. Except for the towers on the left which used 2 strands, the rest all use only one thread.

2. Hand embroidery (single thread) - 

These next 3 are hand-embroidered on handkerchiefs, using only one thread. 
I tried to use the thread for a picot edge but unless the tension is very precise, the silk thread tends to break. I finally settled on coloured sewing thread for the edges.
I've posted details about this here. The sheen and colour choices are amazing! However, ironing needs to be done by placing a damp fabric over the embroidery. Otherwise the threads may singe and fray.
Another hanky where I used single silk thread. These are all old well-used hankies, hence the fraying is visible. For really long-lasting embroidery, I recommend Anchor embroidery thread/floss.
TIP: One tip when using silk for hand embroidery - Use short lengths. Long threads tend to unravel or knot. More importantly, the thread frays due to friction with the needle eye. My solution is to keep moving the needle along the thread so that it does not cut through the thread at one point. It works really well, as in the next project ... 

3. Hand embroidery (multiple threads) -
Here I used 3 strands of silk (1 from each spool - yes, I bought several in the same colour, LOL). Working with multiple strands of silk is not an easy task since unlike embroidery thread, these are smooth and do not adhere together. But where there's a will, there's a way!

This is also the go-to thread for another form of hand embroidery - Phulkari, a traditional style with geometric designs that fills up the entire fabric from the front! The Punjabis use brilliant colours to fill up the spaces. I am not much into symmetrical patterns, hence have never tried this stitch/pattern.

4. Machine embroidery -
Above is my sole venture into machine embroidery. I deliberately went freeform with the neck coz I could not manage to 'stay within the lines' - my design choice, haha. It is for my MIL's nightie way back.
It took a lot of manoeuvring to get the tension right and avoid breaking thread midways. I managed successfully for the most part, but not always.
This is nothing compared to what my Mom could do, including using a horizontal needle to couch over. It was mesmerising to watch how she moved the hoop on the machine with one hand, while turning the hand wheel with the other, phew!

5. Tatting - 
Finally, tatting with silk. Above is my first venture with single silk thread tatting back in 2014. The sheen is not very clear here. I simply let my shuttles take the lead, belting out a freeform braid. As you can see, it has rings, chains, split rings, onion rings, floating rings.
I found it surprisingly easy to tat, except for the eye strain. Thread moves smoothly and surely, rings close neatly. There wasn't a single break throughout! And see how dainty it is.
TIP: Before closing the ring, if you post the other shuttle through the open ring, it creates an overlapping and enclosed effect!!!!
See how the threads seem to emerge from within the topmost ring? It happened when I posted the other shuttle through the ring before closing it. And the chain seems to emerge through the ring!
The flaws in tatting are purely my lack of skill at the time.

6. Tassels - 
Then of course, the common use for silk threads, as advertised when selling, is for tassels, as in the above bookmark. Long tassel earrings are a rage at present.

Silk thread brands in my stash - 
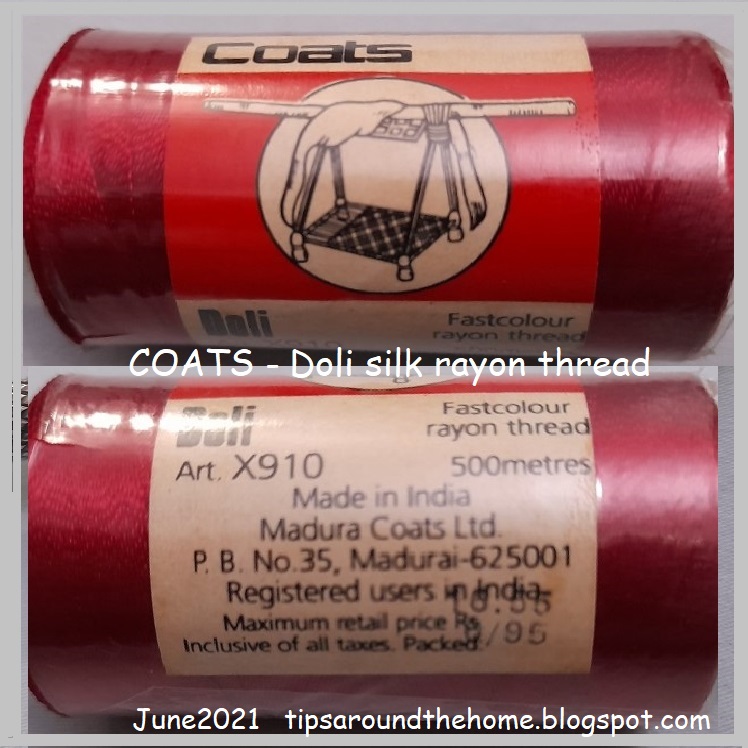
I was asked about the colour fastness & brands of these silk threads. Above are the 3 brands where the tags/sleeves are still intact. Below are each with clearer details ....
I like this Coats' Doli brand the best. The spool itself is tightly wound, as is the thread. I prefer this for machine embroidery.
Besto is another I have several spools of. Both the thread and the spool are not as tightly wound as Coats. But colours are gorgeous - lots of pastel shades.
Codak is from my MIL's leftover stash. I have 3 or 4 colours in this brand, which appears similar to Besto, except that the spool is smaller. No thread details on the sleeve, except for colour fastness.

I have a few twisted strands of silk thread as well, but forgot to take a pic. Maybe I'll add a pic tomorrow. So do check in tomorrow ....
UPDATE - Here's my complete silk thread stash -
The 5 wooden spools are vintage pure silk threads (at least 60-70 years old) as I'd mentioned in my earlier post. 
On the left are some skeins of Opella brand silk threads. Some have been used, others are still intact after decades! The tag says 'Fast to Bleach' (does that mean it is bleach-proof?), and it has the shade number as well, unlike the other spools.

UPDATE - This is what Kathleen Minniti says in her comment below - NO CHEMICAL BLEACH EVER ON SILK! It will literally dissolve silk to nothing. The label may be referring to fading from sunlight; laying garments out in the sun to "bleach" has been a time-honored method of lightening cotton and linen fabrics.

On the cards below Opella, are leftover lengths from projects.
And under that is my new metallic thread stash that I will show you once I've tatted with it!

Thursday, 16 June 2016

a post about post - reposted

Pin It now!
…. where a simple doily round leads to musings & experimentation on rings and when to post a shuttle.
Wiosna 2016
A doily tat-along by Renulek
Measures 11½” in size 40 Anchor Mercer 4054-0300
Another very easy, leisurely round. I was scared of messing up the alternate floating/thrown rings – one with decorative picots, one with single small picot. But frequent checking kept me on the right path, phew.
There is one thing that has me flummoxed for a long time : the directionally tatted (frontside/backside or RODS) rings don’t close as flat as normal rings. Off & on I had experimented with many different tweaks but nothing seemed to work.
I took this opportunity, to experiment further. The rings were small and a botched experiment would not be too visible.
I was surprised at the trial result, and happy to have found a solution that works for me. And in my usual way, I didn’t stop at that. My curiosity to see how different ways of tatting & closing rings compare with each other led to this small experimentation below. The model is accompanied by a table with all details.
This may not be ‘original’, but it is part of my own learning process to make my tatting better.

Dear tatters, what is the secret to Your perfect rings  ???? 

R – ring ; FR – floating/thrown ring ; DS – double stitch ; RODS – reverse order DS ; fs/bs – frontside/backside ; fhs – first half stitch ; shs – second half stitch ;  post shuttle – pass shuttle through ring from front to back before closing ring ; . – close ring ; – – picot.

Points to ponder :
  • Base of ring at closure – in the images, point of closure of each ring lies on the right.
  • Does the core thread emerge from ‘front’ or from ‘back’ – after shs, core thread emerges from the front ; after fhs, it lies behind.
  • Size of the ring – perhaps there is a difference when closing small versus large ring ?
  • Desired shape of ring – tear drop or rounded.

All rings in the pic are 5 – 5 
Except for #1, all lower (aqua) rings are RODS (directional or fs/bs tatting)
Pink rings are thrown/floating rings.
Reverse Work before & after each lower ring.


For a long time now, I had been following Frivole’s tip in Ring 4 of adding an extra shs before closing ring, when working from the front. 
In the latter half of Round 11, where the rings were 4-4, and worked from the back (after reversing work), an extra shs and posting shuttle (as in Ring 9 above) seemed to work, making me happy.

But look what happens in Round 12 where the ring is 8-8 :
In these 'larger' directional rings, before closing, I added a 1st half stitch and posted the shuttle. They lie so much better than the first one on left which was extra 2nd half stitch and post shuttle ! I'm not sure whether size of ring is the reason ... that will require more trials to determine. 
Let's just say that we have many options to choose from as the situation demands.

What I also noticed is that the ring tends to remain slightly open, & requires one final tug to close it completely. Perhaps this is also the reason why I can open the ring much more smoothly in case of retro-tatting.

When to post shuttle ?
(Common Threads V)

I first learned about posting a shuttle through a ring on InTatters & when I tried it (then & later, too), it didn’t work for me. Don’t know why some things just take a long time to ‘click’ !
Although it hadn’t worked in regular tatting, I did find many applications where it is required – whether posting the same shuttle, the 2nd shuttle, or even multiple shuttles ; whether posting through an unclosed ring or through other elements or a loop. 
Here is my compilation (now updated) which I shared in a recent Craftree thread on posting a shuttle. Of course, now I’ll have to go back & amend my answer :-D

(Most links are to my blog posts which have further direct links to respective tutorials )

  1. Interlocking Rings using shuttle – clearly, without posting the shuttle through the previous ring (before it is closed), there will be no interlocking of rings, whichever method one adopts for the latter effect. 
  1. Interlaced Split Rings – In this 4-shuttle braid, the one shuttle from the 2nd pair is posted through the open split ring of 1st pair, in order to interlace adjoining rings. 
  2. Teri Dusenbury's SQDR (split quadruple directional rings) which are rings thrown off a split ring. These thrown/floating rings twist if shuttle is not posted. 
    Arrow points to the yellow ring where I forgot to post the shuttle. 
  3. Freeform – when the 2nd shuttle or ball is posted through the unclosed ring, the next element (chain or ring) overlaps or is enclosed by the first ring, slightly. 
  4. Cluny Tatting – one small step behind the scenes, especially for multi-Warp tallies, requires the loom shuttle to be passed/posted through the horizontal bars at back. This step allows for easy closing of each Warp , when tally is closed. 
  5. Curled Cluny Leaf 
  6. Ninetta's small Curled Rings or Alternate Methods of Curling Rings – requires the other shuttle to be posted through the ring such that it gets encapsulated within the joining picot. 
  7. Ninetta’s Tiny Tatted Beads – In her 3-shuttle pattern, she posts 2 shuttles through the tiny ring, creating a cute beaded effect. 
  8. Celtic Tatting often requires a shuttle to be posted through elements.
  9. Directional rings - for neater, flatter rings, as demonstrated in experiment above. 
  10. Interlocking Split Ring Braid – consists of a  continuous braid of split rings interlocked together in a row. Made with 4 shuttles, it requires posting one pair of shuttles through the unclosed SR of 2nd pair & so on. Also check out this chainmail-type braid by Ninetta made with only 2 shuttles and her pictorial showing 3 methods here.                                                                                                     
  11.  Enrapt rings – one can wrap shuttle 2 thread around the rings in different ways as experimented here Overlapping Picots on rings & chains 
     
  12. Overlapping Picots in rings – in order for the layered picots to become intertwined & overlap through adjacent picots, posting shuttle is required. 
    14. Intruding Picot (UPDATE) - a new way to make inward facing picots that are hugely versatile and easily applicable in a number of techniques. Simply posting shuttle through an open ring or a chain, leaving bare thread for picot, creates this picot. Numerous applications!

15. Spiral Rings (UPDATE) - Lenka's Spiral rings - posting the shuttle makes rhe ring spiral in fhe opposite direction.  https://tipsaroundthehome.blogspot.com/search?q=Spiral+ring

While 'posting a shuttle' usually refers to dropping it through a closing ring, in a sense the movement is performed when encapsulating the other shuttle thread in most joins such as CWJ, LHP, S2LHP, etc. or perhaps SCMR & LTROR when shuttle is 'posted' through a loop.

But why muddy the waters more – haven’t you had enough of this ‘post’ already ?! ;-P

If you have, thanks for patiently reading through :-D
Thanks for leaving valuable feedback/comments earlier


Related Posts : as linked above (blue text) ,
and