Showing posts with label handkerchief. Show all posts

Saturday, 3 December 2022

footprints on the sands

Pin It now!

... of time and tatting. Today I complete 10 years of blogging and it is the 800th post. These are mere numbers but mean a lot to me. 800 posts that each contained some tip, idea, experiment, option... At times 10 years seems like a long time; and yet like a short period, not enough to accomplish all my goals. Did I leave any footprints during this journey? Some faint ones perhaps which will soon be washed away. 

Incidentally, my first post on 3rd December 2013 was on tatted edgings! 

And now these pics from Judith Connors kind of summarise and symbolise my online tatting journey. I wouldn't be here, wouldn't have improved and learned so much without the help and guidance of the community; without their willingness to share freely of their expertise, patterns, and resources.

The lace - design shared freely by Robin Perfetti; tatted by me, in Lizbeth size 80 threads gifted by Sharada R; gifted to Judith who mounted it on a plain white handkerchief. This is what she wrote - 

'If you look at the close-up you’ll see that I crocheted around the raw edge first and then slip-stitched/top-sewed your lace to the crochet. I love how it all came together. When Queensland Tatters next have a display of their lace I shall place our combined effort in there too.'

This 'combined effort' is what my online experience has taught me. It may not always be an overt collaboration but the moment we tat somebody's pattern or when we share something that gets picked up another, the community grows, evolves, thrives.

Speaking of which, Judith also sent her beaded version of the Reflections Snowflake - a gift we send to anybody who completes an Endrucks' pattern.  

I had extracted it from the 100 year old Endrucks' pattern #17; it was modified by Ninetta Caruso and Anna Tedesco; tatted by several of our recipients in their own unique versions, including this sublime beaded beauty.

Endrucks 1920 Project, a huge milestone in my tatting journey, is pure collaboration! I will never reach any pinnacle of perfection and am aware of my limitations. Yet it makes me immensely happy to be able to pass on whatever I have learnt or discovered along the way. 

While the tatting community is growing, the blogging community is shrinking. Blog Land is getting a bit lonely with bloggers dropping off in favour of other platforms. Irrespective, I join those who persevere - I find it the best long-term platform and with absolute freedom to present and express in any kind of format. Let's see what the next years will bring ....

💓Cheers! And a huge thanks to the tatting community at large!💓

Wednesday, 16 June 2021

using silk thread

Pin It now!

Melanie wished for some details on how to put silk threads to use, and this post is a short compilation of my projects showcasing some of the ways I've used them along with my thoughts/tips. But first step over to see the silk project she's working on here.

1. Embroidery on paper - 

So my very first project with silk thread, for which I specifically bought a spool, was for embroidery on greeting cards in 1986-87. These are some of the many I and my sis made together. Except for the towers on the left which used 2 strands, the rest all use only one thread.

2. Hand embroidery (single thread) - 

These next 3 are hand-embroidered on handkerchiefs, using only one thread. 
I tried to use the thread for a picot edge but unless the tension is very precise, the silk thread tends to break. I finally settled on coloured sewing thread for the edges.
I've posted details about this here. The sheen and colour choices are amazing! However, ironing needs to be done by placing a damp fabric over the embroidery. Otherwise the threads may singe and fray.
Another hanky where I used single silk thread. These are all old well-used hankies, hence the fraying is visible. For really long-lasting embroidery, I recommend Anchor embroidery thread/floss.
TIP: One tip when using silk for hand embroidery - Use short lengths. Long threads tend to unravel or knot. More importantly, the thread frays due to friction with the needle eye. My solution is to keep moving the needle along the thread so that it does not cut through the thread at one point. It works really well, as in the next project ... 

3. Hand embroidery (multiple threads) -
Here I used 3 strands of silk (1 from each spool - yes, I bought several in the same colour, LOL). Working with multiple strands of silk is not an easy task since unlike embroidery thread, these are smooth and do not adhere together. But where there's a will, there's a way!

This is also the go-to thread for another form of hand embroidery - Phulkari, a traditional style with geometric designs that fills up the entire fabric from the front! The Punjabis use brilliant colours to fill up the spaces. I am not much into symmetrical patterns, hence have never tried this stitch/pattern.

4. Machine embroidery -
Above is my sole venture into machine embroidery. I deliberately went freeform with the neck coz I could not manage to 'stay within the lines' - my design choice, haha. It is for my MIL's nightie way back.
It took a lot of manoeuvring to get the tension right and avoid breaking thread midways. I managed successfully for the most part, but not always.
This is nothing compared to what my Mom could do, including using a horizontal needle to couch over. It was mesmerising to watch how she moved the hoop on the machine with one hand, while turning the hand wheel with the other, phew!

5. Tatting - 
Finally, tatting with silk. Above is my first venture with single silk thread tatting back in 2014. The sheen is not very clear here. I simply let my shuttles take the lead, belting out a freeform braid. As you can see, it has rings, chains, split rings, onion rings, floating rings.
I found it surprisingly easy to tat, except for the eye strain. Thread moves smoothly and surely, rings close neatly. There wasn't a single break throughout! And see how dainty it is.
TIP: Before closing the ring, if you post the other shuttle through the open ring, it creates an overlapping and enclosed effect!!!!
See how the threads seem to emerge from within the topmost ring? It happened when I posted the other shuttle through the ring before closing it. And the chain seems to emerge through the ring!
The flaws in tatting are purely my lack of skill at the time.

6. Tassels - 
Then of course, the common use for silk threads, as advertised when selling, is for tassels, as in the above bookmark. Long tassel earrings are a rage at present.

Silk thread brands in my stash - 
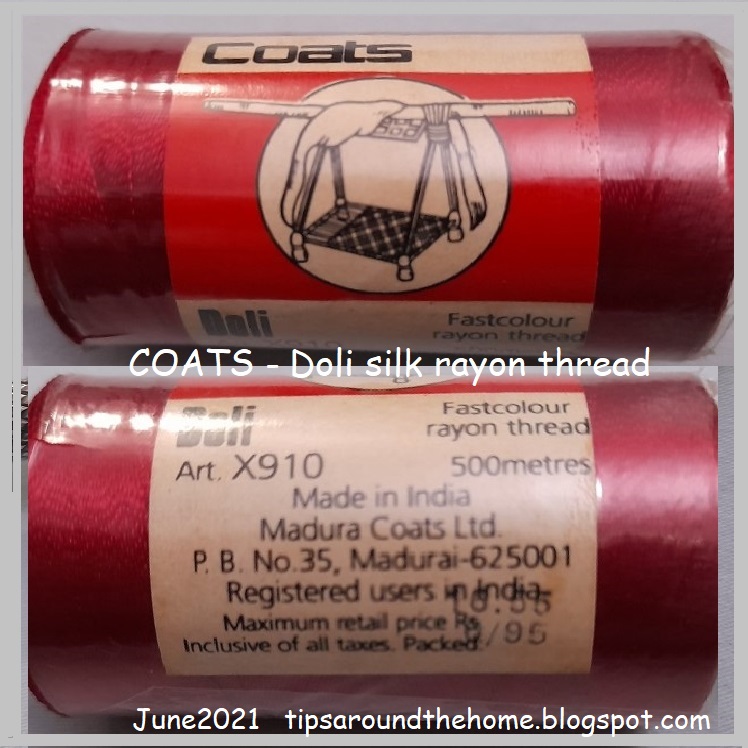
I was asked about the colour fastness & brands of these silk threads. Above are the 3 brands where the tags/sleeves are still intact. Below are each with clearer details ....
I like this Coats' Doli brand the best. The spool itself is tightly wound, as is the thread. I prefer this for machine embroidery.
Besto is another I have several spools of. Both the thread and the spool are not as tightly wound as Coats. But colours are gorgeous - lots of pastel shades.
Codak is from my MIL's leftover stash. I have 3 or 4 colours in this brand, which appears similar to Besto, except that the spool is smaller. No thread details on the sleeve, except for colour fastness.

I have a few twisted strands of silk thread as well, but forgot to take a pic. Maybe I'll add a pic tomorrow. So do check in tomorrow ....
UPDATE - Here's my complete silk thread stash -
The 5 wooden spools are vintage pure silk threads (at least 60-70 years old) as I'd mentioned in my earlier post. 
On the left are some skeins of Opella brand silk threads. Some have been used, others are still intact after decades! The tag says 'Fast to Bleach' (does that mean it is bleach-proof?), and it has the shade number as well, unlike the other spools.

UPDATE - This is what Kathleen Minniti says in her comment below - NO CHEMICAL BLEACH EVER ON SILK! It will literally dissolve silk to nothing. The label may be referring to fading from sunlight; laying garments out in the sun to "bleach" has been a time-honored method of lightening cotton and linen fabrics.

On the cards below Opella, are leftover lengths from projects.
And under that is my new metallic thread stash that I will show you once I've tatted with it!

Thursday, 30 July 2020

starting

Pin It now!
After what seems like ages (certainly months), I finally got some uninterrupted time to tat. Blissful!!!

This is Robin Perfetti's Floral Edging pattern - http://tattingbythebay.blogspot.com/p/free-patterns.html
After much online browsing and even sketching out a couple of my own designs, I finally settled on this beautiful pattern.

So far, I've completed 6 repeats. Worked in Lizbeth size 80, it is 1/2 inch wide and 3" long.
This is for a handkerchief to gift, which is why I wanted something with minimum decorative picots. Makes maintenance easy.
I hope to embroider something in one corner. If not, perhaps some tatted motif.

Tomorrow Ruthie May and I will be starting Robin's Challenge Snowflake.  Join us - more the merrier.
Time permitting,  there are several other little patterns on my immediate list.
Distraction, with a capital D, is my First name obviously ;-D What's yours ?! 

Wednesday, 20 May 2020

lace to fabric QnA

Pin It now!
For several years, tatters have been emailing for some help or other on their current tatting project, term, technique, pattern, etc. It is usually an eye-opener for me, when I have to delve deeper into a method, or come up with a solution. Some of these have been posted as tutorials/pictorials already, several are in the works with pics taken, but not yet presented.

I put in a lot of thought, research, and detail into my response, and have decided to share some Q&A for anybody facing a similar situation. In any case, it makes my life easier when I have a simple link to share instead of re-typing. I may edit/paraphrase/add/organise.

Here’s one such, from one of my dear followers, Emily H, who often comments with a unique perspective. I was pleasantly surprised, and grateful, when she gave me her feedback, along with pics of her final project. Read on ....

  
Question : I want to edge a handkerchief for a friend, but I want it to be usable and washable. I know cotton shrinks, so what would be the best prep for that? I had the thought to tat my lace and then wash it so it would shrink and then cut the handkerchief to the size it ends up.  Attaching together after everything is preshrunk. I am thinking like a seamstress though and don't know how these same principles apply to cotton thread. 

Answer :
Sharon Briggs has some sound advice – scroll down to Washing. Personally, I am a bit scared of her boiling water part.  

Suggestions based on my experience - 

1. Thread size and brand. 
Anchor size 20 definitely shrinks. Not sure about Lizbeth 20, though MIL says her Blossoms remained fine.
But size 40 and 80 should not shrink.
This is evident in the stretch of a thread (my observation).
Hence decide according to thread size you are using. 

2. Definitely wash and shrink the cotton fabric. It will also remove sizing, if any.

3. Is it possible to give washing/care instructions to your friend, and will she follow them? If yes, then despite which size you use, ask her to block the lace (simple rolling pin method works fine, without hassle) after wash, while still damp. Or iron on wrong side while still damp.

4. Try to avoid too many decorative picots. Fewer the picots, easier to care and maintain.

5. If there is a corner in tatted lace - In such cases, I sew on each side (to pre-shrunk fabric) as I finish tatting it, so that placement is precise. 

6. In case of a simple braid, I tat a shorter length than that required, and start sewing it to fabric. The short span can then be tatted and sewn to precision without fear of overlap of any extra bit.

Some links on how to attach lace to fabric : Tatters frequently post their tips and favourite methods but I haven’t collated them all. Here are a mere handful -

Feedback : Thank you! That was all so helpful. I found in my stash a ball of DMC size 30. This was my first time using anything other than ordinary crochet thread (20?) at first I had several breakages, but they got less and less as I went on. I forgot your 5. tip and tatted the lace in a complete square, then measured it for fabric size. 
I did brave the boiling water trick from the link and pressed with a hot iron after wards and it shrunk in 1/2 inch. I also forgot to look at the video on how to attach lace and managed as best I could. I finished it just in time to mail to my friend before her wedding. 


Isn't it a beautiful piece of tatting and a wonderful gift to a friend?!

So what is Your favourite method? Please do share any tips or links and I will add it to my post or the tatting Resources page. 

UPDATE : Kathleen Minniti and Ninetta Caruso have graciously shared their expertise and tutorials/tips on this topic ! Don't miss their pdfs and post detailed here - https://tipsaroundthehome.blogspot.com/2020/06/why-tatting-is-thriving.html 

Sunday, 2 September 2018

gifts with tatting

Pin It now!
for a relative – a card, snood and handkerchief... 

gluing old tatting to a card
is creative ; not at all hard!
Remember the Butterfly Edging card when I elicited suggestions? 
This is the After pic, with 2 more Josephine chains on opposite corners.

I think this simple addition has been successful in 
maintaining the integrity of the composition, 
while closing in the bare white space ?

And I finally found my stick-on embellishments (flat-based pearls, rhinestones, etc). So keep an eye out for more SOUP cards  ;-P  

a doily is very good
for an instant snood!
Remember this beautiful Cherry Blossom doily by Hye-oon Lee? 

To cover the large negative space and add body, I tatted a central medallion (all rings : 7+7). 
I wanted to maintain the beauty of the lovely pink round, hence chose brown. 
On second thoughts, pink would’ve created a much better dahlia-like effect!

With a diameter of 4½”, it was the perfect candidate for a snood for MIL. 
This specially tatted one I gave her was small (at 3½”) and instead she’s been using Konior’s spinning wheel glass mat (4” in size 40).

Including the finished size of projects in my posts has helped.
And what a coincidence! The name of the doily has blossom in it ;-D Serendipitous! 
TIP : With all those rings in the outer blossoms, one can easily weave the ribbon differently and alter the size of the snood.

on an edging pattern raid
I found Jane’s leaf braid!
Remember the Blossoms corner motif? 
What's a hanky without an edging?! Jane McLellan's Leaf Braid was the perfect candidate. 
Worked in size 40, the rings resemble the motif leaves and is not overbearing.

 Here they are, all sewn up, on the hanky. I think the braid was 39" long and 5 to 7mm wide. 

TIP : I tat a slightly shorter length of edging than is required, and start sewing it to fabric. This gives me an exact idea of how many more repeats are required to connect to the start. It works for me - whether it is for a cushion cover, saree, or hanky.

This time I sewed down through each picot, since it is meant to be given away….
for myself, I would’ve shied away from that extra sewing! 
White sewing thread and stitch at the back is hidden within the folds of the hem. 
I actually went round twice - first tacking between rings, then zigzagging through picots..

Hope you enjoyed this post. Some of my next posts might be pictorials of multi-coloured Cluny tatting – fair warning ;-P I’ll try to intersperse them with regular tatting and patterns to keep my sanity as well as yours!