Showing posts with label how-to. Show all posts

Saturday, 13 January 2024

association

Pin It now!

 When we come across a new tatting term/technique, always try to place it within the larger set of techniques you already know. You will be surprised to find that you might already know the technique or at least parts of it. And then learning becomes easier, smoother, and associative.

One of the first messages waiting for me yesterday morning was about the Loop Tatted Ring (LTR) in the Christmas Star pattern by Krystyna Mura, an E31 adaptation. [pdf: https://drive.google.com/file/d/1fz0Hd9jgGnS_qWKayw4UX2Ikr-mp-npb/view]. It starts with a LTR over a bead. 

Despite the video and pictorial links suggested in the pdf itself, Ulrike found it difficult to grasp. I, too, watched a few videos, consulted a few tutorials and found that it could indeed be difficult to grasp, despite the resources themselves being good.  For one, they were all about a LTR on a ring which meant there are too many loops to consider, keep track of, and can become confusing.

That got me thinking and here's how I went about it. Deconstruct the LTR and you will find the basic concept, or at least some steps, is something you might've done before.

Step 1. Can you finger-tat?

Step 2. Have you tatted a single shuttle split ring (SSSR) Mathew Takeda style?

If the answer to both these questions is YES, then you are well on your way to tatting a Loop Tatted Ring! 

Very soon, she came back with her SSSR braid , having consulted a few resources listed in my Resources page [https://tipsaroundthehome.blogspot.com/p/tatting-resources.html]

Step 3. Now tat an entire ring using only the finger-tatting method. After all finger tatting with a loop employed for part of the segment of a SSSR is exactly what you do in LTR, but for the entire ring! 

And by jove, she got it! All within a few hours.

Step 4. Now we can tat the LTR over a bead easily as shown in several tutorials. 

I had written the entire post yesterday but then thought a limited/specific pictorial would help other tatters facing a similar issue, to work this lovely Star pattern too. Hence today I created a stepwise how-to for Rounds 1 & 2 of the pattern. I also took the time to read Miranda's post and pictorial again after several years and discovered the similarities of association! She also gives a nice history of this technique. I apologise for the unintentional repetition. Unfortunately Sabina Madden's site is down though she is trying to find another server to reinstall paradisetreasures.com.


LOOP TATTED RING for E31 STAR - pictorial pdf - https://drive.google.com/file/d/19q6JKdOyACqh8oz-Z0vzHgh-YCIZ5xBd/view

Now a Loop Tatted Ring or LTR is not limited to a LTR on Ring (LTROR). It can be used in several different ways, including on a chain as a thrown ring [https://tipsaroundthehome.blogspot.com/2021/08/thrown-floating-and-8-rings.html pages 7-8 in the pdf] or after a chain. 

Here it is used as a central ring. We could've used a normal ring or a mock ring. But with both methods, we would not have been able to seamlessly add the bead through both threads to resemble the bead on a picot. LTR allows us the freedom to work continuously with the bead. In a lot of circumstances LTR allows us to tat something that would normally require a 2nd shuttle.


Related Posts
-
https://tipsaroundthehome.blogspot.com/2016/07/refresher.html

Friday, 28 August 2020

locked in a rope

Pin It now!

Part 3 - final post of the chain maille pictorials, based on Ninetta Caruso's posts. You can find my previous pictorials here - Part 1 ; Part 2.

So far, we have seen 3 methods/variations (and more listed) of the Interlocking Split Rings that create a 3D chain maille effect. The chain or braid so made, whether with 1, 2, or 4 shuttles, remains linear with clearly distinguishable rings. Ninetta has cleverly twisted the chain into a rope that spirals on itself! Let's see how ....


D. Interlocking Split Rings - Rope Chain

ref : Ninetta Caruso's gold rope chain pictorial
(interlocking split rings - chain maille variation of Kathy Niklewicz's method)

The only difference from the pictorial shared in Part 2 (C), is that instead of pulling a loop through the previous ring, in order to make the next ring, the loop is pulled through the last TWO rings. This collapses the rings, bringing them closer and also creates a gradual twist.

Red is shuttle 1 with cream thread ; yellow is shuttle 2 with variegated thread.
All split rings are 10/10 (since the thread is thick)

 
D-1 : 3 interlocking split rings have been made as in C here. Insert hook from the back through previous 2 rings....
D-2 : ... and hook the shuttle 1 thread ...

 
D-3 : ... pulling it to the back.
D-4 : Pull the loop long enough to wrap around the hand to make the next split ring.

 
D-5 : As in previous pictorial, leave some bare thread before starting the 1st side. 10ds made. Ensure shuttle2 thread is inside the loop.
D-6 : Leave bare thread and work the 10 unflipped stitches for 2nd side.

NOTE : I was so focused on the steps and photographing every detail, that I missed the larger picture! Leave More bare thread I  order for each ring to twist more into a rope-like weave.

 
D-7 : Close ring.
D-8 : Repeat steps to work as many interlocked split rings as desired. As the rope grows longer, it starts to twist - hence the term rope chain. The rope looks superb from the side!

D-9 : This is how the rope looks from the shuttle 1 side.


E. Interlocking Split Rings - Beaded Rope Chain  
ref : Ninetta's Rope Chain bracelet in black and silver with red beads

A short pictorial that follows the previous (D), but with a bead added before each ring. Of course, more seed beads can be added along the edges, etc.

 
E-1 : String beads on shuttle 1.
E-2 : Before starting 2nd ring, move bead to the base. In image, a bead is moved before starting 3rd ring. Insert hook through 2nd ring to pull back a loop for the 3rd ring. These will form a chain maille as in Part 2 (C).

 
E-3 : 3rd ring made. Now we start the rope chain variation. Move bead to base of previous ring (not shown in pic), insert hook through rings 3 AND 2 ...
E-4 : and pull back the loop for 4th ring. 
TIP : Try to be consistent in the position of the threads throughout. I kept the bare thread and loop 'behind' the bead always.

 
E-5 : 4th ring complete and bead brought forward before next ring. Notice how the rings are now very close together, with greater overlap. The chain maille interlocking effect seems to get lost.
E-6 : Insert hook through rings 4 AND 3 to pull back loop for next ring.

 
E-7 : Repeat steps from E-3 to desired length.
E-8 : As seen from the side.

This rope can be quite addictive! I stopped only on running out of thread. Notice the twist?

To finish, beads are strung through the leftover tails, ending with a 6-bead ring/flower, and hiding the ends within a few beads. Add a clasp to the starting ring for a bracelet or a necklace.

There is a tendency for a horizontal thread to show up across the side of each ring. It could be the shuttle1 thread across the 1st side of ring, or shuttle2 thread across the 2nd side (as in my first trials in previous post). 
TIP : To Avoid Visible Bare Thread : By keeping the bare thread at the start of each side of split ring short, this horizontal bar can be avoided. While the bare thread is important to create a play and twist, keeping it as short as possible eliminates its visibility.
Ninetta's TIP : Another possible way is if we use 4 shuttles instead of 2, as in Ruth Perry's models. Or one can use a thread colour and size where it is not immediately visible.

This is it for the present, although I will some day come back to try out other methods (see complete listing here - https://tipsaroundthehome.blogspot.com/p/tatting-resources.html), as well as a couple of project ideas I have applying these effects. I did intend to tat with metallic, but time is at a premium and I need to get back to completing the hanky edging as the deadline quickly approaches.


Longtime readers of my blog may have noticed that I rarely create pictorials of something that is already in public domain, preferring to cite links, unless I have something different or something more to offer. Or, as in this case, when a tatter specifically requests. Hence I cannot thank Ninetta enough for her gracious permission to upload these pictorials, and her willingness to provide valuable feedback and insight. 

And by extension, my thanks to all tatters, teachers, designers mentioned in these 3 posts, who were instrumental in adding a valuable link to our ever-growing Tatting chain!

Friday, 8 May 2020

captured onion rings

Pin It now!
Ninetta has been posting a comprehensive study of Onion Rings – their construction and variations – along with pictorials and tutorial links. A must-read for anybody wishing to learn, explore, or improve. A sumptuous dish!
My guess is that Marilyn followed one of those links to my blog and left a comment for help with captured onion ring
Ever since I tried it here for the first time, I have been hooked to this method and have used it consistently with good effect. I think this is a good excuse, and opportunity, to present a stepwise tutorial.

Captured Onion Rings
Kathleen Minniti's method

BACKGROUND :
Captured Onion Rings are a pair of concentrically placed True rings. These true rings can be tatted with the same shuttle, or with different shuttles for a 2-colour version.

Aurora Lozada first shared her Perfect Onion Ring method (pdf) in 2014 with the Online Tatting Class. She captures the inner ring between the core and working thread After making 1ds. Thus the inner ring is captured Between adjacent stitches of the outer ring. After closing the outer ring, the emerging thread is offset by the 1st ds. 

Kathleen Minniti improvised Aurora’s method to capture the inner ring Within the 1st half-stitch of outer ring. After completing the outer ring, the thread emerges from the center.

I can now understand Aurora’s method, but am still unsuccessful at executing it! Kathleen’s method is like tatting over tails, substituting the inner ring for the tail. I can do that - and if I can, You certainly can!  

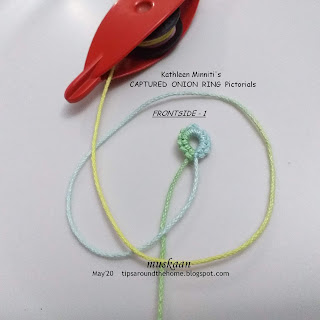
Captured Onion Ring Pictorial - FRONTSIDE

I have used a single shuttle for the pictorial. 
Inner ring : 6 – 6.
Outer ring : 10 + 10.
1. Tat inner ring. Close ring and loop the thread around to start outer ring.

2. Hold in pinch.

3. Start 1st half stitch – under ….

4. …..over

5. 1st half-stitch seen clearly after the flip, but do not snug.

6. Pass the inner ring through the open leg of this 1st half-stitch. Follow the core thread (just as in tatting over tail).

7. Bring the leg to the base of the inner ring by wiggling your left index finger, and

8. snug tight. Make sure the stitch is as close to the base as possible, and that the core thread slides freely.
9. Make the 2nd half-stitch (over-under) and

 10. snug normally. 1st ds complete.

11. Tat around the inner ring, joining to the picot. I used the ball thread or onion ring join

12. Close the outer ring normally. A pair of concentric or onion rings is ready.


In the above ConcentriCITY snowflake, there are 3 concentric rings where the outermost is a chain or mock ring. To bring the shuttles in position, the middle ring is worked backside. This is what Marilyn was referring to. Hence here are a few pics showing the backside working of the captured onion ring.

Note: In directional or frontside/backside tatting, the sequence of half-stitches in a ds is reversed (hence called RODS – reverse order of double stitch) working 2nd half before 1st half-stitch. 

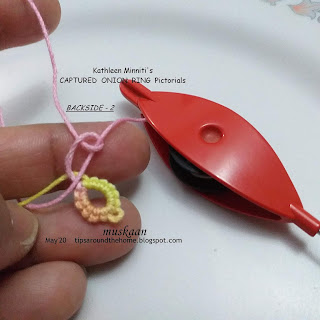
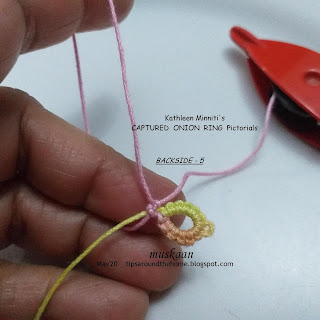
Captured Onion Ring Pictorial - Backside

In this pictorial, both rings are worked backside, but this is not compulsory.

1. Inner ring worked backside. Loop the thread around to start outer ring, and pass shuttle over-under to make the 2nd half-stitch.

2. 2nd half-stitch made, but do not snug.

3. pass the inner ring through the open leg of the half-stitch, following the core thread.

4. Snug the stitch as close to the base of inner ring as possible.

5. Make 1st half-stitch. 1RODS complete.

6. Continue around, joining to the picot, and close the outer ring normally.

7. This is how it looks from the front. (There is some inadvertent space left at the base - the ring should've been pulled close more tightly to avoid that pink line).

Note : This method is so basic that it can be used even for chains/ mock rings, etc. , either in onion rings or in other situations. 


Hope this answers your question, Marilyn?


Many many thanks to Aurora & Kathleen :-) 
My onion rings have certainly improved!  

UPDATE : Comparison of Captured Onion Rings - original and variations!

Monday, 29 April 2019

Jeanie's tips

Pin It now!

When I shared my tips on how to keep tatted motifs uniform, I received a lovely email from tatter & teacher Jeanie enumerating her own list. Now she’s been working on an altar cloth that already has over 400 motifs tatted over a span of years. She’s guessing somewhere between 600-800 hours spent on it, with another 200 hours’ work still left. She’s had 2 mishaps with dye-lots and one with staining due to some finger nail polish. This experience is reflected in the tips.
So, let the master speak! A few of the points have already been covered in my list, but I’d like you to read it in her own words …..

How To Tat Uniform Motifs and Medallions (contd.)
especially for long-term projects
Jeanie Schekel

"In my experience, most patterns require the motifs to be joined as the last round is tatted so the blocking is done after the motif is added. I usually only block nightly. I have seen a few patterns where two sizes of motifs are used and one size is joined by a smaller motif. This type of pattern would allow one to block some of the motifs before joining. Because my project was so large, I used a grid as a guide and marked on the grid the progression and completed motifs.
(She sent me this pic in Dec, 2018)
1.      I would suggest that one make several motifs and compare them before you begin the project.
2.      Measure the thread for one motif and calculate the amount of thread needed and make sure you allow for a mistake or two, so you will have enough of one dye-lot. 
3.      Write down every detail from starting with continuous thread, and any adjustments you make in the pattern, just in case of an emergency that can interrupt your tatting time. Time can affect your memory.
4.      Note where to add magic loops.
5.      Tat most of the last round calculating where to begin joining, and repeat the exact process as often as possible - saves time, calculations and mistakes. 
6.      Don't let a lot of time lapse between motifs. A month is too long for me.
7.      Don't tat other projects with another size thread while tatting this project; it can affect your tension.
8.      When tatting with white thread, you can avoid any discoloration from body oil.  Tape part of waterproof bandages, or liquid bandage painted on the area where the pinching finger and thumb touch the thread, as well as the palm side of the finger where the thread wraps. The sweaty side is the inside of the fingers that touch the thread."

♡♡♡

As you may have deduced from both lists, consistency is the key. Consistency even in the most minute of details, especially if it is a long-term project. 
As always, your input and feedback is valued, so do say something :-)

Many many thanks, Jeanie

Monday, 25 March 2019

uniformly tatted motifs

Pin It now!
A week back I was tagged on Facebook for suggestions on how to make uniform medallions. I love to receive such questions 'coz it gets me thinking and helps me understand better through a fresh new look. I listed 8 common factors at the time, 2 of which she had already suggested (#6 & #7). The following list has been refined and updated and will hopefully be of use to relative beginners.

How To Tat Uniform Motifs and Medallions 
This is a generalised list of 10 factors. There may be pattern-specific factors that may affect uniformity which are not covered here. For instance the swirl join in the model below. 

1. Thread
Mercerised crochet cotton which is tightly wound will keep stitches even, unlike perle/pearl cotton. Experienced tatters can work equally well with any thread.

2. Personal experience
One’s tatting tension improves and becomes more consistent the more one tats.

3. Familiarity with pattern
Sometimes the first working of a new pattern may not be representative since we are intent in figuring out the pattern. Once familiarity sets in, one can focus solely on the work. Hence it may be advisable to disregard the 1st attempt and choose the 2nd motif as a base or reference for future.

4. Template
Scan the chosen motif or glue it over a grid paper to use as template for reference. All future motifs can be placed over it while working to confirm uniform progress.

5. Techniques
Again, consistency and continuity of techniques employed in the pattern.
eg, whether working frontside/backside or traditional; or whether working chains with regular ds or with reverse (unflipped) stitch; and so on. 
In case of Josephine rings and chains, choose whether to work them with first or second half stitch and carry on with the same method. 
Do not change midways.

6. Elements
Consistency in elements is important, especially when working long chains and large rings. Ensure that the stitches are snugged with the same even tension throughout the entire piece.

7. Picot measurement
While uniform picots are visually appealing, the joining picots need to be of the same size to avoid disfigurement. A picot gauge may be a handy tool to use. Detailed article on the choices we have - Measuring the Picot  

8. Joins
Some count the join as a half stitch while others do not. Some prefer a down join to an up join. Whichever way you choose, continue with it throughout.

9. Beads
If using seed beads in the motif, select evenly sized beads.

10. Blocking
Pull motif into shape and use a template to block each medallion accurately. Blocking really helps in 'hiding' minor flaws or discrepancies, so that the final motif becomes a replica of the others. 

Can you add to this list? I love hearing from you!

Related posts

Monday, 24 September 2018

colouring the Cluny

Pin It now!
The current Cluny tatting series has covered how to wind the loom and weave tallies where the loom and weaving threads are either the same colour or different colours. For many more tips, ideas, and possibilities, refer to my earlier series and posts.

We now come to the original purpose of this series – multicolour Cluny leaves or tallies – a glimpse of which you saw here last year.

As usual, let’s go progressively… 2-coloured Cluny tatting. For 2 colours to show on a tally, we will actually need 3 threads – 1 for the loom which is hidden, and 2 for the stripes that are visible.
Adding more threads allows us opportunity to play with colours for the next Cluny leaf or element(s) in a pattern.

I chose to work on a cardboard loom, weaving with a tapestry needle especially when using multiple colours. The process itself is simple, but some management of threads is required as we increase colours (threads). If we choose a flat surface to place our loom while weaving, and lay the unwanted thread on the side, it avoids tangling and weaving can be done comfortably.

To repeat – this same method works on a box loom ; and in any pattern a split ring can be substituted with a regular tally/petal/leaf, and a normal ring with a hanging Cluny leaf.

  • How to add new thread (knotless method)
  • How to hide tail of new thread
  • How to avoid the colour blip from loom thread
  
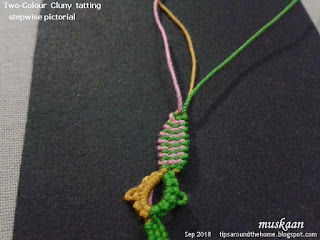
Two-Colour Cluny Tatting
(3 threads and 2-coloured striped Cluny leaf)


Loom/Warp thread - mustard ;
Weaving threads – Colour 1 on the right – green; Colour 2 on the left – pink
Sequence of weaving : green, pink. Colours alternate after each wrap/weave, giving a striped appearance.

You can try different visual effects: from regular stripes to broader bands to random, and from broad to hanging Cluny leaves.


1. The previous element (split ring) already has 2 colours – mustard and green. 
We will add a 3rd thread (pink) while weaving the tally.
Wind the loom as usual, with 3 Warps.
Bring green to the right (Under, Over) and leave pink on the left side.

2. Make 1 pass to the left with green (Under, Over, Under),
place pink over the green ….
(as mentioned in previous post, you can choose your own style of weaving)

 3. … and make the return pass to the right (Over, Under, Over), trapping the pink within. 
Leave a pink tail to be hidden later. 

 4. Snug and tamp down the weaves before proceeding.
Notice the new thread is captured within on the left side.

5. With pink thread, move to the right (Under, Over, Under) …
Scroll to end for 2 ways to hide this new tail. 

 6. … and back to the left (Over, Under, Over)

7. Pick up green and move to left (Under, Over, Under), and return to the right.

8. Similarly, make another weave with pink moving to the right and back to left.

9. Continue, alternating the colours as desired, and shaping the tally as you go.
This tally has 15 wraps and threads are back in their original position.

10. Pass both needles through the top loop, back to front.

 11. Both threads are through the top loop. This will hide the loom thread colour.

12. Top loop pulled off the loom and start closing the tally.

13. Top and bottom loops of the loom are closed.

14. One 2-Colour tally made.

To hide tail of new thread :
Needle the tail and weave it through the back of the tally. 
If we weave under the green thread, then the tail will not be visible at all. 
Snip off excess.

See also tip #12 for hiding tails here and Dagmar’s video here. : In pic #5 above, fold the tail behind to align with Warp1. Then, weave as normal, incorporating/encapsulating this tail within. After a few wraps, the excess tail can be snipped off. 


Next in this series is a 3-coloured broad Cluny leaf (4 Warps), and hopefully a practice pattern for these 2-coloured tallies.

The only 2- or 3-coloured Cluny tatting I have come across is by the talented and prolific Dagmar Pezzuto. In both cases, she has worked hanging Cluny petals or leaves. The principle remains the same. You can find all her Cluny patterns through Georgia’s site here.


… to be continued