Showing posts with label rakhi. Show all posts

Thursday, 7 August 2025

celebration tatting

Pin It now!
We celebrate the brother-sister bond of Rakshabandhan on the 9th of August this year. So I had this strong urge to collect motifs into rakhis, as I have done a few times over the years. 

I had a collection of these rose and floral motifs from past test-tatting and tutorial exercises, and I had intended to arrange and attach them into a necklace or collar to celebrate International Lace Day (June 22nd, 2025). 

Both motifs are adaptations of the central rounds of Eleonore Endrucks' pattern E42 in her 1920 book, ‘Die Schiffchen-Spitzen’, and reworked by Paola Emilia Rotuletti (2021). (https://drive.google.com/file/d/1NgPuAzM83cjVoWvzFaiAIp7UDbuueBB0/view)

The small motif on top is the E42 Roses by Daniela Galli (2025) which she kindly shared for the ILD 2025. Pattern PDF - https://drive.google.com/file/d/1HiDjl4A_CkRcRGqpjhEItWqgEI1bGMhE/view 
There is a small and a large rose, both of which can be worked with a ball and shuttle in one pass.

The large motif below is the E42 Flower Motif by Muskaan (2023). It is my 6-repeat adaptation for my E42 Antiks Snowflake (2023). Pattern PDF - https://drive.google.com/file/d/1U5J5sjuAA7D0qGPOGnK9RJ83MKdNkWSZ/view

I had used the large motifs to demonstrate three ways of climbing out without the need for split chains. https://tipsaroundthehome.blogspot.com/2023/11/game-antics.html

I love lock stitch aka lock chains and simply picked up the knitting cotton size 10 threads in contrasting colours. I worked with one ball and shuttle. The rakhi motifs are all worked in size 20 crochet cotton from various brands.

 
Just so I remember for future, here's how I brought the motifs together with a Swarovski faceted bead (4.5mm) in the center. Pre-string the bead onto a length of thread and slide it to the center; bring both ends through the layered motifs; adjust and wind one end on a shuttle. 
Now from the ball pull off a length similar to one half of the first thread, leave it aside and start tatting a lock chain from the center. When desired length is reached, remove shuttle and again wind it with the other end and repeat the lock chain with ball thread on the other side. The bead remains locked in.

And for the tips, I inserted a bead through both threads at one end, tied a knot niched with the bead and trimmed off the tails. Repeated it on the other side. This seemed the quickest way to finish off the rakhi/bracelet.

The above large motif is from the original E42 center - notice it has 8 repeats.
In fact each E42 rose is also slightly different with tiny tweaks. It's fun to play around.

All together again. Rakhi traditionally has a thin string for tying. However, for a bracelet, one can use broader braids, which are shorter in length with relevant findings instead of ties.
Of course if tatted specifically for a bracelet or rakhi, one can embellish the motifs with beads, picots, etc. Mine are SOUP rakhis hence plain.
💥💥💥💥💥 

Now I had initially collected the motifs back in May with the intention of making a necklace or collar as stated at the beginning.
I played with arrangements using all the motifs at hand. The above could become a necklace with addition of beads and bling...while the one below could be a collar.

Besides these, I had several other arrangements, including asymmetrical ones but deleted the pics someway along the way.

After several possible arrangements, this is what I found the most appealing and settled on it. Tatted ring or curled ring connectors would be used to link adjacent motifs. However I couldn't get myself to accomplish even this simple task and the lace day passed by without any tatting. 

Who knows if the mood takes me I might even free the motifs from the rakhis and rearrange as a necklace. What is your verdict/preference? Leave as rakhis or make a necklace?

NOTE - These are free patterns but please name the designer and the pattern when you make and post And also use the hashtag #Endrucks1920Project.

Many many thanks to Daniela and Paola - always ready to help and share 💕

Related Posts
Antiks Snowflake pattern and more - https://tipsaroundthehome.blogspot.com/search?q=Antiks
Patterns for Rakhi/Bracelets - https://tipsaroundthehome.blogspot.com/p/patterns-designs.html - listed under Holidays, Festival and Jewellery - Hands.
Endrucks, Holidays and Jewellery directories also have some rakhi models -https://docs.google.com/document/d/1w1TZBg-HIzseGEUoJ-rko7tNbtSgZY5A18Oy2Y9Hh0Y/view

Monday, 26 August 2024

starburst fringe

Pin It now!

In my last post I had shared several adaptations of Corina Meyfeldt's Tatted Fringe. Lots of ideas swirled in my head to try out a quick practice pattern, applying all three adaptations viz., tatted fringe, spot/luggage tag fringe, and tatted fringe picot. While I am not fully satisfied with the outcome (it looks especially messy in photographs), there is a lot of scope to play and try something better and different.

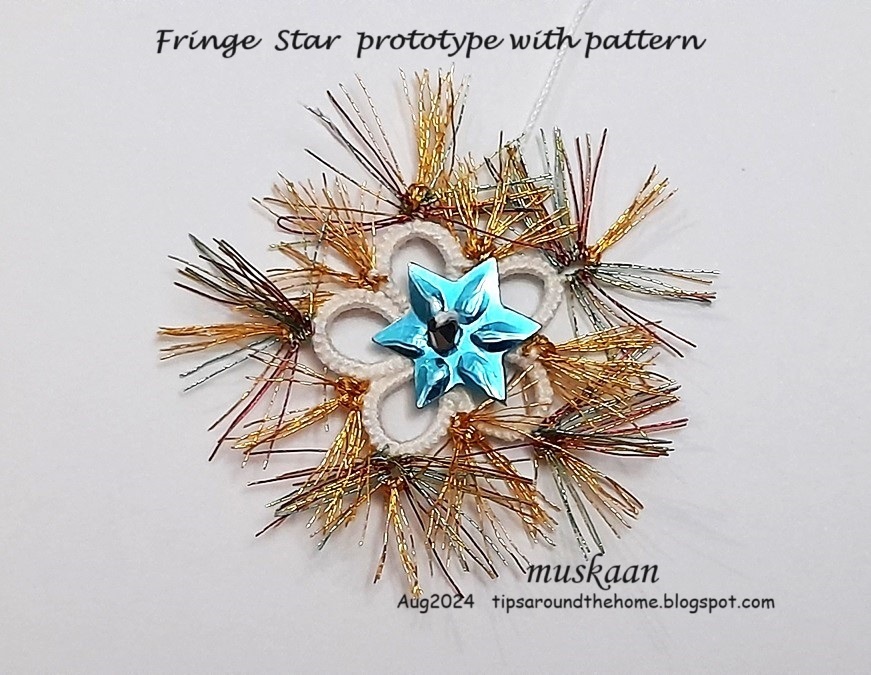
This is the Fringe Star - a kind of practice pattern with a lot of possibilities. 
I got so involved that I forgot to take some process pics.

I started by tying the white (Anchor size 40) shuttle thread with metallic Madeira (Astro 2, No.40) and tatting a chain with measured adjoining picots. This took longer than I bargained for coz the metallic thread is really really fine. However the colourway is beautiful with a range of shades.

Now since the thread was so thin, I feared the picot might turn out to be too small. Hence, after snipping off the tips and dividing them into 5 clusters (eyeballed, not counted!) I divided each further and added a luggage tag in the center of each using Sanbest #34. 
And I wanted a small cluster in the joining picot as well. So, I direct tatted 3 adjoining long picots at the start and between the 5 clusters. 
Future Idea 1 - My original idea was to make layered rings with graduated fringe picots. But somewhere along the way, I decided to simply add the fringe between rings for now.
  
With all the prep work finished, I pushed the clusters further into the shuttle and started tatting. The star body is a simple rosette of 5 rings (6 - 8 - 8 - 6)x5 joining to adjoining ring(s).

However, before starting the ring, bring forth the fringes (Fr) into the loop for the ring.
    For first ring tat 6ds, Fr, 8ds, FrPicot, 8ds, Fr, 6ds. 
    For next 4 rings, tat 6ds +(join to ring: push the Fr towards the top of the picot and join below it), 8ds, FrPicot, 8ds, Fr, 6ds.
    Join last ring to first.

Insert sequin and bead and sew down with the tail and hide the tail end or use it to suspend the star. Trim the fringes.
I wanted a starburst kind of shining aura, hence the long fringe. It is very sparkly when seen in person.
I repeat, it looks especially messy in pics, but there is always room for improvement. 
Future Idea 2 - Use a circle of tatted fringe for the base of a rakhi!!! Or how about fireworks?!

OBSERVATIONS - I'd like to point out that each adaptation has its advantages and this little pattern will help you realize this. 
  • For a fringe picot it is advisable to tat the chain as in Corina's original. 
  • But for spot treatment or to sprinkle a different colour randomly, luggage tags are preferable. 
  • Now if you need fringes on both rings and chains in FS/BS tatting, then you will have to decide and plan beforehand. Decide the number of fringes needed. Then tat the chain in segments of DS and RODS (reverse order DS). 

Future Idea 3 - Tat a motif with spot fringes in rainbow colours! 

Wednesday, 7 August 2024

smiling together

Pin It now!

Ninetta recently surprised me with a thoughtful and gorgeous gift on my birthday. She sent me the pattern for her cute little flowers which she named after my moniker Muskaan which means Smile! What an honour! This sweet Hiding Lady knows how to impress and she shared the Smiling Flowers (rose) pattern here -- https://ninettacaruso.blogspot.com/2024/07/smiling-flowers.html 

This is my adapted application into a rakhi/bracelet choosing to represent our tricolour (tiranga) Indian flag. This month we celebrate our Independence Day and Raksha Bandhan just days apart.
Saffron Marigold impression - Marigolds are considered pure and auspicious flowers and you will find them during any Hindu festival or ceremony.
It largely follows Ninetta's instructions except for the petals on the 2nd row where I used graduated treble tatting with 4 wraps. 
 
White Lotus impression - Lotus is our national flower and also symbolizes purity and peace. 
Although not very clear in the pics, the 2nd round petals have distinctly graduated tds with a pointed tip. Instead of 5tds, there are 7 tds with 1tds(1,3), 1tds(1,4), 1tds(1,5), 1tds(2,6), and ditto on the other side with 5, 4, 3 wraps.   
Blue Center - Clear blue bicone faceted crystals at the center for the Ashok Chakra in the center of our flag. I didn't have any blue bead larger than this.

Tempted to tat one more round of petals for the marigold but I desisted for two reasons - one, I ran out of thread; two, how can a marigold be larger than a lotus, LOL.
( Find treble tatting tutorial/video links here - https://ninettacaruso.blogspot.com/p/blog-page_95.html and on my Tatting Resources page.)

Green Leaves - The third colour of our tricolour is green which symbolizes prosperity, vitality.
Ninetta used the tds rings as calyx for her flowers. I used it to make leaves with more tds and some graduation.
Tatted continuously with a single shuttle, the leaf clusters are connected with a ring braid with pulled loop joins (leave bare thread at the back of the ring and make a lock join to the picot). This will act like a frame to secure the flowers.

Assembled together and attached to a doubled string of beads (12 on one side, 14 on the other for that 'gap'). All sewn in.
The beads are actually silver - like silver lining clouds against a blue sky.

So this is my Rakhi/Bracelet 2024 from Ninetta's beautiful pattern! Over the years, I have often used the tricolour to celebrate August 15th (including Har Ghar Tiranga with the 75 year old coin), and have also shared some of my tatted rakhis. 

And making short work, I am submitting this for Natalie Rogers' PICOT Bingo game, crossing off three boxes --- Treble Tatting Stitch , Add Beads , and Tat a Bracelet

Oh, and I used Anchor Pearl Cotton, size 8, throughout. 
I find the treble tatting stitch quite addictive! I honestly didn't want to stop tatting. If it weren't for the thread and time running out, I would've continued!
In my haste, though I forgot to add a clasp to the beaded ends!

Small 3D flowers always remind me of Carollyn Brown who had made it her personal goal to tat one floral sprig every month for a year! She always managed to amaze me. You can find her blog here - https://tennbrown.blogspot.com/2020/11/

And adding to the all-encompassing nature of this post, this rakhi/bracelet in flag colours is my August submission to splocik's Small Decorations game. Please do head over to the July gallery to check out the talented and diverse submissions compiled there - https://splocik2.blogspot.com/2024/08/male-dekoracje-2024-galeria-lipcowa.html

Thank you my dear partner in crime, Ninetta, for the honour and friendship you bestowed on me. It is precious! Keep smiling, always :-))) 

Saturday, 25 July 2020

applying techniques rakhi

Pin It now!
It's that time of the year again - Rakshabandhan is round the corner and Indian tatters are already posting lovely tatted rakhis. Here's my rakhi for 2020 ... AppliTech rakhi/bracelet!

The portmanteau 'AppliTech' refers to the fact that it is kind of a test or trial or experimental piece for applying a few techniques. It started as an observation piece for the Lock Join Plus methods as posted here - https://tipsaroundthehome.blogspot.com/2020/07/lock-join-plus.html where lock join, reposition threads, SLT, and reverse join (and switch shuttle) were all used in batches, resulting in randomly placed colours on one side.

Then, in response to a question on facebook, I re-demonstrated what I had discovered last year - whether you hold the gauge above the core thread or below it (as in Ninetta's Tuft picot), provided it goes through the leg of half stitch, the final result is the Same!

All tutorial links here, including my study of picots (Interlocking, Mrs Mee, Tuft} - https://tipsaroundthehome.blogspot.com/p/tatting-resources.html
I will share my detailed comparison in next post, along with more observations.

I continued on to make the 3rd Josephine Ring placing the gauge above core thread.
Each ring starts and ends with 1ds, and has a picot after every half-stitch.
Each JR is made of 20 1st half-stitches with a 5mm gauge.

Many of us have already come across this beautiful Lavender sprig by tatting_art on pinterest or Instagram and she has uploaded a how-to video here (thanks for sharing the link, Karen Cabrera).

Next, I started mock rings with treble tat stitch. I started each chain with an Intruding picot which served as the starting picot for first tds, also to join back the chain into a mock ring!

Why mock rings, you ask?! Because I did not know how big the ring should be, what the count should be.  With mock rings,  I had the freedom to keep 'bending the curve' to gauge the chain length.  Hence, no tds count. 

Close-up of the dimensional/stacked flower. Bead was added before starting the last mock ring, by pulling up a loop...
Continued with the Priscilla edging (Fig 29 from her Tatting Book 3), though this time I followed a symmetry in colour placement. Lock Join and Reverse Join are used in alternating chains to move up to the next chain. By direct tatting (unflipped/reverse stitches) every alternate chain, I could tat all from the front. No RW or turn work!
Added findings after it reached 7" length. Anchor Pearl Cotton size 8.

Perhaps with a bit more effort, I could work the 2nd part of the edging to face opposite, rather than appear continuous. But there are a lot more things on my over-full plate ;-P
See you soon ....

Oh, but before I go, Sue Fuller taught my 2017 rakhi (in March) and Bonds of Love rakhi/bracelet (in April? she liked the blue, red, white version) in the Online Tatting Class earlier this year. I didn't get a hold of the logs, though, so have no idea what transpired in the class ;-D

Saturday, 31 August 2019

life without Ts

Pin It now!
Nearly the entire month of August has passed by without my favourite Ts....
Typing (on proper keyboard for blogging, pattern writing, ...)
Tatting (one full fortnight without, and then some !!!)
Tunes (no breath to spare for the extra movement required to switch on my fm)
Tea (my cuppas taste like dishwater - or what I Think the latter taste like 😄).

Thankfully, one T kept me connected when I wanted - my Tablet.
I didn't want August to slide by with just 1 post! When was the last time it happened?!

I've already shared these on facebook to some good reactions....

1. Rakhi 2019. 
This year Raksha Bandhan fell on the 15th. I had assembled with Budding Dahlia Snowflake with a calyx (which later became the Starlet in previous post), bead, and string.
In lower half, the middle petals are raised up for 3D effect.

2. Peacock in the Snow flake
This is a prototype of my 8th snowflake for Land Of Laces' 25 Snowflake Project. I'm going to try adding another round in white to symbolise snow. I uploaded as is so as not to miss out on another Sunday!
I've been a good girl in this project, right, using only regular techniques.  It was time to play .... this one has treble tatting stitch with variation,  giving rise to the serrated outline.

3. Summer Rose Snowflake
This has a very long and interesting evolution (that story for another post),  and I am finally happy with the outcome. 2 versions - one with overlapping, interlaced arms, while the maroon one is flat. Where one is more organic, the other brings out the design better. 
This is counted as Snowflake #9 for the project.

It's Sunday again tomorrow, and I hope to have something for snowflake #10!

All patterns will be shared when I am strong enough to spend time at the desktop. 
Till then, happy tatting .... 💜💙💛💚

Sunday, 6 August 2017

celebrating with a pattern

Pin It now!
It’s that time of the year when a sister ties a rakhi on the wrist of her brother celebrating the bonds of love and protection. I shared my first tatted rakhis in 2015 (links at end).

I was using up threads already on my shuttles from previous projects. 2 strands of Anchor embroidery thread/floss, that roughly measure up to size 40.
Final measurement – approx 3cms across.

This layered rakhi bracelet is an adaptation of 2 single shuttle medallions – the tiny wildflower and star of halves.

Rakhi Bracelet 2017 pattern
2 shuttles with 2 different colours

Round 1 : a 2-colour adaptation of Tiny Wildflower
[Orange ring : 5ds switch shuttle (SS)
Purple ring : 1 vsp 8 p 8 vsp 1.
Work chain of 1 unflipped stitch (reverse stitch) with purple. SS] 5 times, joining adjacent purple rings.
Note : In order to work the purple ring comfortably, ‘fold’ the orange ring forward.
Instead of 1 reverse stitch, reverse work and tat 1ds chain using orange shuttle.

Round 2 : a 2-colour adaptation of Star of Halves.
Picot gauge of 6mm or 7mm for double picot (dp). ORJ – onion ring join
[Orange ring1 : 6 vsp 4 dp 6. DNRW
           ring2 : 6 +(dp) 4 vsp 6. SS
Purple half-ring : 2 vsp 4 ORJ 12 p 12 ORJ 4 vsp 2. Close ring partially, adjusting shape.
Work chain of 1 unflipped stitch (reverse stitch) with purple. SS] 5 times, joining adjacent purple rings.
Pull the outer part/bar of double picot to get 2 distinct arches.


Sew 1 bead in centre through both layers and attach twisted cord, satin ribbon or any tatted cord/braid for tying. (the cord didn't twist properly, hence I cut it off & used the satin ribbon).

The pattern can be worked with a single shuttle in single colour substituting a tiny half-ring or dot picot string for the chain. Bead can be inserted while tatting round 1. I decided later, hence had to sew it in.


My initial idea was to make 2 tiny wildflowers at either end, but ran out of threads on both shuttles – just barely completed the main body.

I like how the flower turned out and it is up to you to use in how and where you want :-)

stay protected in the tatting bonds of love :-)

Related posts :

Saturday, 27 August 2016

antique pattern, modern presentation

Pin It now!

A couple of weeks back, Georgia asked if anyone could check for supposed errors in her modern notation of this vintage snowflake pattern. That very evening, I sat down to test tat it, making my own errors in adding wrong threads, but finally ending with a diagram, written pattern & a pictorial, alongside 3 tatted models ! Yes, I need to get a life beyond tatting ;-P

Louise Hauck ©1915 in ‘Tatting of To-day
*free pdf d/l of the modernized pattern with diagram
I like the pattern, especially how the arms are filled in - a breezy center with dense middle !

It is a 2 shuttle, 4 round pattern, all done in a single pass using mock picots to climb out to next round !!!
Except for one small bit (chain), all tatting is done from the frontside, moving in clockwise direction.

This is the diagram, with colour-coding of each round. To download the complete 3-page pdf which includes written notation, diagram & a pictorial, click here.
The pictorial collage in the pdf has fewer pictures. Hence, I am sharing pics of each round here, indicating major points of each round alongside.

Pictorial of Snowflake
In Georgia's pattern, each round is notated in letters (A-D), which was kept the same ...
Climbing out with a mock picot. The long picots in this round were made with a ⅜ inch gauge held horizontally/parallel to core thread.
TIP : When starting the chain after mock picot, I did not make any unflipped half stitch. Instead, start tatting normally after leaving picot space, and while snugging the chain stitches, simply ensure that the core thread retains the picot length (see pic below). This is especially useful when working chain in another colour - no colour blip will show !
The picot at the tip of chain is a small picot, but the one at the base (after the lock join) is a normal picot. The difference in picot lengths helps to bridge the next round so that the short chains lie neatly. If the base picot is small, the chain tends to turn.
2 thrown rings spanned by a chain. This is the only time when we Reverse Work (RW) in the entire pattern; otherwise, it is all tatted from the front. Of course, this chain can be worked in Direct Tatting using unflipped/reverse stitch.
I used a Catherine Wheel Join to bring continuity to the chain, but it is optional & can be substituted with a lock join. The CWJ is not included in the stitch-count of the chains. Consider it a way to span the distance.
The snowflake ruffles a bit, but is easily flattened with fingers. Picot lengths/sizes play a role in this piece.
The Trefoil is thrown off the chains. Hence, to anchor each ring, as well as the trefoil, in place, I used very small picots keeping the overall stitch-count same.

These tat up very quickly & most of the thread used is from shuttle 2 since it is mostly chains & thrown rings!
I used Anchor crochet cotton size 20 (white - model #2) & size 40 (white model #1 & 4054-0185 for model #3).
It measures 3" in size 20 & 2" in size 40.

It was Rakshabandhan on the day I completed tatting, so how could I not play around, especially since my resolve to put up a rakhi bracelet pattern this year did not materialize. So here's a pic of how 2 snowflakes in different sizes, topped with a long-picoted ring, would work as a possible rakhi centre ... we cord/twine attached under. Of course, the colours are too 'icy', but the idea is use-able, don't you think ?

So, here's hoping you like the modern presentation & download the Snowflake pdf for this Christmas :-)

happy tatting :-)


UPDATE (Jan 2017) : Check out what I did with the 3 snowflakes here
UPDATE (Jul 2019) : FYI. Since the pdf link got corrupted, there is now a new workable link in place.