Showing posts with label twisted picot. Show all posts

Wednesday, 13 November 2019

beads on a roll and twist

Pin It now!

2 years back, when I revisited my 2015 pattern, based on feedback from Georgia’s class, another idea struck me. Could we tie a bead to the floating or free-standing twisted picot? Yes, why not!
In fact measuring and twisting the picot becomes easier for starters.

This shows a self-closing mock ring (SCMR) being made, hence you see a red shuttle for the core thread, and the yellow for the stitches and picots. These were taken in May 2017. 

All we need to do is determine where we want the bead. Then make an overhand knot/tie at the base of the bead. 


Tighten the knot, and keeping the bead at the tip, measure an equal length of thread from bead to core thread. Hold the thread in a pinch at this point and start twisting. Follow it with a double stitch. 

Click here for detailed Twisted Picot tutorial.  The original tutorial was recently taught at Camp Wanna Tat. I hope it went smoothly without too many twists and turns?!

Since bead is knotted or tied on the picot thread, it is easier to do with a 2nd shuttle. It can be done on chains or on mock rings. We will need very accurate placement to tie beads on true rings – not practical, though theoretically possible.

Usha Shah graciously made 2 videos for bead on twisted picot on my request (thank you, Usha) –

TIP : For making a twisted picot, or after adding a bead to it, slide your left thumb over the thread/bead to gently hold in position. This makes it easier to handle the twisting. It also keeps the twist confined to the required length of thread. Using this slight touch, one can make fairly long twisted picots.
The fun part is, if the twist is good, one can actually let go of the picot when tatting the first stitch!

Fast forward to Sept 2019, while working another model using Red Rose metallic thread, I wondered about MULTIPLE BEADS on the twisted picot.
Initially, I slipped in 3 beads instead of one, spacing them while twisting the picot. 
After a while I noticed that the beads had clumped together at the tip!!! Perhaps it was the thread (metallic with a pearl cotton core), or may be they automatically gravitate to the tip?
Solution - knot the beads to avoid rolling!

I tied the 2 lower beads (green & yellow), spacing them out, but left the topmost (red) free. Then measured double the length (from red bead down to core thread) and started twisting. The pic below shows the outcome...beads stay in place.
The long picots appear branched due to these multiple beads tied at intervals. Fun to make as well.  

I went a bit berserk with some of the picot lengths! But I also noticed that only lower beads needed to be tied down to keep them in place; the one at the tip is better left untied.
In the lead picture, some of the earlier picots have untied beads. These had to be rolled back manually into position for the photo shoot ;-D 


Tuesday, 29 October 2019

beady-eyed

Pin It now!
Some patterns are meant to enjoy! That is precisely how this vintage butterfly felt when Georgia announced it for this week’s class.
The Deaconess Butterfly 1916, re-written by Carolyn Groves in 2002. When I went hunting for a Deaconess butterfly, I found her old site!
It is a well-written pattern, with clear instructions. But I also kept referring back to the model image(s) frequently, to stay on track. It is worked in one pass. A very clever presentation by Carolyn Groves.
I decided to play with beads. Small projects are ideal to try out ‘new’ stuff. And not everything was planned ahead. I unwound the shuttle to load seed beads, etc.
The ‘stuff’ that went on here –

  1. Black and orange beads pre-strung on yellow thread and the green seed beads on blue thread.
  2. Twisted (floating) picots for antennae. 
  3. Eyes and orange beads are ‘up’ beads- they need to go in the ring loop before starting the ring.
  4. Long beaded picot –On the tail ring I made a very long picot. After completing the butterfly, I put 4 black beads over it with a hook, then snipped the picot in the center and tied a knot to keep beads in place. Snip off excess ends.
  5. Rhoda Auld’s method for bead in center of ring. This was new to me. I Love it for various reasons and am eager to try out a few more ideas with it. I used it for all 4 wing rings.
The collage shows how the bead is hooked over blue thread and the loop is held with a holder pin/paperclip. This pin passes through both the loop And the picot. When it is time, a loop is pulled through both simultaneously to make the join. The bottom left is a back view to show join.

  1. Frontside/backside tatting meant I used down and up picot joins respectively. 
  2. Avoiding colour blip in Lock join – I did try my own method, but the thread is just too thick to hide it completely. And I was colour-blinded ;-P I thought the yellow blips could camouflage as tiny beads! 
  3. Ninetta’s blipfree join was used in a couple of picot joins, and as usual I counted the join as 1ds. 
  4. Elaine Gan’s Reverse join came in handy thrice, to switch threads/colours. 
  5. Green seed beads in place of all the picots on wings.
  6. In Anchor size 20,  the  butterfly is 2½” wide and 1¾” tall. A good size for brooch, pendant, or hair ornament
Phew, that’s it. I'm happy, though - getting more confident with beads! If you like this butterfly, fine, otherwise think of me being beady-eyed at the time ;-P

Oh, and I added a center to the Wreath snowflake prototype. It looks more like a flower now! This stitch count won’t work for an ice drop version. I added a faceted glass bead and wound the threads to make a suspension loop for ornament.


Many thanks to all for bringing joy fluttering into our TatLand!


Tuesday, 17 September 2019

sparkling and tinkling

Pin It now!

A week has passed since I last worked on the computer. I have posted 2 snowflake projects on facebook just so I don’t miss out since I only have 1 ‘free’ Sunday left ;-D Lots of patterns to write out…
I am taking this opportunity to post at least one pattern here – a 2D bell. When the 3D version is reworked and written out, I’ll combine both into a pdf.

The MatheMagical pattern has turned out to be quite versatile indeed – stars, tree, bells (and a possible angel, and later a coaster/doily, in future!!!). 
I first made a bell in silver metallic, without changing the original tree count (from which it is directly derived). Turned out to be a bit tubular. Then I took courage and tweaked the chain count and am so much happier with this version in gold! My tatting excitement has returned as well, lol.

MatheMagical Bell (2D) pattern

ctm - continuous thread ; - - picot ; dnrw - do not reverse work ; + - join ; rw - reverse work ; SS - switch shuttle.
Please let me know if you encounter any mistakes.

In the image below, the inset model shows sequence of working from A to P.
Black letters/numbers indicate rings while red shows chains.

2 shuttles, ctm.  1 teardrop bead on shuttle1.

Starting with shuttle1,
A Ring   : 8 – 7 – 1. dnrw
B Ring   : 1 +(A) 6 – 7. rw
C Chain : 9 – 7. rw
D Ring  : 6 +(B) 6. dnrw
E Ring  : 5 – 5. rw
F Chain : 6 – 4. rw
G Ring  : 4 +(E) 4. dnrw, SS
H Chain: 8. dnrw, SS
I Ring   : 4 – 4. rw
J Chain : 4 +(F) 6. rw
K Ring  : 5 +(I) 5. dnrw
L Ring  : 6 – 6. rw
M Chain: 7 +(C) 9. rw
N Ring  : 7 +(L) 6 – 1. dnrw
O Ring  : 1 +(N) 7 – 8. dnrw, SS
P Chain : 11 teardrop 11.
Join to starting space, tie, cut and hide ends. 
  

Snowflake Sparkle
And this is my 11th snowflake where I’ve cheated a bit (I didn’t actually tat a new model this time, but will do so this week)…. 
If you remember, it is a 2015 pattern which I improved in 2017 but the updated pattern still hasn’t been shared. This image is from 2017 and I want to tat a new model in metallic thread before I feel confident of sharing the revised pattern.

Keep the tinkling sparkle in your smile :-)))


Friday, 21 June 2019

first doily pattern

Pin It now!
Repetition Doily / Snood
pattern pdf (click to download)
Please scroll down for an Update

Remember the doily/snood I was trying to design out of a mistake? Well, it’s all done, including the pattern writing! In size 40 Anchor, it measures 7 inches in diameter.


Continuing the design story …. I completed the final round with long twisted picots instead of simple double picots. I like how they arch and are sturdy, giving a sense of finality.

I wanted a relatively open center, hence tried a basic spirographic filling – like in string art. A quick trial above looked fine, and I was going to stabilize the long threads with another single round of beige in the center. I had even tacked the doily on fabric in an embroidery hoop! After several days I snipped it off..... 
 
… and this was the result ! A star is born ;-D
I overcame the odd number in previous round (15) by skipping 2 picots and joining to every 3rd picot, thus resulting in the star shape.

 
But those free picots bothered me and I snipped off both central rounds replacing those 2 picots with a long double picot parallel to the star curves! 
Double picots also follow the thematic repetition of outer brown rounds. Star remained the same.
Tadaa !!!


UPDATE (July 2019): This doily has long measured picots which are Functional. The pattern gives picot sizes for Anchor size 40, but what if one wants to use a different thread size?
I worked a short chain with same thread and found that a 7mm picot is equal to the width of 7 double stitches! And so on. Easy to remember and convert.
Just substitute 1mm tall picot with 1ds width.

While picots are normal throughout, the long picots differ in length in each round and a picot gauge is required. I have included the gauge requirement for each round in the pattern.

Each round in this doily is worked separately with shuttle and ball and easy elements. Writing/presenting the pattern was a tough ask! It took me days and days to simplify it as best as possible since the working sequence of the 9 rounds is not a regular order from small to large or in to out.
Jane McLellan kindly and quickly ran her eye through the final presentation with valuable feedback. She is my reliable go-to "glazometer" (((Thank You)))! 
I hope you enjoy the pattern. It is my first complete doily pattern that I have completed and written. My first - Aspiration Doily still awaits that day ;-D 

Friday, 21 December 2018

moth in a choir

Pin It now!

What's a moth doing in a choir of angels, you ask?! Tatting is full of surprises … read on.

We’ve all come across this beautiful angel by wiki on pinterest. Teresa recently made many and shared the pattern. One of my friends asked me about recreating the effect of the central joins which led me tat it up.
Dimensions : 5cms wide x 3½cms tall in size 20 Red Heart

It is a very clever pattern using basic techniques and a long picot for the halo (top right inset) The first ring has a longish picot, too, for linking later chains. The head is a mock ring – simple chain linked on either side with a lock join.

Not wishing to continue with this thick thread, yet not wanting to throw away the piece, I cut & tied, then whip stitched back to the ‘neck’ where I curled the head back from the front, and secured it. Then snipped off the long picot to look like antennae. Kind of cute, eh? So That’s how this angel became a moth.

I started over in white Anchor size 40 and the finished angel is 2½cms wide x 4cms tall. Unhappy with my block tatting!
Techniques : ring, chain, lock join, central picot, long picot, block tatting, decorative picots.
TIP : It can be worked with one shuttle and ball, ctm, and for block tatting I worked from the front only, by resorting to direct tatting.
Wiki has some really cute tatted doodles on her blog.
ßßßß
An angel needs company, so I started on Ruth Perry’s new angel pattern. 
Again, my tatting leaves much to be desired. The size of joining picots is important here.
In Anchor size 40, it is 2½ inches wide and tall.

The head uses padded double stitch (pds or BDS or DDS), and a long picot is twisted for halo. Split rings and chains with decorative picots are used to tat the wings and body in one go.
The skirt of simple rings and chains is worked and joined on the go.
I like the lacy fulsomeness of this pattern! 
Note: One 7ds segment for the wing center (SR) is missing in the instructions.


ßßßß

Two’s company, but three’s a choir! Loved the angel earrings Bernice shared here. It is such an elegant pattern by Sezione Hobbystica and can be found here.

In Anchor size 40, it measures approx. 4¼ cms x 4½ cms

I scrolled through her site and found a great drawing app for tatting !!! Played with it a bit on my tablet - fairly easy and straightforward. But it opens only in Chrome.

Many thanks to the designers for sharing their beautiful patterns

Related posts
ßßßß

Sunday, 28 October 2018

school photo day

Pin It now!
tatted butterflies, square and oval doily


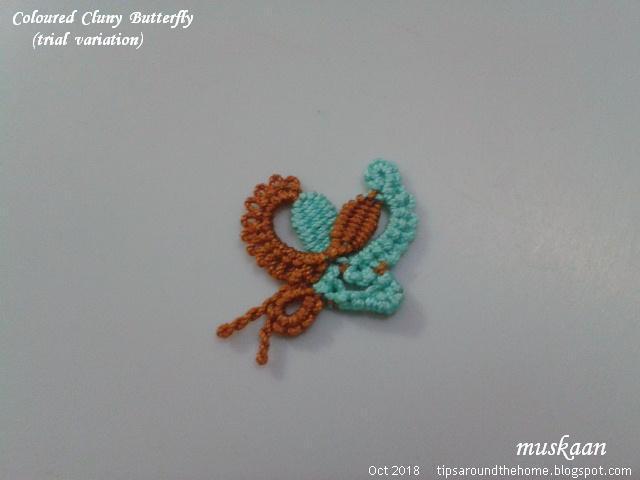
In my previous post I uploaded a school photo day (of all the Coloured Cluny butterflies). But guess what, one of them was too knotty or too shy to face the camera! Found it only when it peeped out from under the looms! 
So here’s a special group photo in celebration, this time with an old teacher standing guard. 
Can you spot which one was missing? (answer at end of post)

A group of butterflies is called a “flutter”, so ...

Question 1 : What should a collective or group of tatters be called ????

This large butterfly is the Butterfly Medallion No. 169 from a 1916 Corticelli booklet. 
I found the pattern here. I followed the rewritten pattern, but some counts are missing.
I’d intended to work it in size 40 white for it’s delicate lacy effect. But with so many cuts and ties, what's the harm in colouring it up to highlight the floral wings?! 

 These are the individual pieces, to be joined later with a pretty trim around each of the ‘florets’. I had to add stitches to floret chains to accomodate the decorative picots.
Re-tatted the body and made twisted (floating) picots this time.

I continued but have already unravelled & re-tatted a number of times. 
With so much back and forth, I am no longer enjoying it. 
So did it get mutilated or transformed? 
To solve that mystery, stop by tomorrow – you may be in for a surprise!

Sparkle Fusion is Usha’s new medallion 
fusing together the dot picot string and variable treble stitches. 
I had the pleasure of test tatting it - her swirl join variation. Worked in Anchor size 20. 
A variable tds creates a nice little peak or scallop on the outer edge of the stitch! 

Scrappy Doily after 5 rounds 
In Anchor Size 20, it is now 4” x 3¼” – I got my oval !!! 
All those suggestions have helped. Too many tatters, unlike too many cooks, did Not spoil ;-P 

Placed on the grid to confirm. 
Click here for earlier musings & notes. 


The truant butterfly !


Question 2 : Should this Coloured Cluny Butterfly be called Ready to Fly butterfly?
One of the names has 2 votes out of 3 (not saying which!), but what’s your choice?

Eager to read your answers ....
flutter by with tatting , always

Saturday, 22 September 2018

twist n twirl, spiral n swirl

Pin It now!
doily tat-along and pictorial
Completed the tat-along a week back but too many presentations swirling around in my compy vying for attention! Without much ado, let me 'jive' in ….


Swirling Butterflies Tat-along 

I made a few tiny tweaks and here are my notes –

1. Treble as a twisted picot : The 2nd part of a treble is actually just a twisted picot!!! Well, well, well. I tried it on some of the tds. Pictorial at the end.

2. The double leaves : It is a very clever design where the leaves are asymmetrical but with graduated segments – from 3ds through to 6ds - creating a swirl of their own!
But my conjoined double leaves just wouldn’t stay flat. Finally I settled with a ring of (3+3) and 2nd ring (4+6), leaving them unattached to each other.

3. Bare thread under the butterfly. My little indolence served 2 purposes :
visually, I felt that the entire body on the twig made it seem more like a caterpillar ; tatting the butterfly was normal - only the double stitches of 1st & last trebles were encapsulated (2 core threads).
And instead of 3 shuttles,  I used a ball and shuttle,  ctm, for green, and 2nd shuttle for pink.

4. An idea – one can make the butterflies separately (single shuttle only – see here) and join to twig normally. Which means, we work the twig with shuttle and ball only! But the butterfly will need 2 picots on core thread held by paperclip.

5. Long picots made and snipped for the antennae.
6. Mutilated Wing – I made only 4tds on the wing instead of 5tds. I did not count the TJ (treble join) as a tds, hence the goof-up. Some of the butterflies look like elephants to me! If I hadn’t blogged, it would’ve gone unnoticed even now ;-P

7. Directional or fs/bs tatting: My way of doing the treble backside is simple – only work the ds part of it backside, keeping the rolled part as usual. Ninetta shared her method here. Always good to have choices!

8. Measurement : Worked in Anchor size 20 threads, the doily works to 4” with butterfly ; and 3” if one leaves out the butterflies.

9. Techniques used : fs/bs tatting, tds (treble tat stitch), spiral rings, floating/thrown rings, encapsulation (direct tatting with unflipped stitches), 3-shuttle tatting (I used 2 shuttles and a ball).

10. Spiral Rings : I believe the best effect of tds is in these spiral rings!


This new stitch is really catching on J 
The fun part is that it can do Everything that a normal double stitch does - 
including half tds, padded tds, and picots of all kinds !


For those who consider the treble a bit of a mystery, perhaps it’s similarity to a twisted picot will help? Most of us know of or have done the twisted picot. So, here’s how we can use the same movements to make the 2nd part of a treble tat stitch !!


Treble Tat Stitch worked as a Twisted Picot
or
Twisted Picot In the Treble Stitch !
Click on any image for enlarged view.
This is a alternate method of working the 2nd part of a treble stitch. 
It can be used as an eye-opener to show the 'common threads' running through 
seemingly different tatting techniques.  

4 tds can be seen on a chain, of which the first 2 were made normally 
and the next 2 were made using the twisted picot method/movement.
See Twisted Picot video here.

 1. Start next tds with a double stitch

 2. Pull loop through picot (not shown), tighten and pull another loop through it.
BUT do Not pass shuttle through this loop.

3. Twirl shuttle and Twist loop ! 
Now here’s where the twisting starts and the direction is very important. 
Hook/hold the loop on the shuttle and
rotate the shuttle clockwise like a ferris wheel – 
moving towards us from the lower side and away from us on the upper side. 
The loop gets twisted once.

If we rotate in counterclockwise direction, this is how the tds turns out -

 4. Repeat this movement again and now there are 2 twists in the loop.

 5. Repeat this movement a 3rd time so that we have 3 twists in the loop.
Keep the loop hooked at all times to avoid untwisting.

 6. Now pass the shuttle through the loop. 
This is the tricky part since the loop should open up sufficiently to allow shuttle to pass through.
If needed, tug the loop to lengthen it.

 7. Start pulling the ball thread to close the twisted loop. 
Then pull the shuttle/core thread to tension the stitch.

 8. Treble stitch all snugged and complete using the twisted picot method!

 9. 3 more trebles made in similar manner.

This method works well with this size 10 knitting cotton as well as Anchor size 20 threads. Does it work equally well for finer threads? Try it and let us know J


UPDATE : Check out My Tutorials page for more Treble tatting pictorials, variations and analyses 

That’s it for now, but I am super excited to show you my perfect Cluny leaf – finally happy with it – and absolutely no colour blips on either end. Will share the trick soon.