Showing posts with label tatted edging with corner. Show all posts

Friday, 27 May 2022

tatting is therapeutic

Pin It now!

The ‘Talking Tatting’ issue 50, February 2022 (a quarterly newsletter of Queensland Tatters, Australia), brought us a new tatter/member who has enthused the FB group with her work in this short period.

Meet Antonia Lai. She started out with doily #28 which was published in the newsletter. It is worked in Lizbeth size 20. (https://tipsaroundthehome.blogspot.com/2022/01/bridging-gaps.html)

Within a week she was “addicted to the Endrucks 1920 Project”!

Her enthusiasm and tatting beauty took flight with this Happy Hands Heart and Butterfly – both patterns are adaptations of pattern #1 and had been shared in our FB group.

She incorporated a body for the butterfly using a chain folded and joined back on itself, as visible in the close-up!

She recently revealed her love of elephants and this painting/print acts as the perfect backdrop for her impeccably tatted doily #40! In Milford size 40, it measures 11 cms.

Meanwhile, she also volunteered to test tat pattern #22 and sent me her notes and feedback.

She sportingly incorporated a suggestion to see whether bilateral symmetry would make a difference to the slight tilt that was inherent in this lace. The difference is clearly visible between the 2 repeats if you compare the block tatting at the top. The right pair are mirror images, unlike the left pair. She used what we call Block Below Tatting or BBT (https://tipsaroundthehome.blogspot.com/2021/07/a-pernickety-question.html).
More pics and details will be shared when I update the old Eleonore’s Angels pattern #22 pdf.

The May 2022 issue n.51 of ‘Talking Tatting’ carried a bookmark/bracelet adaption of pattern #32 by Judith Connors. This, too was quickly tatted up by Antonia.
 
She made a slight mistake and decided to carry it through as a Butterfly Trim.
And there’s a heart in there, too! If we remove the 2 bottom rings on either side, we get a heart shape, which can be tweaked further.
The butterfly trim looks good on the neckline!

And her direct contribution to date has been in designing a beautiful corner for the #1 Happy Hands edging!

  
The edging can be sewn along the outside or inside of the fabric edge without losing its shape or beauty as seen in the 2 pics above. She also modified the edging slightly, making it easier to repeat motifs yet keeping fidelity of pattern.
She not only sent me her hand-drawn diagram, but also meticulously wrote down the pattern.

Happy Hands edging with Corner (adaptation Endrucks' #1) pattern pdf - https://drive.google.com/file/d/1fsiET9ZJvXSD0kcAMKsuUNZt-rznFkO9/view

Lea Di Palma followed Endrucks’ original style, using the picoted side to sew on the edging as seen in this in-progress pic below. Incidentally, she is working it with a ball and shuttle instead of 2 shuttles! Check out more of her tatting in her FB timeline.


Here is what Antonia Lai says about her tatting hobby and our Project -

I started tatting about 16 years ago. Tatting is therapeutic. Always find time for tatting; it makes me feel content. Endrucks projects is addictive. Since February 2022, I have done patterns # 1, 22, 28, 32, 40. People involved in Endrucks are into sharing and community spirits. I am looking forward to doing more.

Antonia has proved Frau Endrucks right when the designer-author wrote - 

"It is a great fortune to create something beautiful with simple means, I hope that my book will give you the key to this happiness.

Ninetta and I take great pleasure in thanking Antonia and Lea for their work and contribution to the Endrucks 1920 Project. Their experience, especially Antonia’s, shows that there is still a lot to explore and extract, derive and apply… if one has the desire.

NOTE: All patterns mentioned above are free and can be found in the EP doc (scroll down to the respective pattern number and click on pdf link) - https://docs.google.com/document/d/17LEVftXweztBIOWh4sL4BB7bX65ssoOsOn4oXIgCepY/view

With love and gratitude,

muskaan & Ninetta

*********************

Endrucks 1920 Project is a community project, where patterns from Endrucks’ German book of 1920 were converted to modern-style presentations and pdfs. We welcome you to join our Facebook group “Endrucks 1920 Project” (please read the group’s description and rules before joining : https://www.facebook.com/groups/1235560633606162) where the fun continues with derivative tatting, new variations, activities, etc. all within the gamut of Endrucks’ patterns.

Using the hashtag 
#Endrucks1920Project when posting in FB or Instagram, ensures that your pic will show up in a search.

If you enjoy sharing and experimenting, or even test-tatting, the group is waiting for you! All info and links to patterns (original and modern), including model images, are in the Endrucks 1920 Project Document, here

https://docs.google.com/document/d/17LEVftXweztBIOWh4sL4BB7bX65ssoOsOn4oXIgCepY/view There is still a lot to explore and extract, derive and apply and scrolling through this document will give you an idea of the possibilities and beyond.

********************* 

Saturday, 23 October 2021

when time flies

Pin It now! Reworked patterns from Frau Eleonore Endrucks-Leichtenstern’s ‘Die Schiffchen-Spitzen’, 1920, for Endrucks 1920 Project
When time flies the best of intentions cannot stop it! Marina was an early bird, selecting 2 patterns in Nov 2020 and starting immediately. She even went to the trouble of watching videos to improve her block tatting after her first trial. And within days she sent me a beautiful snowflake pattern from her shop so that we got an idea of how she presents her patterns! No problem … the hidden beauty of this community project is that we have an eclectic mix of presentation styles, with something to learn from each.

Time had seemingly flown so fast that it was July 2021 in a blink and time to hurry! But the more you are in a hurry, the faster time goes by, especially if your pc doesn't cooperate!
My pc was crashing like crazy and losing data, so I had to restart drawing several times.
Such behind-the-scene roadblocks rarely get highlighted by a crafter, but we all go through such hurdles to produce the best we can. And that she did!

Following is Endrucks’ pattern #6 where she turned the original edging into a lovely Square Motif with a simple skipping of chains. 
 
As with all patterns in this book, the edging uses block tatting and thrown/floating rings besides the regular chains and rings.
Look closely and you will notice the square motif is tatted in 2 colours - white and ecru.
If we skip the thrown/floating rings on either side of the block rings, we should be able to get yet another square turned the other way (as evidenced in pattern #22).

Despite being a bit “intimidated” by pattern #34 initially, she turned out a beautiful doily worked in one pass using Endrucks’ method of climbing out (I hadn’t noticed this earlier)! Resourceful tatters can use split chains and split rings to climb out. Her clear diagrams show each row with count and direction, and she has included needle tatting hints.

My ever-vigilant partner, Ninetta, noticed that her year of birth suggested she was relatively young and was curious about her tatting background. Marina graciously sent in this short write-up of her tatting journey –

"... I am from Belgrade, Serbia a small country in Europe. I found tatting through internet, by chance, while looking for next crochet project. There were some interesting earrings that I could tell were not crochet, so I did an image search, and was stunned by the beauty of this new thing I have found... That was late 2015. Here in Serbia, there is only a few people that know what tatting is, I know of 5 or 6 tatters from around here, and I only talked to one of them on the phone. Everything I know, I picked up from you tube, by rewinding videos many many times and reading blogs, like yours and few other tatters. There is no tatting thread that can be purchased here, only crochet or embroidery, so I use that or some blends I make from sewing and decorative thread. Same goes for shuttles. I used to cut plastic into flat shuttle shape, until regular shuttles I ordered online arrived. I think I love tatting so much because it is so challenging, once you think you have it figured out, new thing pops up, and there you go again... And one more thing, I have never seen tatting, that somebody else made, in person, only on photos and videos... That's it for now. Thank you and Ninetta for all the work you are doing for this lovely craft 💗"

It is truly amazing the wonderful designs she has created in this short span of time! I’ve been saying Marina, but you might recognise her as Mad Jar Tatting (sometimes Mad Zar, depending on the translator). All our contributors are on Facebook and you can visit her page here - https://www.facebook.com/mad.jar.tatting/  

Her etsy shop (https://www.etsy.com/shop/MadJarTatting) is a treasure to scroll through! Some of my favourites are her Sea Star and Dragon Egg patterns! Imagine a Dagger as a bookmark! I sorely wish I’d had the time to offer to test tat her Manohary Doily when she called for volunteers. (manohari is Hindi for enticing). Her designs span simple to advanced, 2D to 3D, jewellery to lace. Her 3D Pine Cones and Sunflower are enticing, as is her latest 3D tatted shuttle.

I had the happy chance to try out her stacked rings earrings in 2019 – a technique that immediately roped me in! Applying techniques is something this talented designer does really well and is a sure way to tempt me!

Though time flew again from July to Oct before I got this opportunity to publicly thank Marina, I know she understands the behind-the-scene issues and will forgive me for my lapse. Ninetta joins in to profusely thank Marina for her valuable contribution and perseverance against all odds.

**********************
Endrucks 1920 Project is a community project, we welcome every one of you to join in! Please let us know where we can find your renditions and derivative tatting!
We created the hashtag #Endrucks1920Project, so please use it for your pics to show up in a search.
We all enjoy sharing and the project is awaiting every one of you!
All info and links (original and modern) are in the Endrucks 1920 Project Document, here: https://docs.google.com/document/d/17LEVftXweztBIOWh4sL4BB7bX65ssoOsOn4oXIgCepY/view
Remember there are many more modernised patterns, derived and extracted patterns/ideas, already listed in the project document, with more still to come! So, do visit and scroll through.
*********************

With love and gratitude,
muskaan and Ninetta

Related posts –
Endrucks’ #22 square derivatives - https://tipsaroundthehome.blogspot.com/2015/11/pattern-eleonores-angels.html
Endrucks’ method of continuous tatting - https://tipsaroundthehome.blogspot.com/2021/07/continuous-paths.html
Stacked Rings Earrings - https://tipsaroundthehome.blogspot.com/2019/11/sidetracked.html

Friday, 23 July 2021

superimposed excitement

Pin It now!

 I couldn't wait to share what I've been tatting with all my wonderful readers (thank you all for your kind thoughts 💝). Although my pace was slow, I finished this square edged frame today and am excited for you to see it, too.

Recognise the motifs from my recent posts - the block tatting question and the extracted earrings

I chose the easy path following Frau Endrucks' practicality and working the blocks on either side 'normally' with no mind to directional symmetry.

Here you can see the adaptation to turn a 90° corner, which inspired those earrings. Removing a few elements and joining at the base, brought the 2 enr together.

Continuing Row 1 working with 2 shuttles, CTM. There are a couple of inward picots that I used a paper clip to hold till joining.

Row 1 complete. I like how this looks! Each side is a single repeat; by adding more repeats along opposite sides it can become a rectangle or a larger square.
In Anchor size 40 (shade 00352), this row is 3½ broad and 13 cms length of side.

After continuing to the next round (all tatted in one pass, and both rounds move clockwise), this is how the final frame/edging looks. I think the inner edge makes an elegant statement, too.
The side now measures 17 cms at the extremities.

Don't these look like 2 different squares superimposed and well-synced? Eyes seem to be drawn first to one square and then to the other. 
The only change I made to this round was adding a few decorative picots, including above a lock join.

Laid over this truffle box which is my current project box with all essentials inside. It makes a nice tatted frame ...

UPDATE: the pattern is included in the main pdf here - (click for pattern)  https://drive.google.com/file/d/1sStHg5IQmuwizC7QcKRaX951CvVoURbn/view

If you visit the Endrucks 1920 Project doc here, you will see the talented Reiko Akamatsu has already made another square adaptation from this same edging. She has introduced more changes and it will be an interesting study to compare these 2 versions.

One very interesting feature of this pattern (and most of Frau Endrucks' patterns) is that the entire pattern is worked with 3ds or 6ds between picots or between joins. The only exception is the 1ds she uses to rise to next level of each block. 

I will share this pattern in due course and hope you like it enough to give it a try. 
In fact I have 2 more narrower edgings in mind but tatting might have to wait. But I am willing to share a diagram if anybody wishes to give it a go. 


Wednesday, 2 September 2020

influential intrusion

Pin It now!
It all started when Grace Tan saw the intruding picot and brought out her long-stalled pattern. She thought it could be used in her serpentine pattern and simplify the working instructions. And I was one of the first few she roped in to test tat Endless Hearts Braid with Corner.
Grace adapted her heart patterns into an undulating length of lace - a clever symmetry - and a larger heart for the corners. The frequent directional changes take a bit of getting used to, but soon one can set a rhythm. It still needs some concentration, especially if one resorts to fs/bs tatting as I did, in two colours, trying to keep the blips at the back. I had to draw my own diagram for reference initially.
 
Inward facing  picots - She substituted the Intruding Picot (ip) with Ninetta's Face Inward Picot (FIP), although the ip worked for me (above pics) in the 3rd and 4th corners. FIP was my first time and it was not easy to tease out the leg in perle cotton. I followed instructions for the braid, using FIP in first 2 corners.
Encapsulating Picot Join (EPJ) - I got to try out this new blipless join that can link several elements together at a later time. As the term suggests, it is a picot join that encapsulates or traps another element or picot. More elements can be linked to the same point later as well.
Sometimes I got the EPJ looking almost invisible from the front, at other times a thread bulge was visible. I played with many tweaks, such as up and down loops, etc, but need more study in thicker thread to figure out how best to avoid that thread to make it consistently indistinguishable.
Layered Picot Join - My 'easier' alternate to EPJ -
1. Make a longer picot on the ring such that it can span the chain(s) that it intends to encapsulate.

 
2. Keep this picot at back of work and make a normal picot join through Both picots simultaneously. 
3. This is how it looks from the back. 
Note - these pics were taken when I was working backside. 

 
4. This is how it appears from the front - the join is invisible here.
5. This is how the hook will be inserted through both picots when working frontside.
And a 4th element can be joined to that same picot through the back. I love how clean the chains look - the join is invisible.
Drawback - the rings tend to lie slightly below the chains, but with sufficiently long picot, it can be avoided. Mainly, there is a colour bar at the back (clearly visible in #3).
Turn Chain (tc) - Of course there are several other ways to work this, as outlined in Grace's post. Overall, I limited myself to very few tweaks and substitutions, trying to largely stay true to the pattern. I have used many ways to turn a chain, but stayed with her version of turn chain which was to simply rotate the stitches in such a way as to reposition them, like this Twist Work (TwW).
There are also several applications to this versatile pattern! -
Add a drop crystal and beads for a beautiful V-shaped necklace or collar; or a square collar to sew on!
Without the corners, it is easily a braid, bracelet, bookmark, ring, choker, etc. 

In Anchor Pearl cotton size 8, the braid is 1" broad ; 2 hearts = 1.5" long. The entire frame is 3" on the inner edge and just over 5" at the outer edge.
All in all, a good learning experience with tons of ways to work it.

Romancing With Life - an autobiography by Dev Anand -
This all-hearts pattern seemed a fitting frame for this true karma yogi's life, work, and joie de vivre perspective. Ageless, who died at 88 with his boots on and with more energy and curiosity than his juniors by generations.

Dev Anand needs no introduction to Hindi film buffs and Indians in general (isn't that top left pic just great?! - the 3 great contemporary heroes). But my international friends, can you identify who he is with in the top right pic?! This hardbound book is a feel-good read for the most part, dwelling mostly on his various loves - be it nature, mountains, films/film-making, women, beauty, etc. There are more areas and depth one would have liked to read about, but it is understandable how the entire focus was on romancing.


Wednesday, 25 April 2018

butterfly invasion !

Pin It now!
Remember my 2nd round design for the round robin where I discovered butterflies? Well, it got me thinking of edging possibilities which further led to a veritable butterfly invasion - of the happy kind :-) I used that same motif for the "make me pretty" challenge. Sharing some more of that happiness with you.

Butterfly Edging/Insertion
and off-shoots ! 
I will convert this into a composite pdf once I have tatted all models.
This card is not complete. Will share more eventually ...

A versatile pattern. Single butterfly motifs can be tatted separately to empty shuttles. The straight edging with alternating butterfly and flower motifs can also work as an insertion. It can turn the corner on either side with butterflies facing inward or outward. 2 Square motifs can be derived from these.


Techniques : 2 shuttle tatting, split ring, decorative picots.
Dimensions :Tatted model (maroon) is worked in Anchor size 40. Width – 1.5cms; 4 motif repeats are 9cms long. Each corner is 1cm long.


2 shuttles wound CTM.
Butterfly :
A-Ring : 6 vsp 10. rw
B-Chain: 6 - 8 – 3. rw
C-Ring : 4 + (to vsp) 8 – 10 – 2. dnrw
D-Ring : 2 + (to C) 10 – 8 vsp 4. rw
E-Chain: 3 + (to B) 8 – 6. rw
F-Ring : 10 + (to vsp) 6.
Flower :
G- Split ring : 1 – 1 –- 1 – 1 / 1 – 1 -– 1 – 1. (6 picots)

This completes one motif. Repeat from A to G for desired length.

End with a butterfly motif and work the corner with 3 flower motifs as follows -


To turn corner (to the left/upward):
SR1: 1 (– 1 –- 1)x2 - 1 / 1 (– 1 –- 1)x2 - 1. rw, Switch shuttle. (10 picots).
Ring2 : 1 (– 1 -- 1)x4 – 1. (9 picots). rw. SS
SR3 : same as SR1.
Join the next butterfly to the previous one (ie. Join C of new butterfly to D of previous one). This stabilises the corner.

Continue to follow pattern till end, joining back to the beginning.
Tie and cut. Hide ends.
Sew the edging to fabric or glue to cardstock for a framed greeting card.

It is the first time I’ve tried to block in this manner, with a grid paper below 
that thin plastic sheet. It really helped to keep the corners sharp and edges straight.

Notes :
  • All rings are tatted frontside, except for the corner-most ring (R2).
  • All picots are normal or decorative except where vsp (very small picot) is mentioned.
  • Overall, the edging moves from left to right.
  • In order to keep the edging/sides straight (and avoid twisting in case of long edgings), do not leave any space between butterfly and flower. Avoid gapsosis.
Since it was not to scale, I found it very difficult to diagram the corner. 
Hence I tatted a model in light colour and thick thread and notated instructions on it.

Suggested Variations :
Substitutions -
substitute floral picots for flowers for a layered effect ;
add seed beads instead of picots ;
add a pearl bead in center of each flower ring ;
substitute flower with large bead.
I hope to try some of these in my butterfly decorations.

Conversion
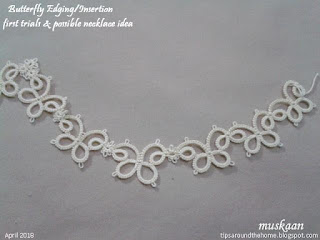
This straight edging can easily be converted into a gently curved necklace by leaving a tiny bit of space between the butterflies and flowers. This will allow the edging to curve slightly.
This pic is of my trial and practice piece and you can see that it can easily be 
arranged in a curve without changing the pattern.
This is definitely on my to-tat list and I've already chosen the colour.

Direction

Turn the corner in the other direction – to the right/downward. Instead of 3 rings after the butterfly, we only work 1 single split ring as follows :
SR : 1 – 1 –- 1 – 1 -– 1 – 1 -– 1 – 1 / 1 . (7 picots)
Then continue with next butterfly, joining to the nearest free picot of previous butterfly.


Here’s a collage of more ideas clockwise from top left -
Doesn’t this give a sense of a possible crown? An outer round to bring it together and give proper shape?
Turn it over and is can be a pendant with beads and a teardrop !

2 square motifs (blue is a trial piece) when the corner is turned to the right. These can be joined together either at their tips or along their sides for a larger fabric.

In case you detect any errors or if there is any confusion, do let me know so that I can make the changes in the pdf.


make me pretty butterflies are slowly starting to fly in. What wondrous joy !!! So if you haven't, get right down to it and send me the pics or your posted link. I would love to share them in a future post. 
I still want to keep my own butterfly samples a secret for now so as not to corrupt any ideas ;-P


happy tatting always J