Showing posts with label E22. Show all posts

Friday, 27 May 2022

tatting is therapeutic

Pin It now!

The ‘Talking Tatting’ issue 50, February 2022 (a quarterly newsletter of Queensland Tatters, Australia), brought us a new tatter/member who has enthused the FB group with her work in this short period.

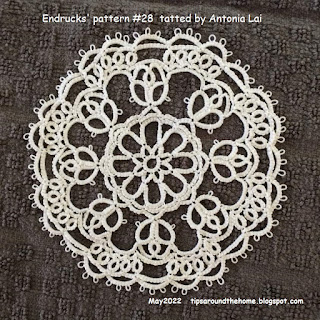
Meet Antonia Lai. She started out with doily #28 which was published in the newsletter. It is worked in Lizbeth size 20. (https://tipsaroundthehome.blogspot.com/2022/01/bridging-gaps.html)
Within a week she was “addicted to the Endrucks 1920 Project”!

Her enthusiasm and tatting beauty took flight with this Happy Hands Heart and Butterfly – both patterns are adaptations of pattern #1 and had been shared in our FB group.

She incorporated a body for the butterfly using a chain folded and joined back on itself, as visible in the close-up!

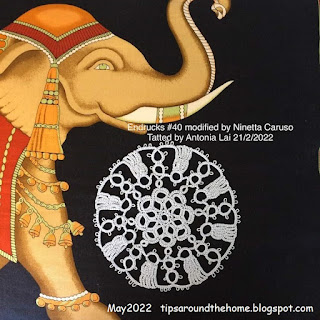
She recently revealed her love of elephants and this painting/print acts as the perfect backdrop for her impeccably tatted doily #40! In Milford size 40, it measures 11 cms.

Meanwhile, she also volunteered to test tat pattern #22 and sent me her notes and feedback.
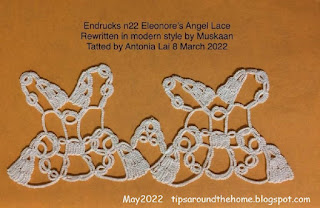
She sportingly incorporated a suggestion to see whether bilateral symmetry would make a difference to the slight tilt that was inherent in this lace. The difference is clearly visible between the 2 repeats if you compare the block tatting at the top. The right pair are mirror images, unlike the left pair. She used what we call Block Below Tatting or BBT (https://tipsaroundthehome.blogspot.com/2021/07/a-pernickety-question.html).
More pics and details will be shared when I update the old Eleonore’s Angels pattern #22 pdf.

The May 2022 issue n.51 of ‘Talking Tatting’ carried a bookmark/bracelet adaption of pattern #32 by Judith Connors. This, too was quickly tatted up by Antonia.
 
She made a slight mistake and decided to carry it through as a Butterfly Trim.
And there’s a heart in there, too! If we remove the 2 bottom rings on either side, we get a heart shape, which can be tweaked further.
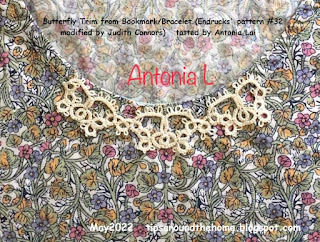
The butterfly trim looks good on the neckline!

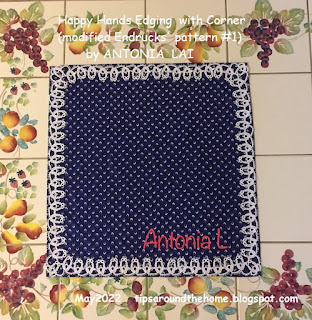
And her direct contribution to date has been in designing a beautiful corner for the #1 Happy Hands edging!

  
The edging can be sewn along the outside or inside of the fabric edge without losing its shape or beauty as seen in the 2 pics above. She also modified the edging slightly, making it easier to repeat motifs yet keeping fidelity of pattern.
She not only sent me her hand-drawn diagram, but also meticulously wrote down the pattern.

Happy Hands edging with Corner (adaptation Endrucks' #1) pattern pdf - https://drive.google.com/file/d/1fsiET9ZJvXSD0kcAMKsuUNZt-rznFkO9/view

Lea Di Palma followed Endrucks’ original style, using the picoted side to sew on the edging as seen in this in-progress pic below. Incidentally, she is working it with a ball and shuttle instead of 2 shuttles! Check out more of her tatting in her FB timeline.


Here is what Antonia Lai says about her tatting hobby and our Project -

I started tatting about 16 years ago. Tatting is therapeutic. Always find time for tatting; it makes me feel content. Endrucks projects is addictive. Since February 2022, I have done patterns # 1, 22, 28, 32, 40. People involved in Endrucks are into sharing and community spirits. I am looking forward to doing more.

Antonia has proved Frau Endrucks right when the designer-author wrote - 

"It is a great fortune to create something beautiful with simple means, I hope that my book will give you the key to this happiness.

Ninetta and I take great pleasure in thanking Antonia and Lea for their work and contribution to the Endrucks 1920 Project. Their experience, especially Antonia’s, shows that there is still a lot to explore and extract, derive and apply… if one has the desire.

NOTE: All patterns mentioned above are free and can be found in the EP doc (scroll down to the respective pattern number and click on pdf link) - https://docs.google.com/document/d/17LEVftXweztBIOWh4sL4BB7bX65ssoOsOn4oXIgCepY/view

With love and gratitude,

muskaan & Ninetta

*********************

Endrucks 1920 Project is a community project, where patterns from Endrucks’ German book of 1920 were converted to modern-style presentations and pdfs. We welcome you to join our Facebook group “Endrucks 1920 Project” (please read the group’s description and rules before joining : https://www.facebook.com/groups/1235560633606162) where the fun continues with derivative tatting, new variations, activities, etc. all within the gamut of Endrucks’ patterns.

Using the hashtag 
#Endrucks1920Project when posting in FB or Instagram, ensures that your pic will show up in a search.

If you enjoy sharing and experimenting, or even test-tatting, the group is waiting for you! All info and links to patterns (original and modern), including model images, are in the Endrucks 1920 Project Document, here

https://docs.google.com/document/d/17LEVftXweztBIOWh4sL4BB7bX65ssoOsOn4oXIgCepY/view There is still a lot to explore and extract, derive and apply and scrolling through this document will give you an idea of the possibilities and beyond.

********************* 

Sunday, 29 August 2021

thrown, floating and 8 rings

Pin It now!

Please note that the post and pdf have been updated on 30th August 2021. In case you already downloaded the pdf, kindly click on the link to refresh the document.

Tatting with an international community throws up interesting facts and ideas. All patterns in Endrucks' (1920) book use 2 shuttles and has plenty of rings made by switching the shuttle in hand - you guessed it - thrown rings! However, as Ninetta pointed out, a lot of Italian tatters have mastered the art of tatting with a single shuttle and ball, and adapting any pattern to suit this. It got me thinking about all the various ways in which we throw off a ring and here is the result of that exploration/stream of thought.

Thrown Ring Methods - a Ready Reckoner. click this link to download the complete document - https://drive.google.com/file/d/1PhXhtq9K-WiUbys0dwwZuOIat10hGlB0/view which contains pictorials for each method as well as patterns to practice. Included at the end is a list of Needle tatting resources. 

For several of the patterns, despite having a pdf, I had to give the link to the blog post because the pdf link just wouldn't work the moment I converted this doc into a pdf. Probably some formatting glitch.

 
Following is a limited glimpse into each method. 

Gapsosis - A frequently asked question is how to avoid any bare thread/gap between the chain and the thrown ring. Above is an old pictorial I had done in response to this very question, where we have a trefoil instead of a single ring thrown off the chain - https://tipsaroundthehome.blogspot.com/2017/05/squirreling-away-gapsosis.html

1. Using 2 shuttles. I prefer this method except when I want to create a point in the chain where the ring is.

A thrown ring does not necessarily have to be floating above a chain or ring! It can lie above a join, between 2 chains, and can also face inwards.....
While this 8-ring appearance may not use the term thrown ring, the blue ring is made exactly according to any of the TR methods (in above case, with 2nd shuttle). 
Several other effects can be seen in the above model. Can you identify the thrown ring(s) in each?

NOTE: Although not shown in the pictorials, the pink ring need not be alone. We can have 2,3,or more rings below, with 1 or more TRs above!

All the rest of the methods are made with one shuttle and ball. Compare the colour of the TR and the chain curvature between each method. It is very important that chain stitches are snugged properly before attempting the TR.
2.A. Flipped-Up ring is simply a normal ring that is turned upwards before continuing with the chain.
2.B. Since I didn't like the way it sat, I tweaked it by stabilising and centering the TR with on overhand tie and keeping the ball in front of the work.
3. Loop Tatted Ring can be used to throw off a ring as well.
4. We all know that the Self-Closing Mock Ring is often used to deliberately create a pointed chain - whether it is a 1ds SCMR or a larger thrown ring.

Direct Tatting. In certain cases, it is easy direct tat a chain and throw off a ring, using single shuttle and ball. Tatting will move from right to left, but the shuttle will be in position to make a thrown ring.
Even if the shuttle is not in position, it can be brought to where we need it, by the following 2 methods -
5.A. Twist Work - I start by making an unflipped half-stitch but instead of snugging. I pull the shuttle upwards (or downwards, if required) such that the threads now switch position and I have the shuttle where I need it. I had explained it here to switch threads after a lock join - 
 https://drive.google.com/file/d/1nRj_48VHK2LjhcxdQnirXBVweKO6h2ow/view 
5.B. Shoe Lace Trick - we all know this, but I avoid it and prefer other repositioning methods, including twist work. Jon Yusoff has explained this method very nicely here (wish I could get my SLT to behave so well!) - https://tatsaway.blogspot.com/2010/05/sometimes-you-dont-need-two-shuttles.html  

6. Changing Course - When another row/round follows the one with thrown rings, one can choose to shift the rings to the next row/round and make them normal rings. Obviously the direction of the rings will change, and sometimes it may cause ruffling/cupping/distortion. However, it worked fine in the above version - those purple rings were supposed to be thrown rings from the previous round, but I wanted this colour here, hence.... https://tipsaroundthehome.blogspot.com/2019/06/valley-of-flowers.html 

I tatted this twice! My intention was merely to showcase the different effects when using each of the methods (lower scroll). But then somebody asked whether I had a tutorial actually showing how to do a thrown SCMR. So, I started over, taking stepwise pics for each method. 

And now I'm calling it a Ready Reckoner (RR), because as far as possible, I have included everything we'd want to know about Thrown or Floating Rings. I would love to get your feedback on this format and exercise. I already have another RR on the way that was started in July in response to a friend's request for help. 


Monday, 21 December 2015

angelette pattern

Pin It now!
She Popped Out !!!

What can I say, look for yourself :
Isn't she adorable ?! As soon as I completed the main pattern by Endrucks, I couldn't wait to tat her.
Some figuring out was required to tat her in one pass, since in the main pattern, she spans both rows partially.
All the tatting was done ages back. However, preparing the diagram & writing the pattern took a while. I was hoping to post it sooner .... still, hope this little angel brings joy & happiness to your homes & hearts :-)

Derived from 
* Click on names for respective pattern downloads


I am sharing a few process pics that I thought might help. The complete pattern can be downloaded here.

1. After step #12, make a very small picot & turn back up to continue step #13. This is how it looks so far.
Rings A,B, & C are split rings. Rings D & E are thrown/floating rings.
I used CWJs in places where the chain edge was contiguous. However these can be substituted with Lock Joins throughout.
2. 1st of 6 pearl beads in shuttle 1 is brought forward after closing ring F. The concentric chain block to the right has fewer ds as compared to the left one since this curves inwards & one is tatting from the outside to the inner chain. However, I was still not able to eliminate the angularity. Any thoughts ?
3. Here, we have reached step #21 with a long beaded picot holding 18 beads & a chain or 9+9 below. The tatting in upside down wrt angel. Hold the 18 beads a bit loosely on the long picot, so that when joined, there is enough slack for a nice curve.
 4. This is the complete diagram. Diagram is for the main version only. Version 2 has only a few changes, which are detailed in written pattern .
5. Main version of Eleonore's Li'l Angel done in size 40.
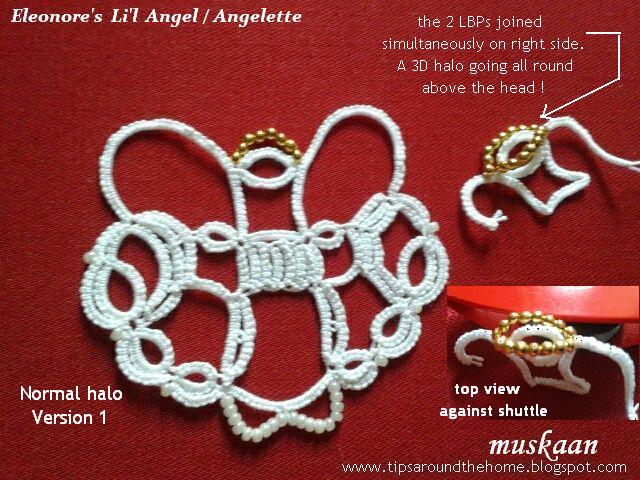
6A. Even as I tatted, I wondered if the halo could be made 3D, going all round the head. Above is the first solution I came up with - hold the beads in 2 long picots & then join them together in a single join, at the other side.
6B. This is how it looked in comparison with the original. The halo goes nicely over the head !
Note: I only tatted part of the wing & head as trial.
7. Version 2. In this, I had to preload Shuttle 2 with the gold beads (unlike the previous trial in 6A,B where loose beads were used). The beads were brought forward in a picot-like fashion & tatting continued. On reaching the other (right) side, a normal join to this beaded ring was all that was required.
TIP : After the beaded 'picot' I made 1ds, then ring for head. However, this causes the halo to sit low down on the head. Instead, make 2ds or 3 ds between the gold beads picot & the head ring. Make the same adjustment while joining on other side. It will have an added advantage : the complete halo will be visible !
8. Trying to show the complete halo in Version 2. I added graduated picots to the wings in this version. Makes the wings a bit more interesting, I think.
The Li'l Angels measure just over 2"x2" in size 40 thread.

Hope you enjoy the patterns. Feel free to contact me for any questions or help ...
Happy Tatting :-)

Related Posts : Eleonore's Angels

♫♫♫♫♫♫♫♫♫♫♫♫♫♫

I still have a few snowflakes to blog about, as well as a few "new" effects I've been trying out sporadically over the past few months. May be a sneak peek of the latter before the year is out, till I develop them further, ... but days are short & cold :-(


Thursday, 5 November 2015

Pattern: Eleonore's Angels

Pin It now!
Jigsaws to the rescue !


Who knew ?!
Who knew my love of puzzles, & jigsaws in particular, would help me solve a tatting pattern ?!
You know I love challenges, and true to form “fools rush in …” I readily agreed to do some summer homework for the Online Tatting Class, which incidentally/ironically, involved “angels”.

Single Angel medallion, tatted in one pass
Before proceeding with my trials ....(click on links to download)
The pattern is by Eleonore Endrucks Leichtenstern : Pattern #22 from Schiffchen-Spitzen 1920 and this book is in public domain. It can be downloaded from Georgia Seitz’s Archive (listed as Endrucks 1920 and Endrucks 1920 diagrams insert) . For modern version : Eleonore’s Angel Lace

A normal, 2-shuttle pattern, requiring only a knowledge of thrown rings (or rings on chain), & lock join followed by very small picot (or any preferred block tatting method). Yes, that's it ! 

**************

My Trials with
After quite a bit of puzzlement, I decided to make the very 1st edging pattern in her book, in order to get a sense of her designing, diagrams, writing, & notations (this will be shared later, along with pattern & an adapted coaster/edging).
Even so, I could comprehend only parts of her pattern & went ahead to tat those like a puzzle, hoping to fit pieces together later. As you can see in the pic below, the jigsaw rule was followed , by seeking out the ‘corners’ first …(Can you see another angel profile there ?!) 
Once these were done, it became fairly easy & within 2 days, the entire pattern was decoded ! It is large in size 20, hence for all subsequent tatting, size 40 was used.

**************
ROW 1
But let's start afresh. 
Having succeeded at piecing the puzzle together in size 20, I picked up purple (& white) in size 40. The lace/broad edging , despite it's elaborate & large size, is Only a Two-Row pattern !
Following are pics of Row 1, tatted in one pass. 
And also playing with it in various formations  ...
Single Repeat of Row 1 
TIP : When block tatting chains curve inwards, in concave fashion (as the block over the large ring on right), one can decrease the chain segment by 1ds each, to avoid cramping.
I did this much later, only in the Angelette tatted in white (2nd last pic below).
2 Repeats of Row 1
2 repeats of Row 1, when folded inwards
Choker Necklace, with beads & a tiny ring.
(when Row 1 is folded inwards. 2 repeats, one pass)
TIP : Excellent use of block tatting to move over distances, to move in diverse directions, to return to desired point, ..... spanning large areas, yet covering them with lacy effect.
4 repeats of Row 1, joined back to starting point.
A beautiful curved-corner edging/lace, tatted in one pass !
When Row 1 is folded 'outwards', it forms a 
V-shaped/triangular edging or necklace/choker !
4 repeats of Row 1 & joined back to starting point.
A 'Points n Curves' Edging for square/rectangular 
coasters, or mats, again, all tatted in one pass !
The 2 pics above have a part of Row 2 (last section - the outward-facing arches) included between each Row 1 repeat.
**************
Are you enjoying the genius of this designer ? Isn't it a marvel ?!  
Let's now move to Row 2 & see what is in store :-)

ROW 2

Steps 10-15 when starting Row 2, were a bit more puzzling than the rest, especially getting the curves & shuttles in place. Hence, I added 2 pics - one from front & other from behind to show how it looks.
Note : there are No SLTs in the entire pattern, which involves 2 shuttles. 
  

One repeat of Row 2 complete .
Confession : When I first laid eyes on the pattern, it did not appeal to me. Seemed to lack elegance. But as I tatted samplers and saw the potential, I kept getting drawn in to the brilliance of this design, and the designer. I intend to try out more of her patterns in future ....
2 complete repeats of Lace pattern 
2 complete repeats of Lace pattern, continued with
partial Row 2, & joined back, to create a square
2 partial repeats of Row 2, when folded inwards,
create another snug-fitting square !
Did Eleonore do jigsaw puzzles ? See how neatly each 'tile'/piece has been fitting in with adjacent 'tiles', irrespective of which tile or aspect or part thereof one chooses ?!

Angelette extracted from within the 2-Row medallion.
Tatted in one pass, with pearl & gold beads
TIP : For peripheral chains in blocks, one can replace LJs with CWJ for smoother outlines. However,  CWJ cannot be used in the concentric chain block on the right ... that requires concave tatting. Having decreased the concavely-worked block chain from 6 to 5 ds, it lies flatter now.

One single medallion tatted in One Pass !
(without last segment of Row 2) CWJs used
My tatting leaves a lot to be desired. And I keep thinking what I should/shouldn't have done... the vsp could've been even smaller for one; blocks could've been neater... And I absolutely should've blocked the pieces before photographing! But hope the tattiness of my tatting does not keep you from giving Endrucks book a go.

**************
Besides the fact that each piece fits immaculately with others, in different formations, do you want more proof of her mathematically impeccable design ?

  • Both rows have the exact same number of steps : 44 !
  • Both rows require the exact same length of thread  : 30yards/28m CTM for 4 repeats !
  • And although I haven't calculated, 'chances' are the number of knots is the same too, right ?! (I doubt she left anything to "chance", though)

For those interested :
DIMENSIONS FOR SINGLE MEDALLION/REPEAT :

In Size 40 thread :
ROW 1  : 3¼” (<8½cm) along base ; 1¼” (3cm) across top ;  <1¼” (3cm) high
ROW 2 :
Segments v-vii : ~4 cms across narrow ‘base’ ; 5½ cms across outer tips ; 3½ cms high (at tips) ; 2½ cms high in middle
Segment viii : 2 cms wide x ~2 cms high

In Size 20 thread :
ROW 1:  <4½” (11cm) base ; 2” (5cm) top ; 1¾” (4½cm) high
ROW 2 :
Segs v-vii :  2” wide at narrow ‘base’ ; 3” broadest ; 2” high (at tips) ; >1” high in middle

Seg viii : 1” high ; 1¼” wide 

**************
Tatting these does not take time. Really ! Writing & diagramming the pattern was like a never-ending process. So many drafts & redrafts had to be made & rejected, till everything seemed to be as logical as possible.  If you have any questions or difficulties, feel free to ask away.
I tatted FS/BS (using RODS) & have written & diagrammed accordingly, with colour coding, though it is Optional. However, if anybody finds that too intimidating, & wants an All-black pattern, please let me know & I will convert it into an all-black diagram/text & send/upload.
I will also post patterns for all the adaptations/derivations as they get completed.

The pattern was taught by Georgia on Nov 2nd, 2015 

Motifs 6-10 / III for 25 Motif Challenge

Happy Tatting :-)