Showing posts with label one pass tatting. Show all posts

Wednesday, 12 July 2017

slippery paths

Pin It now!
a TWoT analysis of climbing out in tatting

Mark ‘tatman’ Myers’ Luster Snowflake
Studying Pathways and Process – a stepwise pictorial


Luster snowflake by Mark Myer is an excellent study in tatting continuously without cutting the thread, using techniques such as split rings (SR) and self closing mock rings (SCMR) to climb out. The pattern also provides plenty of SCMR practice.

We’ve all been there – we can do the split rings and SCMRs, yet the orientation and which shuttle goes where can get confusing during early stages of learning. Which is what happened with Amritha from the online class. She is aggressively learning many tatting techniques and often emails me for help. I can usually answer her questions using various means, but this particular one needed a holistic approach. It required more stepwise visuals, despite the accompanying diagram and notations therein. And I discovered 2 pathways in the process!

With Mark Myer’s kind permission and lovely email, I am sharing the path/sequence of elements in the snowflake, through the use of 2 different colours, in the hope that others facing similar situations may also find some resolution. 
This exercise will be beneficial in future 2-colour tatting to understand placement of colours, direction of tatting, shuttle choice, and directional (frontside/backside) tatting - to make choices and understand effects.

This project was started & completed in May when his Tatterville site was still operational. Since then, most of his patterns have been shifted to facebook. 
This pattern can be downloaded from Photos  Tatting Patterns album.

Click to download Pictorial pdf of Luster Snowflake Process
The stepwise pics and explanation are in the pdf along with notes, tutorial links, table and tips such as when to switch shuttles, etc. 

When you climb out with a split ring and the very next element is a chain, how do you work this ? Do you reverse work and tat the chain from the back side (path 2) or do you simply switch shuttles and continue from the front side (path 1) ?

My own feeling is that the former is almost a natural subconscious movement and often unwritten/unspecified in written patterns & diagrams. The switch shuttles is a more ‘modern’ phenomenon. And I guess tatman used the Reverse Work path - it all fits in.
I faced a somewhat similar directional dilemma in this heart pattern where the diagram & instructions went a certain way & my tatting the other.

Your choice determines the overall direction of working the round, the shuttle required for elements such as thrown rings & SCMRs, and also the colour of chains, thrown rings, mock rings in two-colour tatting. 
This is one of the TWoT (This Way or Tat?) rules that is yet to be shared through diagrams.
Let's examine it partially through the snowflake ....
In both models, shuttle 1 has copper thread and shuttle 2 has green. The center is worked exactly the same. Only after the climbing into outer round with split ring, do we need to take a decision on how to proceed.

TWoT Rule for climbing out with a split ring
Path 1 involves choosing the nearest shuttle . Thus tatting progresses from the front, in a clockwise direction. 

Path 2 involves reversing work (RW) as we would do if it were a regular ring-chain pattern. Here, tatting progresses counterclockwise when seen from the front. (The same consequences are seen if we Turn Work here)

Compare also the colour changes that occur in the outer round because of these choices - in the chains, the rings and the thrown clover!
And obviously the working shuttle changes.

So how do we decide which shuttle produces what effect in some of the common techniques used ? Especially in 2-colour tatting. The following table works as a quick reference. 
Red thread in shuttle 1 & blue thread in shuttle 2. 
The table shows the colour of stitches and the lower row shows core thread colour (which is the same as the working shuttle, except in case of split rings).
And these coloured arrows depict the core thread colour in the luster snowflake (path 1) model ... where red is shuttle 1 (copper thread) & green is shuttle 2 (green thread)

This post has probably become more technical than I'd intended, so if you managed to read through, you are my hero :-)))

I thoroughly enjoyed tatting the 3 models, although I do prefer working in size 40 (white). And I hope some confusion will be laid to rest through the pictorial in pdf.
This is my first tatman pattern, but definitely not the last.


Many many thanks to Mark ‘tatman’ Myers
for his gracious permission and generosity


Related Posts :
How to avoid gapsosis in ring clusters (Luster snowflake used for pictorial)  


Saturday, 22 October 2016

fluorescent candy

Pin It now!

For all sweet-tooth tatters, my serving of a neon-isc candy treat. Hope you enjoy the slow release of flavors ;-p

Hamigyeong (tattingweed)

Most of the details have already been accounted for in the previous post, including graphics of how the work progresses, a few tips, and my working notes. Keeping my promise of few words ....
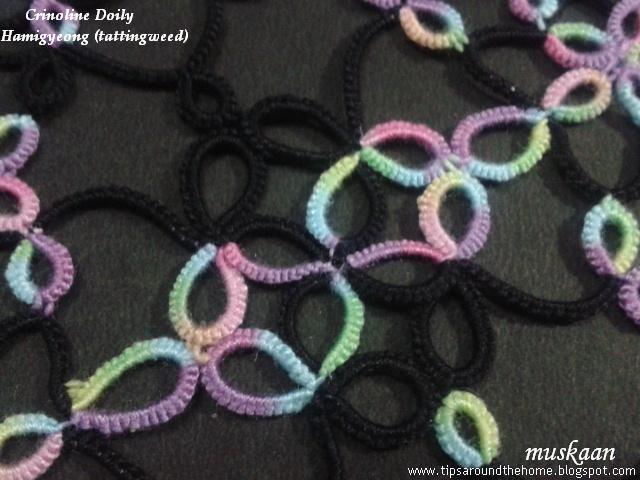
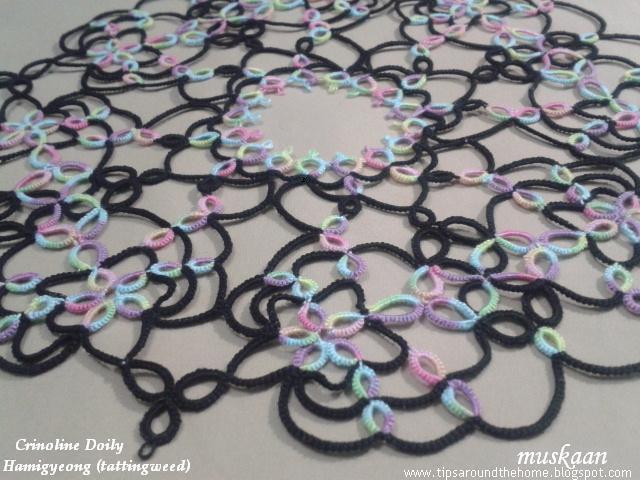
Love the multiple patterns and shapes that jump out ….

This is the same pic, with swirling wheel effect, as the lead in previous post, against a black background.

Finished size – 7½”. From clover point to point - 7¾” ALL IN ONE PASS !!!
Threads - Anchor crochet cotton size 50 black; Anchor Embroidery 4615 – 1335 2 strands.

Techniques I used : 2 shuttle tatting, directional tatting, reverse stitch, split rings, self-closing mock rings, thrown/floating rings, folded chain, reverse join, up & down picot joins, split ring join.
Personalized colour placement required some additional callisthenic  

If the graphics in my previous post scared anybody, Hamigyeong shares a simpler and smaller Little Butterflycoaster/doily with the pattern inked here. It is like a precursor to the larger and more complex Crinoline, both conforming to the same basic principles.
I don’t particularly like too much open space in a doily, preferring them a bit dense. And if the chains were shorter in this one, it might have been that much simpler to work with. But I enjoyed Every Single Moment of it. And I absolutely love the clean lines without picots ! 
How simple rings and chains can be meshed together ! Brilliant designing !!! Of course, one needs one’s wits around while working this. It is not your everyday relax-and-tat pattern, thus making it so much more special. It does, however, follow a logical sequence and stitch-count which becomes easier at the 3rd quadrant stage (for me).
I hadn’t realized that Hamigyeong (aka tattingweed) is the author of the currently popular book “Tatting Lace With Your Life” ! Check out her beautiful work on Instagram . She also goes by the name of  Fireweed Plains. This is her gorgeous working of the Crinoline doily that got me ‘shuttled’ immediately. (I didn’t have this link earlier). Of course the timing was just right - it has helped me further in my TWoT series.

 Many many thanks to Hamigyeong for sharing her brilliant design !

happy tatting :-)


Thursday, 20 October 2016

truly serpentine

Pin It now!
I had written this post some days back, while still less than halfway through the doily. Didn’t get a chance to either take pics or to notate them and post. Meanwhile, I completed tatting the entire doily a couple of days back. Life is a bit in the way, and that has forced me to break the presentation into 2 posts. Here, I will share my working notes (the Boring stew), giving me time to complete the presentation of the finished doily (the yummy candy).

My Working Notes
for
There is quite a bit of interest in this beautiful doily. Before I start to forget, I’d like to share my working and thoughts ….The doily is not blocked, so please excuse the pics

Abbreviations used (in order of appearance):
SCMR – self closing mock ring
DS – double stitch
RODS – reverse order DS
SLT – shoe lace trick/overhand tie
p – picot
shs – 2nd half stitch
fhs – 1st half stitch
RS – reverse stitch (unflipped)
RW – reverse work

1. Worked completely in one pass !!! Divided into 4 quadrants ; each further divided into 2 mirrored halves (thus we get 8 sectors or pizza slices). Each quadrant (made of 2 sectors) forms one complete repeat.

At this stage it looks like a bull’s head !!!!
2. When considered for the doily as a whole, the overall direction of work is counterclockwise. However, within each sector, we work in many different directions, including ‘up and down’, ‘in and out’. It’s serpentine movement reminds me of the magic square and Iris Niebach’s doilies. 


3. The pattern as such is simple, worked with two shuttles : Rings and chains with reverse work. 4 SCMRs, few split rings, and a few rings made with 2nd shuttle. That’s about it! What makes this doily an arguably advanced or skilled pattern is the movement of the elements and segments – not easy to memorize.

4. If one is doing directional (frontside/backside) tatting, then we encounter ‘blocks’ or segments that act as a “unit” – thus we start with a segment where rings are DS & chains are RODS; then switch to the next segment where rings are RODS and chains DS. Those who have tatted Mary Konior’s Spinning Wheel Glass Mat in directional tatting (or in 2 colours) will understand how one half of the wheel ‘spoke’ works as a unit/block/segment.

5. Exception to #4 : There are also what I consider ‘thrown’ rings (even though they may not strictly be on a chain) ie. rings made with the other/auxiliary/second shuttle. They, of course, will follow the order of the ‘chain’ (RODS or DS)
6. I did add some complexity of my own (yes, I can’t seem to leave well enough alone !) by customizing the placement of colour using Reverse Join or simply laying one thread over the other (instead of SLT. See, I’m not much of a stickler for rules, nor a lover of SLT ;-) ).

7. To turn direction, I used ‘folded chains’ ie., (p, 2shs) or (p, 2fhs). These were included in the stitchcount of the chain (1DS). The folded chain also helps to keep the colour of chain constant.

TIP : In order to fold the chain, I made a picot and continued with the Same half stitch twice, as the last half stitch ; thus there are 3 same half-stitches in a row.
Note that in directional tatting the order switches after folding, because the chain has turned back over itself!
Thus, when folding a DS chain : (p,2shs) , continue next chain with RODS
Conversely, when folding a RODS chain : (p,2fhs) , continue with DS

8. I love the way tattingweed has sketched & notated over the scanned doily with little red arrows showing the direction of tatting – very clear. While tatting, though, I did miss the numbering on rings. Hence, halfway through the 3rd sector, I took another printout & inked the ring sequence. It really helped ! I also added the stitch count for the mirrored Sector 2. in the first printout.

9. There are some rings that need picots, while other elements join there. Due to changes in direction, it was sometimes difficult to tell which ring came first and had the picot. I made a black line on that ring, in the printout. But with the rings numbered in 2nd printout, it was easy.

10. Using Reverse Stitch for chains is another way to keep track of the pattern. RS helps us tat from the front, reducing RW to a minimum. This makes it easier to read the printed sketch. However, if a segment has many ‘thrown’ rings, then RS is not such a convenient option (unless one uses Reverse Rings or Rings in RS!)
As it turned out, I didn’t use the RS much for various reasons. It did come to the rescue in the very last segment, when joining back to the first sector. Here, one has to work inwards, and it became too confusing. When I switched to RS, I could accomplish the tatting and joining all from the front.


Spot treatment

There were a few mistakes where I had to retro-tat the element. But one mistake was discovered very late and a lot of tatting would have to be cut – I had joined a ring to the wrong picot! This called for some minimally invasive localized surgery.
Here’s what I did :
Cleared some space in the ring by moving the stitches and snipped the stitch thread - Not the core thread ; Not the entire ring.
Logic : It would give me plenty of thread at either end when the ring was unraveled.  Luckily it was a large ring and I had more than enough length to sew in the ends to adjoining elements.
Pull the core thread to unravel all the stitches.

Add new thread and tat the ring.
This was also completely knotless method of hiding ends – tatting over tails and sewing in opposite directions to adjoining elements
As I write this, I realize an easier way – I could’ve done a Mock Ring using the core of snipped ring! Waaaaah :-(  Or may be I had already closed the ring and it didn’t seem worth the trouble to unravel it. Memory evades; but nevertheless a solution to keep in mind for future.

As a reward to those who have diligently read through all this, I’ll keep my mouth shut for the most part of the grand reveal in next post, letting pics do the talking. Ummm, at least I’ll try my best ;-p

happy tatting till then :-)

Monday, 21 December 2015

angelette pattern

Pin It now!
She Popped Out !!!

What can I say, look for yourself :
Isn't she adorable ?! As soon as I completed the main pattern by Endrucks, I couldn't wait to tat her.
Some figuring out was required to tat her in one pass, since in the main pattern, she spans both rows partially.
All the tatting was done ages back. However, preparing the diagram & writing the pattern took a while. I was hoping to post it sooner .... still, hope this little angel brings joy & happiness to your homes & hearts :-)

Derived from 
* Click on names for respective pattern downloads


I am sharing a few process pics that I thought might help. The complete pattern can be downloaded here.

1. After step #12, make a very small picot & turn back up to continue step #13. This is how it looks so far.
Rings A,B, & C are split rings. Rings D & E are thrown/floating rings.
I used CWJs in places where the chain edge was contiguous. However these can be substituted with Lock Joins throughout.
2. 1st of 6 pearl beads in shuttle 1 is brought forward after closing ring F. The concentric chain block to the right has fewer ds as compared to the left one since this curves inwards & one is tatting from the outside to the inner chain. However, I was still not able to eliminate the angularity. Any thoughts ?
3. Here, we have reached step #21 with a long beaded picot holding 18 beads & a chain or 9+9 below. The tatting in upside down wrt angel. Hold the 18 beads a bit loosely on the long picot, so that when joined, there is enough slack for a nice curve.
 4. This is the complete diagram. Diagram is for the main version only. Version 2 has only a few changes, which are detailed in written pattern .
5. Main version of Eleonore's Li'l Angel done in size 40.
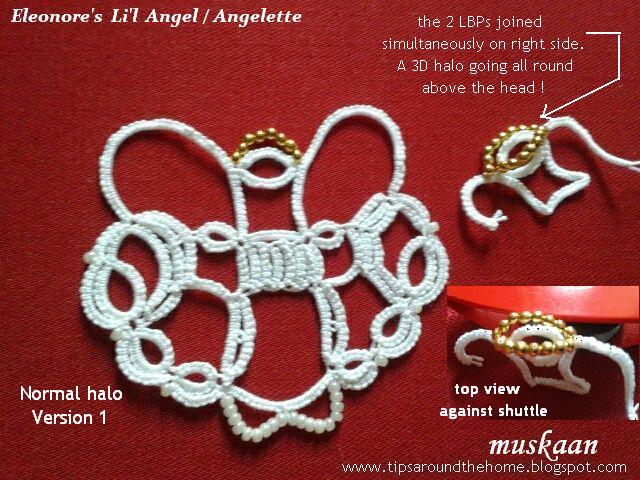
6A. Even as I tatted, I wondered if the halo could be made 3D, going all round the head. Above is the first solution I came up with - hold the beads in 2 long picots & then join them together in a single join, at the other side.
6B. This is how it looked in comparison with the original. The halo goes nicely over the head !
Note: I only tatted part of the wing & head as trial.
7. Version 2. In this, I had to preload Shuttle 2 with the gold beads (unlike the previous trial in 6A,B where loose beads were used). The beads were brought forward in a picot-like fashion & tatting continued. On reaching the other (right) side, a normal join to this beaded ring was all that was required.
TIP : After the beaded 'picot' I made 1ds, then ring for head. However, this causes the halo to sit low down on the head. Instead, make 2ds or 3 ds between the gold beads picot & the head ring. Make the same adjustment while joining on other side. It will have an added advantage : the complete halo will be visible !
8. Trying to show the complete halo in Version 2. I added graduated picots to the wings in this version. Makes the wings a bit more interesting, I think.
The Li'l Angels measure just over 2"x2" in size 40 thread.

Hope you enjoy the patterns. Feel free to contact me for any questions or help ...
Happy Tatting :-)

Related Posts : Eleonore's Angels

♫♫♫♫♫♫♫♫♫♫♫♫♫♫

I still have a few snowflakes to blog about, as well as a few "new" effects I've been trying out sporadically over the past few months. May be a sneak peek of the latter before the year is out, till I develop them further, ... but days are short & cold :-(


Thursday, 5 November 2015

Pattern: Eleonore's Angels

Pin It now!
Jigsaws to the rescue !


Who knew ?!
Who knew my love of puzzles, & jigsaws in particular, would help me solve a tatting pattern ?!
You know I love challenges, and true to form “fools rush in …” I readily agreed to do some summer homework for the Online Tatting Class, which incidentally/ironically, involved “angels”.

Single Angel medallion, tatted in one pass
Before proceeding with my trials ....(click on links to download)
The pattern is by Eleonore Endrucks Leichtenstern : Pattern #22 from Schiffchen-Spitzen 1920 and this book is in public domain. It can be downloaded from Georgia Seitz’s Archive (listed as Endrucks 1920 and Endrucks 1920 diagrams insert) . For modern version : Eleonore’s Angel Lace

A normal, 2-shuttle pattern, requiring only a knowledge of thrown rings (or rings on chain), & lock join followed by very small picot (or any preferred block tatting method). Yes, that's it ! 

**************

My Trials with
After quite a bit of puzzlement, I decided to make the very 1st edging pattern in her book, in order to get a sense of her designing, diagrams, writing, & notations (this will be shared later, along with pattern & an adapted coaster/edging).
Even so, I could comprehend only parts of her pattern & went ahead to tat those like a puzzle, hoping to fit pieces together later. As you can see in the pic below, the jigsaw rule was followed , by seeking out the ‘corners’ first …(Can you see another angel profile there ?!) 
Once these were done, it became fairly easy & within 2 days, the entire pattern was decoded ! It is large in size 20, hence for all subsequent tatting, size 40 was used.

**************
ROW 1
But let's start afresh. 
Having succeeded at piecing the puzzle together in size 20, I picked up purple (& white) in size 40. The lace/broad edging , despite it's elaborate & large size, is Only a Two-Row pattern !
Following are pics of Row 1, tatted in one pass. 
And also playing with it in various formations  ...
Single Repeat of Row 1 
TIP : When block tatting chains curve inwards, in concave fashion (as the block over the large ring on right), one can decrease the chain segment by 1ds each, to avoid cramping.
I did this much later, only in the Angelette tatted in white (2nd last pic below).
2 Repeats of Row 1
2 repeats of Row 1, when folded inwards
Choker Necklace, with beads & a tiny ring.
(when Row 1 is folded inwards. 2 repeats, one pass)
TIP : Excellent use of block tatting to move over distances, to move in diverse directions, to return to desired point, ..... spanning large areas, yet covering them with lacy effect.
4 repeats of Row 1, joined back to starting point.
A beautiful curved-corner edging/lace, tatted in one pass !
When Row 1 is folded 'outwards', it forms a 
V-shaped/triangular edging or necklace/choker !
4 repeats of Row 1 & joined back to starting point.
A 'Points n Curves' Edging for square/rectangular 
coasters, or mats, again, all tatted in one pass !
The 2 pics above have a part of Row 2 (last section - the outward-facing arches) included between each Row 1 repeat.
**************
Are you enjoying the genius of this designer ? Isn't it a marvel ?!  
Let's now move to Row 2 & see what is in store :-)

ROW 2

Steps 10-15 when starting Row 2, were a bit more puzzling than the rest, especially getting the curves & shuttles in place. Hence, I added 2 pics - one from front & other from behind to show how it looks.
Note : there are No SLTs in the entire pattern, which involves 2 shuttles. 
  

One repeat of Row 2 complete .
Confession : When I first laid eyes on the pattern, it did not appeal to me. Seemed to lack elegance. But as I tatted samplers and saw the potential, I kept getting drawn in to the brilliance of this design, and the designer. I intend to try out more of her patterns in future ....
2 complete repeats of Lace pattern 
2 complete repeats of Lace pattern, continued with
partial Row 2, & joined back, to create a square
2 partial repeats of Row 2, when folded inwards,
create another snug-fitting square !
Did Eleonore do jigsaw puzzles ? See how neatly each 'tile'/piece has been fitting in with adjacent 'tiles', irrespective of which tile or aspect or part thereof one chooses ?!

Angelette extracted from within the 2-Row medallion.
Tatted in one pass, with pearl & gold beads
TIP : For peripheral chains in blocks, one can replace LJs with CWJ for smoother outlines. However,  CWJ cannot be used in the concentric chain block on the right ... that requires concave tatting. Having decreased the concavely-worked block chain from 6 to 5 ds, it lies flatter now.

One single medallion tatted in One Pass !
(without last segment of Row 2) CWJs used
My tatting leaves a lot to be desired. And I keep thinking what I should/shouldn't have done... the vsp could've been even smaller for one; blocks could've been neater... And I absolutely should've blocked the pieces before photographing! But hope the tattiness of my tatting does not keep you from giving Endrucks book a go.

**************
Besides the fact that each piece fits immaculately with others, in different formations, do you want more proof of her mathematically impeccable design ?

  • Both rows have the exact same number of steps : 44 !
  • Both rows require the exact same length of thread  : 30yards/28m CTM for 4 repeats !
  • And although I haven't calculated, 'chances' are the number of knots is the same too, right ?! (I doubt she left anything to "chance", though)

For those interested :
DIMENSIONS FOR SINGLE MEDALLION/REPEAT :

In Size 40 thread :
ROW 1  : 3¼” (<8½cm) along base ; 1¼” (3cm) across top ;  <1¼” (3cm) high
ROW 2 :
Segments v-vii : ~4 cms across narrow ‘base’ ; 5½ cms across outer tips ; 3½ cms high (at tips) ; 2½ cms high in middle
Segment viii : 2 cms wide x ~2 cms high

In Size 20 thread :
ROW 1:  <4½” (11cm) base ; 2” (5cm) top ; 1¾” (4½cm) high
ROW 2 :
Segs v-vii :  2” wide at narrow ‘base’ ; 3” broadest ; 2” high (at tips) ; >1” high in middle

Seg viii : 1” high ; 1¼” wide 

**************
Tatting these does not take time. Really ! Writing & diagramming the pattern was like a never-ending process. So many drafts & redrafts had to be made & rejected, till everything seemed to be as logical as possible.  If you have any questions or difficulties, feel free to ask away.
I tatted FS/BS (using RODS) & have written & diagrammed accordingly, with colour coding, though it is Optional. However, if anybody finds that too intimidating, & wants an All-black pattern, please let me know & I will convert it into an all-black diagram/text & send/upload.
I will also post patterns for all the adaptations/derivations as they get completed.

The pattern was taught by Georgia on Nov 2nd, 2015 

Motifs 6-10 / III for 25 Motif Challenge

Happy Tatting :-)