Showing posts with label apron. Show all posts

Tuesday, 31 May 2016

coming together for a cover-up !

Pin It now!


I didn't want to enter the kitchen so soon ! But a tummy needs what a tummy needs, no matter sun or rain, muggy or cold. There's no grumbling with rumbling. Leftovers, you say ? Yes, of course, but one still has to make something in order for there to be leftovers, right ?
And one doesn't want to get one's pretty dress dirty in the process !
So off I crawled to the kitchen, .... taking a little detour through time and the sewing room. 

'Make something' first !
Stepping back a couple of years.... My MIL needed nightwear ASAP due to an emergency hospitalization leading to a long recovery/rehabilitation thereafter. Luckily I had recently bought a lot of cotton fabric for both of us and could sew them out quickly. Here is one such, a hand-block printed Bagru cotton :
 
There was no time for anything fancy ...
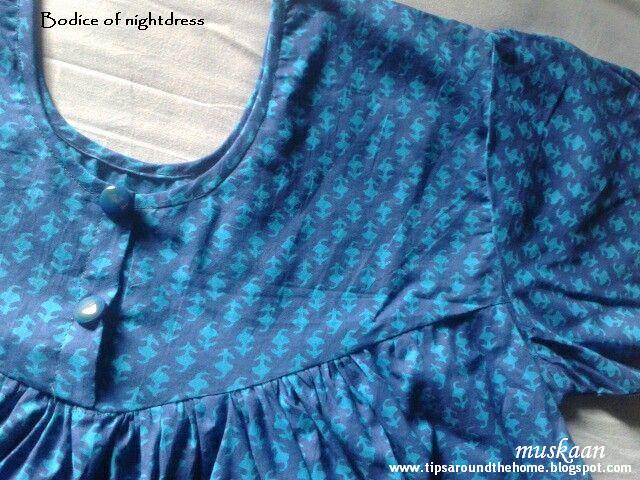
But still too simple, so I rummaged through my frugal button stash and found some matching buttons to put along the front … (these buttons were left over from a 2nd birthday dress I had sewn for my niece).
And the sleeve, though not clearly visible, has an open box-pleat at the base and a minimal puff at shoulder.

One of the advantages of sewing oneself, is you get to keep all the leftover fabric pieces :-D  
There was a decent-sized rectangular piece that could be used for an apron, since it was pure cotton.


Apron from 'leftovers' ! 
My pinterest challenge for May 2016


What pattern to use ?
Tropical weather can be quite hot & humid as we approach monsoons, and add to that the heat in the kitchen. Even the thin apron strap round the neck can cause discomfort & perspiration ! I have been looking for apron patterns that circumvent the neck strap/string & saved a few on my DIY-Sewing board.
Despite the lovely ideas, they all had a kind of skirt around the waist, and wider straps behind needing much more fabric than I had or wished to use. These projects gave me a very good idea but customization was called for. 

Firstly, I had only about 35”x 22” (plus enough seam allowances all around) of this material. Plenty for a straight-cut apron; not enough for pleats and skirts.
Secondly, the fabric suddenly seemed a bit thin for a durable apron; not enough body.
Rummaged through my fabric stash & found this plain blue fabric.

A double-sided/reversible apron ?
Yes ! Keeps the boredom away ;-D

How to adorn ?
Tatting …
Another rummage, this time through my tatting stash.
I had 30 blue & white motifs in 3 sizes which had been sewn on to a blue silk sari & gifted to my MIL in 2000. Unfortunately, the sari colour ran & the white turned pale, spotted blue :-(  Eventually she removed & returned the motifs, knowing I would put them to some sort of use, & wore the sari plain.
Perfect for this fabric print & colour ! Picked the ones where the white thread was more evenly ‘dyed’. 
3 small motifs & 2 medium motifs were arranged & sewn only through the printed fabric.
The pattern is from the only tatting book I had for decades (gift from a dear friend) “Tatting Favourites” from Anchor Design Center

…. and Painting !
My idea was to do some freestyle monotone fabric painting on the plain blue side. That was the reason I used dark blue sewing thread on the light blue fabric. But practicality ruled. See, once the front is ironed, it will leave an ‘imprint’ on the back; so it would not really be a reversible apron. The blue would just have to settle for being a lining.

How to strap it on ?
Still strapped with the neck 'strap' problem….
I couldn’t decide whether the strings should go straight down the back or make a cross. This led to difficulty in estimating their length and position (one should have a mannequin or a live model!). Hmm, as I write this, it occurs to me that I could've used crocodile clips to estimate !!!
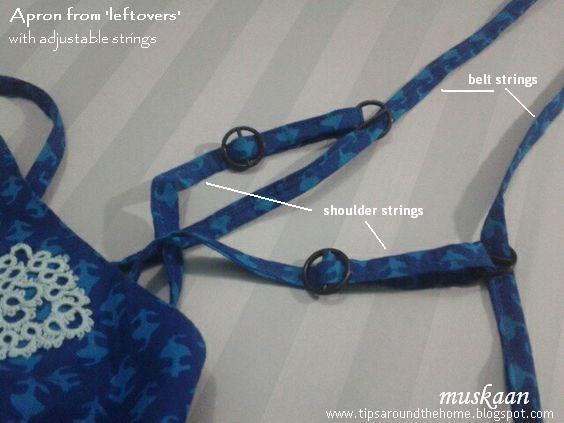
So the decision was postponed – 4 strips were sewn – 2 on top & 2 for the belt.
Meanwhile the remaining sewing, including hand-hemming the bottom seam was completed.
I was still lost, and the last day of May to post the pinterest challenge was fast approaching… take a deep breath and Think girl !!! 
Rummaged through my meagre leftover neural stash .... and  Eureka ! 
Adjustable strings !!!
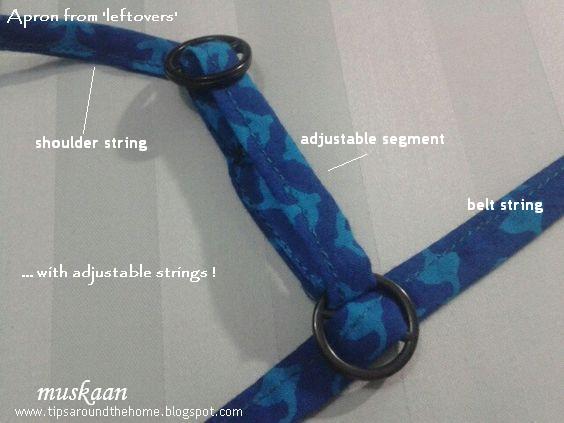
Rummaged through my closet & cut out an old beige bra & removed the ahem “bra strap adjustment slide rings” – quite a mouthful (hmmm, didn’t know the term, but Google always obliges).
 Once I saw that it would work, I cut out another black one for black rings.
One ring went into each belt, and the rings for adjustment went on each shoulder strip.
The adjustable segment was hand-sewn.
The belt rings are free-sliding at present, leaving me the option of wearing the strings straight or across my back. The final tacking down of the rings on the belt will have to wait till I wear the apron for a bit & adjust to comfort.

The belt strings are left long enough to be tied in front .

That’s my challenge completed & solved to my liking, literally using leftovers – quite a cover-up!


Aren’t you just curious to see what the other pin chicks are up to? I am.
Let's visit them and check out their immense creativity at
& our newest member


Related Posts : pin chick in the bed room ,
the kitchen,
the bathroom,
the dining room


Thursday, 25 September 2014

Tatting Away VII

Pin It now!
Sunshine Snowflake Lace & Braid !


οОο οОο οОο οОο οОο 

Sunshine Snowflake by Patty D
Patty Dowden writes “I was struck by the notion that I could design a snowflake that was all rings, not hard and be interesting to look at.”
Well, she achieved all that & more! A snowflake made with radiating beams of rings only!
First time I set eyes on her Sunshine Snowflake, I was intrigued & by how she got all those rings lined up one after the other – vertically radiating from a circular formation – just like sunbeams !! They seemed to be connected in a circle at the center but were simultaneously unconnected when radiating outwards And no threads crossing between motifs !


She graciously shared the pattern on the forum & has given me free rein to share it too, along with pictures of her own project. Click on the caption under the snowflake picture for the pdf.

οОο οОο οОο 

Neck Lace / Edging
Materials :
Anchor Mercer Crochet Cotton size 20. Variegated Purple with white – 1208.
Single Shuttle.
Techniques :
Ordinary/Normal Ring – R
Split Ring – SR
Single Shuttle Split Ring – SSSR  (can be optional, but is preferred & convenient)

Each vertical row starts with one ordinary R, followed by SRs, ending with a small SSSR. That’s it !!!

I started off intending to make the snowflake. But having made 3 vertical rows or one repeat, it dawned on me that this would look great around the neck ! 
So I restarted, this time converting it into an edging for neck. 
To that purpose, I eased off on the peripheral gradient by adding another vertical row between the ones in the original pattern.
The original Snowflake pattern has a section/repeat/motif of 3 vertical rows (as seen in image above) : 
( 4 rings, 6 rings, 4 rings ) x 6.
All I did was add another row of 5 rings on either side of each vertical row : 
( 4 rings, 5 rings, 6 rings, 5 rings, 4 rings, 5 rings ) repeat to desired curvature. (see close-up image below)


TIPS / Notes :
  • Because each vertical row is ‘separate’ & started afresh, there will be a lot of thread ends to hide. So it is a very good idea, & convenient, to learn SSSR. I swear by SSSRs now !!! Gone are the days when I had to tie a knot & sew/ weave in the tails !!!
  • One can increase the length of each vertical row by adding as many SRs as desired !
  • If the joining picots in base ring of each vertical row are shifted, then one can get a longer, broader curve, rather than a short & deep one. However, for a choker or necklace, it is perfect ! Add a pearl or bead & it’s soiree time !
  • If one continues further to complete the circle, it could make a nice mini-doily too (sew on a piece of circular fabric for center). And since each ‘row’ is made separately, one can grow crazy with multi-colored sunbeams !! The diameter from periphery is 7½ inches approx.
  • Make 2 half circles, alter the positions of vertical rows & sew on as a stylized Peter Pan collar !!!

It was a surprisingly quick & thoroughly enjoyable tat & was then hand-sewn on to my newly stitched apron. I have not tacked down each and every ring, just at critical & strategic points, to hold it’s shape & alignment.

Next step : Make the neck or shoulder straps in the form of braids. Not as easy as smooth sailing as it seemed …..
οОο οОο οОο 

Apron Braid / String :
Materials : Anchor Mercer Size 20
Variegated Purple – 1208
Purple – 0101
Techniques :
Split Ring
Woven cords/braids

All I wanted was a simple Split Ring braid, keeping the stitch count in sync with the snowflake/border, and using the same thread.
But as the braid progressed, the thread regressed !!! The tightly twisted thread kept unraveling &/or breaking. I was already half way into the braid when the problems began, so chugged along.
Change of course was nevertheless required !

Made similar braids with solid purple and interwove them with the original variegated ones, to provide the necessary strength, stability and durability. Interweaving braids was on my to-learn list for a long time anyways. I followed Gina Brummet's tutorial on Woven Split Ring Cord-2 shuttles.

The smallest ring in the braid, however, wouldn’t allow the larger rings to pass through. Hence, the weaving was done by placing the smallest ring of one braid over the largest ring of the other braid; for all other rings, the braids were passed through them. This gives a slightly irregular weaving because after 2 proper weaves, the 3rd rings (one small, one large) in both braids just lie juxtaposed, not passing through each other. But overall, a symmetry is maintained & barely discernible.

Repeats of -- ( SR 6/6, SR 10/10 , SR 12/12 , SR 10/10 ) to required length.
Interweave the 2 braids & sew tips to fabric of apron.


TIPS / Notes :
  • To go round the neck, a single woven braid suffices.
  • I made 2 woven braids & sewed them on either side as shoulder straps, joining to the belt behind. It can get really hot under the neck in these Indian summers, so this is more convenient. Since the braids did not cross at back, length of 25 inches sufficed for me.
  • One can also opt for sewing the entire braid on to fabric straps, which are in turn attached to the main body of apron.
  • I deliberately avoided picots in the braid. Washing would mess them up & it would take quite some effort to iron them out looking right every time. So, keep it simple ;-))
  • The braid(s) can be sewn on along the edges of the entire apron. I wanted the focus to remain on the “neck-lace”, hence did not attach the braid to the sides.
  • The woven braid can be used as a belt/apron string as well.
  • Or how about a string of rings around the neck ?!  

I enjoyed tatting the braids to the extent that the variegated thread remained willing & gracious. The solid purple braids were extremely quick & silken smooth to tat. That is the difference a thread can make !!
The weaving, though easy, was a bit tiresome. Without a shuttle in the hand, it just didn’t feel the same ;-)  But I learned a new technique & that’s what matters.
οОο οОο οОο 

Tatting Mantras by Patty D

"The knot does not care how it is made"
"Every tatter does it different"
“Ideas are free”


 οОο οОο οОο

I am very grateful to Patty for sharing her lovely pattern, & to Gina, for her clear tutorial .

Happy  Tatting  ;-)

Motif #18 & #19 for 25 Motif Challenge