Showing posts with label bead effects. Show all posts

Saturday, 21 March 2026

Dedicating my 1000th

Pin It now!

For this 1000th post I kept musing on the choice of subject. And I finally decided to dedicate it to some of my favourite people who have shaped and inspired my tatting journey. This is a symbolic gesture to ALL the tatting teachers, designers, innovators, experimenters, explorers who have shared their own learnings and experiences. 

Three Geniuses and a brand new stitch in tatting!

Two years back I stumbled upon two drawings that gave Ninetta Caurso's treble tatting stitch a basis in tatting history! 

A drawing on page 31 in Anne Dyer's 1994 book, To Boldly Go Where No Shuttle Has Gone Before, showing the decorative chain picots. 

A drawing on page 85 in Rhoda Auld's 1974 book, Tatting: the contemporary art of knotting with a shuttle showing her twisting the thread (this twisted picot is something I had pointed out in my pictorial) and passing the shuttle through it. Her tatted model is what we now call the vapour stitch.

Well, our very talented Ninetta engineered the two movements to create her treble tatting stitch (tds) all on her own! At the time she did not posses either of the books and till I pointed it out to her, she had not noticed! Basically, the chain picot became the 1st half of the tds while the vapour stitch became the 2nd half of the tds! 

💧One of the reasons for the delay in posting this was ambiguity about whether I could share the diagram pic from the book with due credit. Anita suggested I ask Tamie Montgomery, who now runs The Online Tatting Class and is very mindful of such issues. She was very receptive and we discussed it. Although she said it was okay to use the accredited pics (like Georgia had done) since it was a 'technique', I still wasn't comfortable, till I hit upon the idea of showing it in thread as above. 

💧💧💧

Auld is gold bead effects!

Last year I found some new beading effects by Rhoda Auld in the same book and took the liberty to give them each a name based on words used by her.

Framed Bead - The diagram on page 107 has been in circulation through Georgia Seitz's classes for several years now. Georgia pitched it as a way to add a bead in the center of a ring and I used it in this butterfly. 


However, Rhoda showed it as a way to add a free bead on a long picot with bare thread framing the bead on both sides when slack is removed. Makes for some good possibilities.

Piggyback Beads - Now this was fun to discover! On pages 99-100 Rhoda shows how to place two free beads one over the other using simple movements. I tweaked it a bit to make it easier to tat.
Instead of loading the bead on the core thread where she has to move the chain stitches, I loaded it on the knotting thread (teal in above sample) and the rest of the process remains the same. On an earlier page, Rhoda makes the teal picot longer and ties up both picots till required for joining. Hence there are many options depending on the pattern.
My sample is a bit wonky, but you get the picture, right?
💧💧💧

Generosity knows no bounds!

💧I can't thank Anita Barry enough for gifting me so many vital books on my list. Without these I wouldn't have been able to review and edit Net Best's, Six T's of Shuttle Tatting, not with any satisfaction or confidence. These have helped me to confirm, correct, or refine terms for her glossary, and even understand and discover so many gems, some of which I took the liberty of adding to the glossary.

💧Judith Connors has been taking an active interest in the glossary, too, either as an answer to my question, as a reaction to my blog post, or reaching out on her own privately. You can imagine what a treasure trove of knowledge she is and how lucky we are to benefit from her skills. 

Judith sent me a copy of her 2000 book, Creative Tatting with beads, shuttle, and needle. It has some of my all-time favourite patterns besides numerous interesting effects and applications. While I read the book, tatting models will be later in the year. 

💧Late last year I received a wonderful digital book by Carin Jansen, Riego ReTatted (2023).  She needed some advice on selling the book through the USA, not being sure of its reception. With permission, I sought Anita's advice and we both gave our respective take urging Carin to put it on the market. Eventually she decided against it for personal reasons, though she has shared her Dutch version within her group. It is such a labour of love and we hope she will change her mind in future. Carin has chosen patterns from each of Mlle Eleonore Riego's books (1850-1886) and shared detailed steps and modernised versions/tips in a pleasant format alongside diagrams and written patterns. 

💧💧💧

I'd like to think that my blog has stayed true to its name to the extent that almost 95% of my posts have a tip of some kind. Unfortunately I couldn't stay true to the url since this blog soon turned into a tatting blog ... not that I'm complaining, LOL. 

Hope you continue to follow my blog and read my posts. 💞

You will find tutorial links to terms in this post here - https://tipsaroundthehome.blogspot.com/p/tatting-resources.html and you can use the search box on the right panel to look for past posts on the tags used here and much more.

💧💧💧

Many many thanks to all the wonderful tatters mentioned here and also to those not mentioned who have influenced, inspired, and improved my tatting journey and maintained my eagerness to blog.

Thursday, 31 July 2025

interwoven beaded bracelet

Pin It now!
As promised, here is another pattern and technique reveal from my bead tatting post back in May. All relevant links are listed at the end of this post.
A simple name - Muskaan's Interwoven Beaded Bracelet, made using four shuttles with pre-strung beads on each and Barbara Arango's variation of the Interlocking split rings technique.

Above is a practice pattern I am sharing. As you can see in the inset, traditionally 4 shuttles are used and the split rings are tatted simultaneously, lying close to each other. The idle pair of shuttles is passed through the open SR and then the ring is closed so that the next SR will is encapsulated and overlap with the previous. video link at end

Barbara used the flexibility of 4 shuttles to distance the SRs with a chain between two SRs. She used it to create the desired effect in a round doily! 
Practice Pattern: 
To keep track, I used 4 different thread colours in each shuttle....
Sh1: yellow; Sh2: cream; Sh3: pink; Sh4: blue.
I started with two normal rings.
Sh1) R1: 18. dnrw, SS
Sh2) Ch1: 6.
Sh3) R2: 18. dnrw, SS [insert R1 through R2]
Sh4) Ch2: 6.
Sh1) SR3: 9 / 9. dnrw, SS  [pass shuttles 3 & 4 back to front through SR3 before closing it]
Sh2) Ch3: 6.
Sh3) SR4: 9 / 9. dnrw, SS  [pass shuttles 1 & 2 back to front through SR4 before closing it]
Sh4) Ch4: 6.
Continue the SR steps for desired length.
Posting the shuttles front to back will give the opposite overlap.

Having 4 shuttles meant I could have beaded strings instead of Barbara's chains between the SRs! Which led to the bracelet above. 
Muskaan's Interwoven Beaded Bracelet   ©May2025
String all 4 shuttles with seed beads. In my model worked with Anchor Pearl Cotton size 8 ---
Sh1 & Sh2 with teal thread, CTM, and purple seed beads
Sh3 & Sh4 with dark purple thread, CTM, and yellow seed beads

Follow the process and instructions as explained in the practice pattern. However, instead of chain, slide beads from both shuttles before starting the next ring or SR. 
Sharing only the repeated portion of the pattern ---
Sh1) R1: 3 [- 3]x7. Slide 5 beads from Sh1 & 2. dnrw, SS
Sh3) R2: 3 [- 3]x7. Slide 5 beads from Sh3 & 4. dnrw, SS [insert R1 through R2]
Sh1) SR3: 3 [- 3]x3 / 3 [- 3]x3. Slide 5 beads from Sh1 & 2. dnrw, SS [pass shuttles 3 & 4 back to front through SR3 before closing it] 
Sh3) SR4: 3 [- 3]x3 / 3 [- 3]x3. Slide 5 beads from Sh3 & 4. dnrw, SS [pass shuttles 1 & 2 back to front through SR4 before closing it] 
Repeat SR3 and SR4 for desired length. 
Posting the shuttles front to back will give the opposite overlap.

I ended with a curled ring (see inset) that works as a toggle for a quick & lazy finish.

Note: The beads are a slightly different size. Unfortunately I can't find my notes but I remember there was a little TIP I wanted to share. Oh well, perhaps I will find it some day and make a proper PDF presentation. 

Future Ideas - Add more beads in place of the picots. Throw off rings or decorative picots on one or either side. Attach more braids with same or additional colour for a broader version. The alternate SRs can differ in size or different sized threads can be used.

UPDATE (18th Aug, 2025) - Splocik has used the tweaked braid as a foundation, adding rounds around it, for two bookmark versions here - https://oczka2.blogspot.com/2025/08/zakladka-na-podstawie-motywu.html

💛💛💛

INTERWOVEN  versus  INTERLOCKING

Often the two are used interchangeably in tatting terminology. Confining myself to the split ring braids,  there are several techniques and effects that tatters have created over the years. These may range from a single row of split rings (called a SR braid or cord), or a double row where the SRs are interlaced and lie adjacent to each other. 

Or the braids may lie 'stacked' with overlapping SRs. These are the SR braids that are interwoven where the SRs from two braids lie intertwined through each other. These are also called interlocking SR braids and can be made with either 2 or 4 shuttles - two independent braids woven through each other; a foundational braid encapsulated within the second on-going braid; simultaneously tatting the SRs using 4 shuttles. 

Then there is the 3D chain maille effect where each subsequent SR lies at right angles to the previous one just like in interlocking chains and links in jewellery. I prefer to call these 3D SR braids Interlocked and the 'flat' ones Interwoven. This gives a more exacting visual especially since there are several ways to interweave and interlock the braids, whether 2D or 3D. 


Related Posts and Links -
 
 
Simple interweaving - https://tipsaroundthehome.blogspot.com/2024/03/exciting-firsts.html 
Interlocking split rings 2 Karen Cabrera Lesson 79 - https://www.youtube.com/watch?v=ZR04RLHdmA0   (2 shuttles)
Interlocking split rings 2 Karen Cabrera Lesson 80 - https://www.youtube.com/watch?v=BBrDRLFibO8   (4 shuttles)
How to start and end SR without a knot - https://tipsaroundthehome.blogspot.com/2016/11/beginning-or-ending.html 
SR braids, including beaded, some with pictorials - https://tipsaroundthehome.blogspot.com/search?q=SR+braid 
Interlaced SR braids with pictorials and patterns - https://tipsaroundthehome.blogspot.com/search?q=interlaced+SR
Tatting with Beads - a few effects - https://tipsaroundthehome.blogspot.com/2025/05/bead-tatting.html

Thursday, 26 June 2025

quick tatting

Pin It now!

 I first shared a pic of my Fan Palm motif or pendant here - https://tipsaroundthehome.blogspot.com/2025/05/bead-tatting.html . Now I have the pattern ready --- 

Fan Palm Motif/Pendant by Muskaan (March2025) pattern PDF: https://drive.google.com/file/d/16amEUnVT7ERSySRJqbMsj0af0Xu_MFsP/view

It is a simple motif that can be worked with a ball and shuttle and the beads are not pre-strung. 

It is a prototype I made to show beads over/on a picot. These beads are slipped over the long measured picots at the time of joining. Or they can be slipped over the picot while it is being formed, and held with a paper clip or marker. I prefer the former to avoid beads and clips getting in the way of smooth tatting. 

Measuring the Picot (including using beads as a picot gauge) - https://drive.google.com/file/d/1Kk6rtyIUvo5JFA5u3vE3ruU2Z7zQ9fuq/view


I deliberately chose to do a mock ring since I did not know how big I wanted it. And then made an under-over or alligator join across the start of the chain. There are several ways to make the under-over join (alligator join is only one of them). Refer to my pictorials here - https://tipsaroundthehome.blogspot.com/2018/05/mock-rings-1-under-and-over-join.html  and https://tipsaroundthehome.blogspot.com/2018/05/mock-rings-1-u-o-join-continued.html

The diagram in the PDF is simply a guide. You can choose to tat with two shuttles if you wish to empty them of leftover threads. You can even work the mock ring as a true ring and without need for an under-over join. 

For a plain, flat leaf, avoid any beads on the picots. 

I used 4mm beads, but you can choose smaller ones and adjust their number accordingly. Oh dear, I've been so flaky lately that I forgot to take a pic of this on a chain. Hmm, not too difficult to imagine, right?

This is such a quick tat, really, and easily adaptable to any thread and bead size. Or go all around for a floral motif! Hope you enjoy the pattern. 

Thursday, 12 December 2024

fulgent and folly

Pin It now!

This month Ninetta has hosted the Bead Me Endrucks game in the Endrucks 1920 Project FB group. Simple and single rule - to choose any pattern from the original or derivatives and bling it with beads. Here's my fulgent attempt...

I extracted a motif from Endrucks' pattern #10 and worked it into a complete circle. Since I haven't decided what to use it for - so many possibilities - it's a medallion for now.

I used Wally Sosa's version (page 4) in the reworked pattern presentation by Ninetta Caruso here - https://drive.google.com/file/d/1YFBYqbgssthqDKYi8YkTX-fvAPmIYbm-/view. After taking the length of bugle bead into account, I doubled the stitch count in the rings. Since the bugle bead covers the chain length, there are only 2ds on the ringside and 1ds, p, 1ds, bead, 1ds, p, 1ds on the inner side. See TIP below.

Materials - This is a pic after I gathered all the supplies needed. I chose to go with a ball and shuttle instead of 2 shuttles. Red Heart metallic thread size 40; yellow seed beads size 16/0; red beads size 5/0; twist bugle beads #4. And beading needles and crochet hook #11. I selected beads from my stash, though I do need to buy more in different sizes.

As per my visualisation, I pre-strung the bugles on ball thread and the red and yellow beads on the shuttle. However, the shuttle beads didn't work out the way I had hoped. Hence all the beads were removed and re-strung differently. One yellow bead between a pair of bugles on the ball thread and alternating 1 red and 2 yellow beads on the shuttle.

This is how I ended up doing the effect I had in mind. On the ring, a long picot holding 14 yellows...
I loaded the beads using sewing thread and size 28 tapestry needle as seen in the background. 

Followed by 1ds, red, 1ds, join to the beaded picot, continue. This centered all the beads beautifully.

Can't say how much of the brilliance and shine the camera caught, but in real it is quite the shining medallion!

Folly - not one but many! If you look closely, most are easy to spot.

  • I should've used pure metallic thread instead of this single metallic strand twisted around perle cotton, size 40. Tons of trouble with the metallic strand breaking while closing the large ring even after I started working the stitches loose. Had to start afresh many times! Took the shortcut but tying a slip knot and tatting over both tails. The number of rings you see in the final medallion are only half the rings I tatted, LOL. 
  • Once I forgot to work the twin ring and had to cut off two repeats. 
  • Not making a lock stitch at the end of the bugle bead to avoid the core thread from being pulled too tight. Did it for the last few beads. 
TIP: If the bugle bead is not on the core thread, it may be a good idea to add an unflipped stitch at the end before continuing, so as to lock in the core thread and bead.

  • Noticed the difference in bugle bead size in one arm only in the pics, LOL, though I kept wondering why it wouldn't stay even. And not to mention the space between two rings where the thread got pulled while closing the ring and I didn't notice in time. Dr Downplay at work here, though lessons learned for future.

It measures a wee bit over 7cms across. 

Mr Meticulous is not happy at all, but Dr Downplay rules the day. What's your verdict?

Many thanks to Ninetta and Wally for their work on the main pattern and thanks for organising the game, Nin!

Tuesday, 29 October 2024

never be late

Pin It now!

 I barely made it before the end date. 

This month we have a very special game in our Endrucks FB group. We were supposed to convert Endrucks' pattern #30 into a cross and those who didn't want to tat a cross, could do a bookmark, bracelet, etc. I chose to do a cancer awareness ribbon, but with beads. Beads to signify the happiness/bling of being a survivor and also to be able to wear it as a bracelet if so desired. 

It is for a very special and sweet friend who, though being merely a couple of years younger, insists on being a younger sister and calling me 'badi didi' ;-D Well, she certainly has my blessing and good wishes always 💕
And never be late to detect any lump and get it checked.

This is worked in Anchor Pearl Cotton size 8 with randomly loaded 13/0 (red) and 17/0 (clear) seed beads. They add a nice weight to the piece and it feels good to wear it. I didn't inset any findings, though, and for a 7 inches long bracelet make one repeat less. 

One can play with colours, too! Use any Reposition Method to get the desired thread/colour placement. 

This is one of the patterns I had attempted in 2015-16 and couldn't get the chains to lie nicely. While here, too, I could've done better by adding 1 stitch to each segment of the onion ring, this is merely my own tatting tension issue.
While tatting the edge on the other side, I ended up adding 2ds in each chain segment, which I should've done for the first edge as well.

Ninetta Caruso did an excellent job of reworking the pattern and sharing versions, including a corner and a square motif adaptation! Here's the pdf link - https://drive.google.com/file/d/1f7g8gIB7S3-ggRbdneLYmxfxPcDBoq7u/view . She has also uploaded a diagram-only version in here flickr account which I used - https://www.flickr.com/photos/ninettacaruso/50560777536/ . 

Why'd I use two different coloured beads? The clear ones wouldn't have shown up well in the pics and the clear red ones would dominate the ribbon. And loading them randomly on both shuttles was Dr Downplay's flexible path to quick stringing without any calculation of bead position, LOL.
Also, when I started, I had no clear idea where and how I wanted to place the beads. 
 
Shuttle #1 ran out of thread hence had to rewind and re-string beads. Shuttle #2 ran out of beads and had to add more beads. Yet, it was an enjoyable tat and something that went pretty fast considering the number of beads used. Only wish my tatting was better. Well, there's always a next time!


And I am entering this as a second submission this month to splocik's 'Small Decorations' game! I just think it will resonate with many, hence. Thank you, splocik 💖

Many thanks for all the work that went behind reworking this pattern and also creating adaptations, Ninetta!

Sunday, 18 February 2024

happy surprise

Pin It now!


I was tatting a sampler last night to show placement of beads. In my head was a possible zigzag effect but was so happily surprised to see this shape - such graceful arches! 

On pondering, it is 'elementary' - since the stitches all face the same direction, the broader waistband of the stitch creates an uneven arch -- the same reason why a normal tatted chain curves!

I haven't decided how to put this effect to use - possibly a necklace or even a bracelet? 

It would've been even better if the beads were all the same size. Overall the chain remains straight.

If anybody is interested, here's the 'pattern' for Beaded Scallops:

    One shuttle and ball, both pre-strung with seed beads.

    [ 1 bb 1 bb 1 bbbb 1 bb 1 bb 1 bbbb ] repeat for desired length.

The 'up' bead(s) are on the ball or picot thread ; the 'down' beads are on the shuttle or core thread. The red beads are on ball thread and the green on shuttle thread.

TIP: Be careful while snugging the cluster of 3 down beads and 1 up bead to avoid gapsosis. I left the shuttle thread a bit loose, made sure the up bead was positioned and snugged properly, then tugged on the core thread to snug the down beads. 

It might've been done before, obviously. However, this is my very own experiment and trial which threw up an unexpected effect. In fact I had first loaded all my beads on only one thread and it was only when I started tatting that I realized my mistake and went back to string beads on both threads ;-P

Happy happy dance!

Friday, 17 March 2023

flat to 3D

Pin It now!

 Over a month since I last blogged. After my last post I was on a roll, tackling so many presentations, reviews, etc., leaving me no time to blog or tat. A concerned email had me picking up my shuttles for a night of tatting. And suddenly life came to a standstill due to health issues. Oh what a tremendous roadblock! However, I am back now to the extent possible, though shuttles lie idle. 

This is part of what I did before my enforced break (I will show the 2nd motif I tatted later) -

Remember the 3D Buttercup idea I showed here - https://tipsaroundthehome.blogspot.com/2021/11/a-trip-to-beach.html. This time I converted it into reality.

This is pattern #39 from Eleonore Endrucks' book. It is the discarded trial piece. Along with one separate all-yellow motif, I curled the lace into a 3D flower ...

And also added pearls and beads in the center while sewing. There is 1 green seed bead between each pearl, and then a string of the same green beads encircling the pearls.

I like how it created a kind of wavy look. I also lifted the 'petals' for a more buttercup shape.

Another side-view to show 3D. I've left the green thread tails, intending to add some foliage when  possible.
This is one of the patterns shared for the #pickmeEndrucks February 2023 event in our Endrucks 1920 Project FB Group.

Our pattern (and idea) collection is burgeoning at such a fast pace that it is difficult to keep track. Hence we have started creating categorised Directories where derivatives will be showcased. The main EP doc will finally become a collection of mainly the reworked 44 original patterns. 7 such directories are complete. More about this in future.

Hope to catch up on some blogs soon ....

Saturday, 11 February 2023

truant heart

Pin It now! The truancy continues, well at least on some days. On other days I am simply vegetating hoping to rouse myself. 

This time it is with two heart patterns shared by our clever and prolific designers - Ninetta Caruso and Daniela Galli.


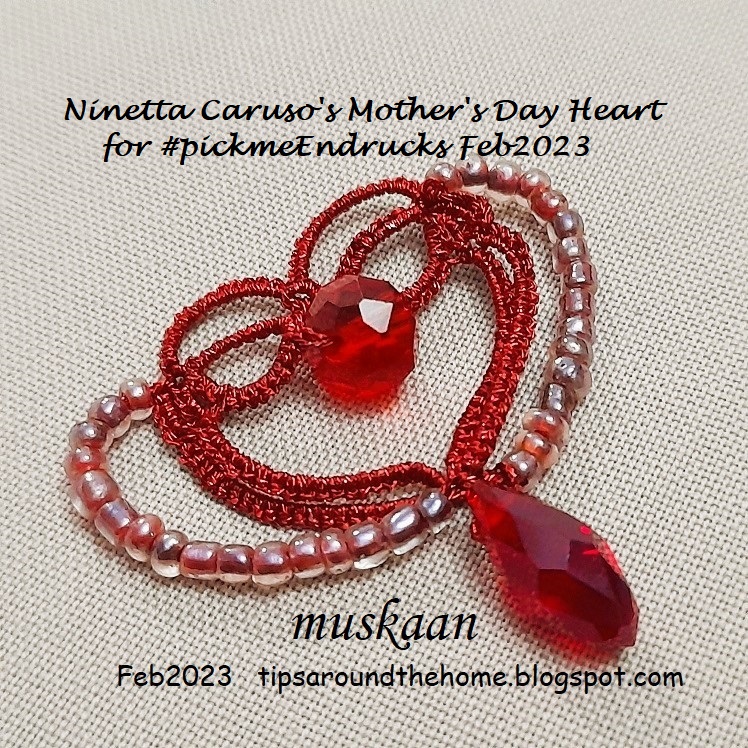
Mother's Day Heart by Ninetta Caruso - 
This is a derivative from Endrucks' pattern #5. I worked it in Sanbest metallic.

Instead of the beaded strings, Ninetta left bare thread on both sides - a nice effect! In a conservative mood, I strung beads on the thread after all the tatting was completed.

Can't say I am too comfortable working with metallics ... for one thing, the front and back side are not clearly distinguishable.
Just one more pic, LOL.
The pattern which was first included in the main pdf for pattern #5, is now shared as a separate pdf and is one of the patterns in our #pickmeEndrucks Feb2023 event in our Endrucks 1920 Project FB group.

Albero dell'amore (Tree of Love) by Daniela Galli - 
This heart shape is so biologically correct, isn't it?! 
There were large colourful beads added to the rings, and I was going to sew them in, too. But ....
 
I love the overlapping Victorian set chains. I worked this 2-round deign in one pass by starting at the left and climbing out with a split ring so that I could continue around with a 3rd round ...

Not willing to distract from the effect, I avoided the large beads. 
Instead, I added another round of chains to the top half, with seed beads ....

And this is what came of it - the biological shape ensconced in a stylized iconic heart shape.

Worked in Anchor size 20 (equivalent to Lizbeth size 10), it turned out kinda large.
This pattern was shared by Daniela Galli in an event in their Chiacchierino: Filo, Amore e Fantasia FB group.

I thoroughly enjoyed working on both hearts, and hope the designers don't mind my tweaks. And both hearts are quick tats, beads notwithstanding!

💗Grazie mille per questi meravigliosi schemi, Daniela and Ninetta 💗

Thursday, 29 December 2022

before and after 4

Pin It now!
In November, our Chiacchierino FB group held an event. Daniella Galli diagrammed and presented a 3D angel pattern designed by Rita Santoro - Angelo Veuliah.

The skirt/gown looked like a bell and I was immediately tempted to tat one.
This is in Chameleon Sanbest 6 strands. It is most definitely true to its name! It actually changes from a musty gold in the shade to a vibrant green in sunlight!!! Wow.

The After version with beads, and other knickknacks strung through.

It is worked in one pass. My tatting could've been better, but ...... 
I also tatted one wing in regular thread. My idea was to tat several and use them as petals for a flower. However the single wing is still on the shuttles. Perhaps some day ...

💙 Many many thanks to Roberta and Daniella for this fun diversion 💙