Showing posts with label whip stitch. Show all posts

Friday, 29 December 2023

oversew and so on

Pin It now!

For the longest time since (mid-1980s) I have wondered what ‘oversew’ meant when hiding tails at the end of a tatting project. I came across it in my Anchor and Coats books. Tried my own methods (including overcast stitch as in embroidery) but none worked out – knotting was the only way I knew and continued with it despite the 'ugliness'. 

Two decades later, on the net, I asked around, to no avail, but I switched to whip stitch some years ago.  Until a few months back when Jean Inglis used the term in her FB post! At my request, she explained and also uploaded a WIP pic. It got me thinking and I obviously had to try it out to compare and contrast with other sewing methods of hiding ends/tails as compiled here -. https://tipsaroundthehome.blogspot.com/2016/11/beginning-or-ending.html

In my current study, I found two main methods that are commonly used to sew in the ends. Please excuse my shoddy samplers below (the sewing thread/tail should not be visible once it is pulled tight). I have used a contrasting blue thread as tails or ends for the purpose of clarity.

The first is what I will now refer to as OVERSEW

Here, we sew the tail Under the cap or waist band of the double stitch, and weave between the legs of the ds - under and over the half-stitches.  Hence a 10 ds count segment will give you 10 stitches front and behind. This method is diagrammed clearly by Jennifer Williamshttps://www.cariad-tatting.com/techniques.  

A variation of this method is shared by Lily Morales where we weave between the double stitches. Hence if there are 10 ds, you have 5 stitches under the caps in front, and 5 behind. [the link from The Online Tatting Class is currently unavailable]. 

The second method is WHIP STITCH. Here we sew the tail across the Top of the caps, weaving in between the double stitches. You can clearly see the tail (blue thread) moving over the top of the stitches instead of through the sides. This is my go-to method for 7 years now, when Carollyn Brown uploaded her video - https://www.youtube.com/watch?v=7Q-JloBBdIM and it just clicked with me.

Jean Inglis'  Mom taught her to tat in 1980 and to sew in her ends as above. She used the term 'oversew'. She unravels the tail and uses the thinner thread to sew and hide, thus leaving a tinier footprint. But look closely, and you realise it is actually the whip stitch! Yet, this unraveling of thread can be used for the oversew methods described above, too.

In conclusion, I'd say traditionally 'oversew' would simply have meant to sew in the tails whether you wove the tail under or over the caps; between double or half-stitches. However, if we wish to fine tune it, we can differentiate oversew from whip stitch as explained above.

Feel free to share your own thoughts and experience; no need to hide them!


For an annotated and frequently updated listing of the many ways to start, add, or hide ends, mostly knotless: https://tipsaroundthehome.blogspot.com/2016/11/beginning-or-ending.html

Many thanks to all mentioned above, and those not mentioned, who constantly help us improve our knowledge, understanding, and skills.

Sunday, 30 September 2018

picot join to the right part 2

Pin It now!

Continuing on from the previous post, not just rings, but chains too can be joined to the right in the exact same way – rotate the work on your hand so that the joining picot lies to the left of work, make a normal picot join and continue.
So instead of repeating it all over again, I will switch to images showing how to join with a down loop instead of up loop. This is for directional tatting (frontside/backside), and creates a complete ds visually.

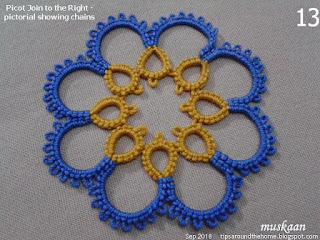
A simple enclosed space medallion was created to illustrate. Mustard colour thread in shuttle is joined to blue ball thread.
Pattern :
Ring  : 6 ± 3 – 3 – 6. reverse work
Chain: 3 (± 2)x9, - 3. rw.
Join ring to previous ring, and chain to previous chain.
         The last ring and chain will be joined on both sides. 

Picot Join to the Right - Part 2
(joining last chain to first using the down loop)

In a rosette such as the ones in Blossoms motif, rings face outward and hence a picot join to the right is needed. However, even when rings face inwards as in this medallion, the same join is required when linking back! So, in this medallion, we are using the join twice – once for rings (follow as in Part1) and then for chains.
1. The last chain is worked to the point where it needs to be linked to the first chain. 
This chain, with it’s joining picot is on the right side.

2. Start rotating the work in counterclockwise direction …

3. till we have the ball thread positioned under the picot 

4. and pull up a loop through that picot, passing shuttle through it as in any normal picot join. This can be followed by a 2nd half stitch or a complete ds.

For frontside/backside tatting, with a down loop or down join, I am restarting from image #2 - 
5. After rotating, position the ball thread above the joining picot 

 6. and pull a loop down through it, passing the shuttle through this down loop.

 7. and start closing the loop

 8. The loop is now tensioned and snug – the 2 chains are successfully linked! 
Notice both threads are above the work.

NOTE : If we want both threads to be under/at back of the work, then before starting the linkage, place both ball and shuttle under, leaving only a short segment of the ball thread over the picot, through which we can pull a loop down.   

9. Work the 2nd half stitch (along with the join, it counts as 1ds) and 2 more ds. 
This completes the last chain.


Quite a while back another relative beginner asked me where and how I tied off the 2 tails. This is how I do it (not all steps are pictured here) -
10. Needle the core thread and pierce through the base of the previous ring. (Imagine where the core thread would’ve been if it wasn’t the end).

11. The ball thread is passed through the tip/cap of the stitch on the adjacent chain. 
(again imagine or see how the threads lie in the previous segments when they are continuous).

12. I make a single overhand tie at the back, and …

13. whip stitch the core thread through the ring and the ball thread through the chain.
Leave off following the middle path mantra.
Tug and then snip off excess tail ends.


So, joining to a picot on the right of current work can be as easy as that – all a matter of perspective, and nothing to fear. And we have seen it in use in enclosed space medallions where rings faced outwards (previous rosette), and also for inward-facing rings and chains (the above medallion).

I’d like to talk a wee bit more about this join – a common threads kind of overview through various project pics.

to be continued (final part)
Related Posts
Joins in Shuttle Tatting

Tuesday, 28 August 2018

needle tips

Pin It now!
When I was tatting back in the mid-80s till about a few years back, my Anchor tatting book & a few other patterns said “tie and oversew” at the end. Despite asking/searching, nobody seemed to know what it really meant. Similar questions are often faced by beginners who start on their own. Which is why I was recently requested to write a post about the tools used to hide ends and the tips I shared privately. When somebody shares, we all learn.
So, at your request, Jean ....

Which needle to use?
I remember Grace Tan telling me about tapestry needles for sewing in ends. These have a long/large eye and a blunt tip which prevents snagging & fraying the tatting thread. They are also called darning needles or long- or large-eyed needles.
This is the Pony tapestry needle set with coloured ends. 
I also slipped in a few larger wool needles for the extra thick threads.

This image shows the comparative size of needle and thread...
from top -
Large eye blunt needle – size 3 or 5 crochet cotton
Size 22 – size 10 Anchor knitting cotton
Size 24 – size 20 Anchor crochet cotton (about as thick as a Lizbeth size 10)
Size 26 – size 40 crochet cotton
Size 28 – size 50 and finer. Here it carries simple sewing thread which is knotted. I use this for stringing small beads.

A needle-threader is essential.
A couple of tips, that work for me, on how to use it effectively.
Hold the threader horizontally through the eye
In other words, let the needle stand erect/vertical and the wire loop open when seen from top. Then insert the thread through loop, pull loop and the thread is smoothly pulled through.
I find that holding the threader as in the bottom left, is not always effective, despite what the instructions on the threader show.

Secondly, keep the tail end short while threading. 
By doing so, we can go down a needle size! It may fray a bit at the tip, though, as seen in the collage. But the advantage is that we get a finer needle to sew through the stitches.

Whip stitching
Sewing in the end tails is the most common and secure method of finishing off. The various ways of sewing in the tail pertain to where the needle is inserted in the tatting stitch – weaving under the caps from top (whip stitch) or through the legs. You can find some of the how-tos here
Ever since madtatter80 posted her video, I’ve been hooked to whip stitching. It is almost invisible, easy to do, and does not add bulk.

I’ve used my earlier diagram to indicate where to insert needle. 
I prefer weaving the needle under the crests, but one may choose to do it under the troughs. 

Note that I have not drawn the woven tail in the diagram but can be seen in the tatted model and collages below.
Here I have used a different colour to show whip stitch 
and am piercing needle through the crests. 
Weaving progresses from right to left here.

Once the thread is pulled, it almost disappears!
Here the cream thread is hidden under the ring stitches,
woven from left to right under the crests. 

And of course, one can hide ends without sewing, whichever may be the last element(s)! As I said before, this post is in response to a specific situation and question.

happy tatting always :-)