Showing posts with label maltese tatting. Show all posts

Friday, 6 December 2024

and more

Pin It now!

 After reading my posts, Elisabeth Dobler took up the challenge and quickly sent me her version of the DAL Celtic Snowflake, designing a third round and also tweaking the first motif to incorporate Celtic knot picots! And she graciously shared the pattern, too, becoming our 21st participant. It took me some time to diagram it, though. But here it is ....

I realise only now while inking and uploading that we forgot to mention the beads in the center. It looks like she used two beads on each picot and made a swirl join at the end. 
There are Maltese rings at the tips and the thinner metallic thread picots fill the ring.

Elisabeth has a way with picots! If you are on Facebook or Instagram, you should look up her work and how she elegantly transforms the models. Her impeccable tatting is so inspiring, too. She frequently sends me pics of her work and I will soon share a few here.

Before I forget, you can find the pattern and all details in this Google Docs -https://docs.google.com/document/d/1pVqM6S5Ng49xk6erSsDyRm3y7SdV2tCIUOCgltze4lM/view

❅❄❅❄❅❄❅❄❅

And I also know of two other tatters who tatted the snowflakes -
and Padma M chose to tat Mariola Siwek's version which she shared in her FB account - 
UPDATE (Dec2024): The pattern (diagram for Padma's variation is also uploaded in the above document.
 
Many thanks to all for your participation! Being inspired and inspiring others is an unending cycle of creativity! 

Related Posts - 

Thursday, 25 July 2024

multifascination

Pin It now!

 This time I have not delayed, not by much essentially. A couple of months back I came across an Instagram post on tatting and their profile said they were a German group of 15-20 members with a common passion for occhi! I messaged them about our Endrucks 1920 Project and so began a lovely friendship with Elisabeth Dobler (she manages the account and is the founder of the group 'Occhi Freunde Oberschwaben'), a very talented tatter who enjoys pushing the boundaries and exploring new techniques.

Inspired by my E25 palm leaves, she belted out a range of effects from one basic model! We decided to call these Multifaceted Leaves. She graciously accepted to share the pattern and we worked together to create a presentation that is hopefully clear and easy to follow. She also made a presentation in German. Here are the links to both -
E24 Multifaceted Leaves by Elisabeth Dobler - https://drive.google.com/file/d/1ywaZcQP8b1M86jo4yLIwpH5fZ5kQ0_tX/view
E24 Facettenreiche Blätter by Elisabeth Dobler - https://drive.google.com/file/d/1-uFBNdM9aFOPUDCJyWC_dy1R_nyC4KRw/view
 
Multifaceted Leaf #1 (basic) 
This is the basic pattern which can be embellished as desired. She has worked the leaves in a clever and interesting fashion, entailing encapsulation. 
While the detailed pattern for this basic leaf is given, for the others an explanation of the effect/process is provided. Instead of repeating the description here, I request you download the pdf and understand the intricacies.

Multifaceted Leaf #2 - 
She has used metallic thread to embellish the leaves.

Multifaceted Leaf #3

Multifaceted Leaf #4
Maltese Rings adorn this leaf.

Multifaceted Leaf #5
Here the leaf starts at the mekik oyasi ring with cut picots and progresses back and forth to ensure it is worked in one pass. The crosshatch filling is so impressive.

Multifaceted Leaf #6

All six leaves together. 
Would these make a bushy mustache or even eyebrows, LOL? 
Simply add a stemmed flower in the center for a nice composition.

This is but a small slice of the enticing array of possible effects one can play with, using the basic model!

🍃🍃🍃🍃🍃
Patterns 24 and 25 from Eleonore Endrucks' 1920 book, Die Schiffchen-Spitzen, are very similar; E25 has a bit extra on the E24 as base. E24 was reworked by Ninetta Caruso for the Endrucks 1920 Project and you can find her work here ---
https://ninettacaruso.blogspot.com/2020/10/eleonore-thats-difficult.html - notes.

🍃🍃🍃🍃🍃

Elisabeth Dobler has published two books with tatting patterns - Tatted Necklace with Roses, and Tatted Faces! Oh the faces book is really interesting and fun! 

Just like with Sally (in my previous post), it is always a pleasure to correspond with someone who is receptive, prompt, and willing to learn and share mutually! Seeing her interest in new techniques and effects, I told her about Ninetta's flickr account and blog and her new Captured Picot. Elisabeth got right down to it, diligently learning the captured picot, teaching it to her group and also applying them creatively! Wish I had taken her permission to share the pics here ... perhaps in future. But you can check out her Insta posts with all her wonderful displays here - https://www.instagram.com/occhi_freunde_oberschwaben/

These Multifaceted Leaves and many other leaves (seen in Elisabeth's Insta feed) will be displayed in the Austrian Lace Association's Congress 2024 - Participation Leaves in Linz from 11th to 13th October. Wish I and our group could've participated - hopefully next year.

Many many thanks to Elisabeth and looking forward to more creations.

Related Posts - Palm Leaves from E25

Saturday, 4 April 2020

picoted S Chain cords

Pin It now!

Ever since I shared the S-chain cords using scrap threads, there has been a renewed interest in this beautiful effect. Last week Madhur asked for help with the picoted S-Chain I had used in a bookmark tail here. 
I took pics and prepared a quick pdf to send to her. I’m sharing some background notes here along with detailed steps and large pics, if you are interested.

S-CHAIN WITH PICOTS or faux Pearl tatting!
- PICTORIAL -

NOTES :
  1. Sabina Carden-Madden first wrote about the S-Chain, along with instructions and comparison. 
  2. 1 double stitch is followed by 1 reverse stitch or lark’s head knot. In other words, 1 flipped stitch is followed by 1 unflipped stitch/hitch, and repeated to desired length.
  3. If picots are added before every stitch, the cord looks like Pearl Tatting, without the hassle of 3 threads or even 2 shuttles.
  4. It can be tatted with single shuttle and a ball, but the effect is best seen when there is a contrast between colours.
  5. For initial practice, use a thick thread and 2 colours.
  6. For even picots, a picot gauge can be used. Scroll down to page 3, III-A – Direct Tatting, to see how a gauge is used in direct tatting or reverse stitch.  


Above pics show vertically and horizontally measured picots in 2nd side of split ring which uses reverse stitch.


Double Stitch v/s Reverse Stitch :
1 double stitch is made of 1st half-stitch (under-over) followed by 2nd half-stitch (over-under).     1 ds = fhs, shs
1 reverse stitch is made of unflipped 2nd half stitch (over-under) followed by unflipped 1st half stitch (under-over).     1 rs = ushs, ufhs
UPDATE - 1 reverse stitch is made of 1st hitch (over-under) followed by 2nd hitch (under-over). 1 rs = 1st h, 2nd h


Pictorial shows coloured thread in shuttle, and a ball of cream thread.
Tie threads or start with a ring in order to get a good grip.

The 1st image shows a ring (with tails hidden within) followed by (1ds,1rs)x4 already worked.
1.  
Start chain with picot followed by 1 double stitch. 


2.
The next stitch is a reverse stitch or unflipped stitch (as in 2nd side of split ring).
Bring shuttle over-under to make an unflipped half stitch.
Do NOT snug tight. Leave picot space at the beginning. See next pic for a better idea.

3.
Notice the bare threads after previous ds? This will later become the picot.
Make next unflipped half stitch (under-over) to complete 1 rs.

4.
Now snug the stitch.
The space converts into a picot at the beginning of this reverse stitch.
Also notice that the reverse stitch faces downwards as opposed to the double stitch.

IMPORTANT : Snug properly only after you are satisfied with picot length because each stitch locks the work in place. See above on how to use a picot gauge.

5.
Leave picot space and make another ds.

6.
Repeat the 2 stitches (p,1ds, p,1rs) for desired length.


See bookmark tail made using a doubled-up cord. It is also linked into a mock ring that resembles a Maltese Ring! 

Hope to see this cord being used in patterns - it can easily be substituted for regular chains, mock rings, etc. Vary the length of picots to create feathery effects! Let your imagination free

UPDATE : If distinctly contrasting colours in size 20 or thicker thread are used, a beautifully woven pattern emerges! Check the image in this post -  https://tipsaroundthehome.blogspot.com/2020/05/tracking-both-sides.html

Monday, 21 May 2018

stabbing at tidbits

Pin It now!
A few small pieces, mistakes and all ….


Started with Lavi’s new Wheat Circle earrings. I miscalculated and made only 9 rings. 
Although I liked the small circle I wasn't happy with the teardrop suspension.
With my new bead-stabbing, I was enthusiastic to have another go. 
This time will all 12 rings and the teardrop pierced with a jump ring, 
then suspended on a double chain of beads. 
I also increased the number of seed beads on the bare thread. 
Much better but wish I’d stuck with the earlier shade of green thread.
Both worked in Anchor size 20

In between the two, I worked this long overdue Sunflower in Maltese Tatting by Jane McLellan. I need occasional refreshers for some of these techniques and this is such a pleasant project. But I had beads left – hmmm! Not that it shows much.
While blocking I deliberately went with angular petals and noticed one was way smaller 
– hey, that’s to give it a ‘natural’ look ;-P
Yellow is Anchor size 20 and black is size 40.

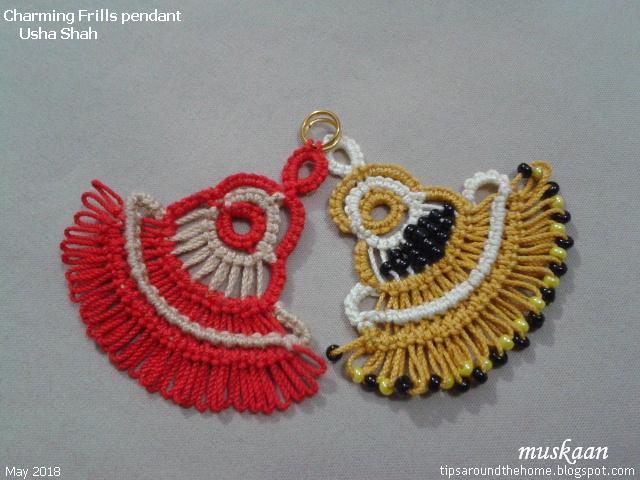
Lastly, as I mentioned in my earlier post, I wanted to see how Usha’s Charming Frills looked with beads. Had another stab at it. 
Oh and another reason was that in the last fringe row, I had made 2 CWJs in one picot (since it was not clearly specified at the time – the pdf has been updated now). I thought that was the reason my pendant was broader, with the stitches all neatly lined up.
As it turns out, the last row is a chain with alternate CWJ and double stitch, with long picots between each obviously.
The black beads in the center are in a diamond formation. For this I reduced one long picot 
(only 7 instead of 8 and following with multiples of 7 in subsequent rows).
Too late I noticed the threads were tied off at the wrong point (gap seen on left side)! 
I had worked the first pendant from the prototype while the pattern was still being polished for presentation. So I’m happy to have made it again as per the final.
Worked in Anchor size 20.


many thanks to Lavi, Jane, & Usha for sharing their lovely patterns

happily tatting always – beads and mistakes and all  ;-P