Ever
since I shared the S-chain cords using scrap threads, there has been a renewed
interest in this beautiful effect. Last week Madhur asked for help with the picoted S-Chain I had used in a bookmark tail here.
I
took pics and prepared a quick pdf to send to her. I’m sharing some background
notes here along with detailed steps and large pics, if you are interested.
NOTES :
- Sabina
Carden-Madden first wrote about the S-Chain, along with instructions
and comparison.
- 1 double stitch is
followed by 1 reverse stitch or lark’s head knot. In other words, 1
flipped stitch is followed by 1 unflipped stitch/hitch, and repeated to
desired length.
- If picots are
added before every stitch, the cord looks like Pearl Tatting, without
the hassle of 3 threads or even 2 shuttles.
- It can be tatted
with single shuttle and a ball, but the effect is best seen when there is
a contrast between colours.
- For initial
practice, use a thick thread and 2 colours.
- For even picots, a
picot gauge can be used. Scroll down to page 3, III-A – Direct Tatting, to
see how a gauge is used in direct tatting or reverse stitch.
Above
pics show vertically and horizontally measured picots in 2nd side of
split ring which uses reverse stitch.
Double Stitch v/s Reverse Stitch :
1 double stitch is made of 1st half-stitch (under-over) followed by 2nd half-stitch (over-under). 1 ds = fhs, shs
1 reverse stitch
is made of unflipped 2nd half stitch (over-under) followed by
unflipped 1st half stitch (under-over). 1 rs = ushs, ufhs
UPDATE - 1 reverse stitch is made of 1st hitch (over-under) followed by 2nd hitch (under-over). 1 rs = 1st h, 2nd h
Pictorial shows coloured thread in shuttle, and a ball of cream thread.
Tie
threads or start with a ring in order to get a good grip.
The
1st image shows a ring (with tails hidden within) followed by
(1ds,1rs)x4 already worked.
1.
Start chain with picot followed by 1 double stitch.
2.
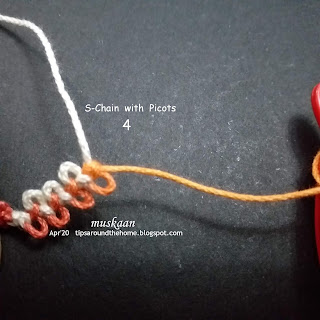
4.
5.
Start chain with picot followed by 1 double stitch.
2.
The
next stitch is a reverse stitch or unflipped stitch (as in 2nd side
of split ring).
Bring
shuttle over-under to make an unflipped half stitch.
Do NOT snug tight. Leave picot space at the beginning. See next pic for a better idea.
3.
Notice
the bare threads after previous ds? This will later become the picot.
Make
next unflipped half stitch (under-over) to complete 1 rs.4.
Now
snug the stitch.
The
space converts into a picot at the beginning of this reverse stitch.
Also
notice that the reverse stitch faces downwards as opposed to the double stitch.
IMPORTANT : Snug properly only after you are satisfied with picot
length because each stitch locks the work in place. See above on how to use a
picot gauge.
Leave
picot space and make another ds.
6.
Repeat
the 2 stitches (p,1ds, p,1rs) for desired length.
See
bookmark tail made using a doubled-up cord. It is also linked into a mock ring
that resembles a Maltese Ring!
Hope to see this cord being used in patterns - it can easily be substituted for regular chains, mock rings, etc. Vary the length of picots to create feathery effects! Let your imagination free
UPDATE : If distinctly contrasting colours in size 20 or thicker thread are used, a beautifully woven pattern emerges! Check the image in this post - https://tipsaroundthehome.blogspot.com/2020/05/tracking-both-sides.html
UPDATE : If distinctly contrasting colours in size 20 or thicker thread are used, a beautifully woven pattern emerges! Check the image in this post - https://tipsaroundthehome.blogspot.com/2020/05/tracking-both-sides.html


That’s so clever! And effective.
ReplyDeleteThanks, Jane 💗🍀💗
DeleteReally interesting technique and effective. I will try. Thank you for sharing this. Well done :-)
ReplyDeleteThanks, Justyna 💗🍀💗 I'll be on the lookout 😉
DeleteLove that unique look!!! :) Thanks for another great lesson!!
ReplyDeleteAlways welcome, Sue 😉😍
DeleteLove the look and interesting different look many things could have, I really must try this, just something else to add to my list
ReplyDeleteEnjoy, Margaret 💕💗
DeleteBeautiful tail for your bookmark, you've designed many beautiful things!
ReplyDeleteAnd you are my constant inspiration, Nin :-)
DeleteWhat a wonderful technique! I think I might try this for “ties” on a baby bonnet which is next on my list. Thank you, as always for your wonderful, clear, and comprehensive tutorial!
ReplyDeleteWonderful idea, Michelle!!! Hope you show us pics :-)
DeletePiękne! Super ten wzorek 😍
ReplyDeleteThank you, Agnieszka :-) Hope you use it in your lovely creations.
DeleteA perfect tut for people like me Muskaan
ReplyDeleteThanks, Madhur :-) Glad it helped. You did a great job with your trial pieces!
DeleteThe picture with a single ring and small bit of S- chain cord makes me think of a small worm or caterpillar!
ReplyDeletealso this technique reminds me of a fancy ribbon. I love it, and must find a project to use it in now!
Now I see the worm/caterpillar, too, Emily! Isn't it cute :-D Animals seem to be inching their way into my lace - probably feeling left out with all those flowers ;-P
Delete