Showing posts with label avoid SLT. Show all posts

Wednesday, 23 June 2021

2nd shuttle or ball

Pin It now!

 A question was asked recently in the context of a specific pattern. The pattern contained chains that faced opposite directions in an edging. It would be an easy "switch shuttle" if one were to use 2 shuttles. But she wanted to know if it could be done with one shuttle and a ball?

Yes! Of course, the easiest way is to do a shoe lace trick (SLT) or overhand tie, but you know I avoid it as much as possible, preferring other options such as Reposition, Twist Work, Reverse Join, and/or Reverse Stitch, whichever is most effective at the time. (See https://tipsaroundthehome.blogspot.com/2020/07/lock-join-plus.html)

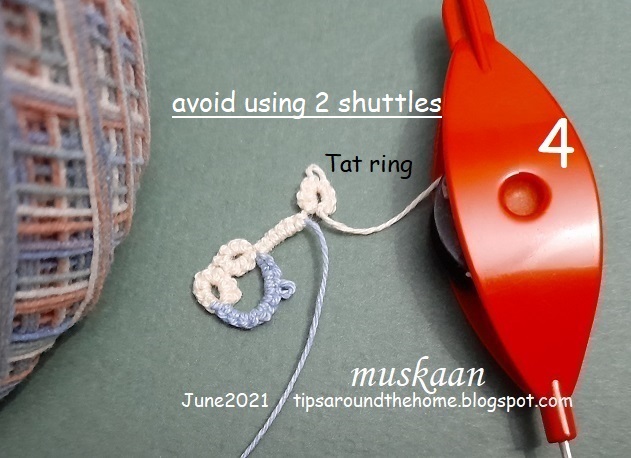
Here's a quick sampler I tatted to show one way of  How to Avoid Using 2 Shuttles - using direct tatting.

Please note that this is Not the original pattern, though the general shape, and direction of each element, is similar. I also made up my own stitch count.

1. I started with the middle ring, unsure how long the leftover thread would last. But basically, we are tatting ring and chain segments, reversing work (RW) each time.
2. Now here is where the chain changes direction and our single shuttle is not in position. To bring it in position, either do a SLT, or follow what I did -
Turn work (as if turning the page), and direct tat the chain ie. with unflipped or reverse stitched (as in 2nd side of split ring).
Notice the chain takes the colour of shuttle thread, unlike the previous chains. 
3. Reverse work after completing the segment. This brings the shuttle to the top ...
4. .... and tat the 1st ring of next repeat. It looks like a thrown/floating ring.
5. Rest of the motif is again worked as alternate chains and rings, with RW between each element. Repeat the direct tatted chain and continue for desired length.

TIP: If you want all chains to have the same colour, SLT or Repositioning at the start and end of chain would be a better choice, and the chain would be worked with normal flipped stitches.


A couple of days back I stumbled upon Jon Yusoff's How-to - Avoid using the 2nd shuttle . See, thrown rings using one shuttle !!!! 


One might inquire 'Why replace 2nd shuttle with a ball?

My answer is that it may be a matter of preference, sometimes mood! It can also be a means to reduce the number of tails to hide especially if it's going to be a looooong edging. Of course, one will need to either have 2 balls of the same shade (in order to reload the shuttle) or preload several shuttles before using the remainder of the ball for the 2nd thread.

One other scenario is when the rings are worked as mock rings (MR) or as self-closing mock rings (SCMR), a single shuttle and ball can work well.

Personally, I do not mind hiding ends, and 2 shuttles are more portable and manageable (a shuttle won't unravel if it slips off, unlike ball of thread). 2 shuttles also provide a lot of flexibility and freedom. 

As I always say, there's no absolute right or wrong in tatting. Choose what you feel comfortable with, or what the pattern demands, or how the pattern can be adapted to colour(s) and techniques. My point is merely Be Aware that there are several paths to the same destination, and with a bit of thinking ahead and adaptation you can travel any road!


You can find all tutorials here - 

Wednesday, 22 April 2020

tricks without the trick

Pin It now!

Colour play without the shoe lace trick (SLT)!

Last week when I went digitally AWOL, I was compiling a pdf package for the IOLI Chapter Pattern/Gift CD, 2020. Instead of sending a single pattern, my recent crosses from the magic square spurred the idea of an entire project based off those sketches. It would make a wonderful design exploration for groups. I need to convert some pdfs into shareable links - will post later.
After sending them off, I couldn’t resist trying out the pinwheel sketch. So, here is the ‘simpler version’.

Pinwheel Coaster (or Tatted Quilt Block)
Adapted from the vintage Magic Square
To make it easier, I started with a black medallion of 4 rings. It should’ve been smaller (my mistake!) – you can see how the adjoining chains have a shallow dip.

The correct stitch count for each ring is : (3-3-3-3), joining to previous ring and to the first one at the end. 
Notice the numerous tails? Lots of scraps used in first 2 motifs. All knotless addition of threadtatting over tails in separate elements, and lots of False CTMs (and more here) in order to start the chain as if the thread is continuous and later add in new thread/colour. Remember to cross the new thread around the old one
These (and more below) ‘tricks’ kept the SLT away!!! 

All rings are 6-6, the first of each 4-ring cluster has a large central picot.
All chains are 6 or 6-6-6.
Each triangular motif is worked with one shuttle and ball.
I wound 2 Pony shuttles separately one with yellow and other with orange and these lasted for the entire coaster. Respective ball when needed. 

Core thread under 2-coloured outer chain and when joining to inner black ring, have the core of same colour as start of chain.
The corner chains show 2 colours. For this, the core thread remains the same as the first half eg. yellow chain with yellow core. Midways, orange chain thread is added over the yellow core. The yellow chain thread is snipped off and whip stitched back (since I like to hide under different elements)
Similarly, the inner chains that join to the black ring have the same core thread, but different stitch colours. While making the join, I pulled up a loop of the new colour ball, passed the shuttle through and worked the chain, hiding one tail. The other tail was whip-stitched back.

Work moves counter-clockwise and can be tatted all from the front using direct tatted chains.
For the adventurous, this square can work as one block in a larger tatted quilt! Imagine the riot of designs and colours and shapes.
Each side of this quilt block square is 9½ cms and 12½ cms diagonally in Anchor Pearl Cotton size 8.
A separate medallion in the center is the easier version. If one wants to tat exactly like the sketch above, the inner 2-coloured ring can be worked as a SCMR, adding the 2nd colour midways using this method of adding thread WITHIN a ring.  

I debated whether to add an edging. My sketched ideas looked good on paper, not in tatting - overkill! Ended up with a simple outline which hubby approved!

All chains are 6-6, lock join.
Corner chains are 2-2—2---2—2-2. (graduated picots)

Avoid shoe lace trick: Keeping the SLT away is a personal preference. In needle tatting, this knot is made after every ring and chain, yet the lace looks beautiful. So for those who do not mind the SLT, wind 2 shuttles, one with each colour, and make a SLT after each element to shoe the colour you want. There won't be so many ends to add and hide then.

The same holds true for tatting this coaster. My notes pertain to how I approached it. Every tatter is free to choose their comfort tactics.

I will also share how to keep the colour blip on the backside when working and joining a chain backside. I've used this before, but not in this situation and I truly love the trick!


Friday, 17 April 2020

springing flowers

Pin It now!
...and surprise emails… Stay at home orders have truly unleashed the learning and creative founts of tatters! Emails asking for help have increased, too. One such was a request to test a 2-colour re-writing of Julie Patterson’s Spring Flowers bookmark in order to help out a friend.  
Got on it right away and experimented with a few little spring flowery effects. 
Though not mentioned in the original pattern, it is best worked with 2 shuttles.

Mogra Gajra (garland)
In order to get a feel of the pattern, I worked it in single colour, 2 shuttles. This is the easiest to accomplish and simply by switching shuttles, one can keep all elements flat and in position.

TWoT Notes : This pattern moves en bloc like Mary Konior’s glass mat or Sushma's bookmark. I’ve come across a few such patterns where shuttle 1 is the main shuttle for a block of work and then shuttle 2 takes over for the next block and so on. This is especially evident in frontside/backside tatting. 

My next red and brown version is the flame of the forest (Butea monosperma or palash) tree in full bloom! One of my favourite flowers to draw in ink.
In order to get the colours in position, shoe lace trick (SLT) had to be used. I am not a fan of this and later tried many little tweaks, including capturing the brown thread in the single red ring to avoid SLT. Nothing worked to my satisfaction since the twig does not remain in the same plane as the flower. It tends to start beneath the 4-ring cluster.
I ended the twig with padded double stitches, getting a straight, thick branch.

My final version is clearly lavender! Love the colours here. 
In this case, I used an unflipped half stitch in place of the SLT. Unlike regular reverse stitches, it is manoeuvred in such a way that the half stitch faces in same direction as the ensuing chain. Images 3A to 3C give an idea of what I did - twist work in reverse stitch. The shuttles switch position!
I like this method best for 2 colours as you can see that every element lies flat in the same plane.
UPDATE: one page pictorial for Twist Workhttps://drive.google.com/file/d/1To6YwZSkh2ffQH3XBcKZ-Ed3l4myW34c/view

To compare front and back views of all three -

view from the back
All 3 are worked in Anchor Pearl Cotton size 8 and are 1” wide. Length depended on the thread left on shuttles. Due to this narrow length, I'm going to use these as tails in a future bookmark(s), hence left the tail threads uncut.

I love the pattern – the clean lines and turns – it is exciting to work. However it is floppy (the SLT one is floppier than the others) unless sewed down. So stiffening will be needed or inserting it into a sleeve. Or one can add a joining picot to the 3rd ring and link the chain to it.
Beads can add colour and sparkle, and decorative picots can change the look of the flowers. Something to try in future.

Many thanks to Julie for sharing her pattern and 
Jill for throwing the opportunity my way :-)

Sunday, 29 October 2017

switch the core !

Pin It now!
I have a few pictorials concerning split rings waiting to be shared for some time. To get things moving, I am uploading as a post now, and will convert to pdfs soon, including the sew-free hiding of tails in SR pictorial.


When working a pattern with numerous split rings as in a braid, the shuttle that is used for the core thread empties faster than the 2nd shuttle. Despite starting with equal lengths in both shuttles, the core thread uses up an extra length, hence the mismatch in usage.

In another scenario, we may have just enough thread in shuttle 1 to make the stitches of the ‘last’ ring but not enough to form the core.

If we are working with same colour in both shuttles, we could use an overhand knot or shoelace trick (SLT) to switch shuttles, thus emptying both shuttles equally.
But what if it is a 2-colour braid? The SLT will cause a switch in colours. It also creates the tiniest bit of knot which I personally dislike.

Following is an alternate way to optimize use of both shuttles whether working with one or more colours. I haven't seen it anywhere, and it works for me....

Switch the Core Thread
Optimizing Thread Usage in Split Ring Patterns
muskaan  © Oct, 2017

Each split ring in this braid is 8ds/8ds. There is a very small mock picot between rings.
Shuttle1 (red) – cream thread ;  Shuttle2 (blue) – variegated thread.

1. I tatted over tails on either side for a knot-free start to split ring. 
Middle path mantra was followed. 

 2. Complete the ring, tug and snip off extra tails.

 3. Next split ring is also made using shuttle1 core

 4. Continue tatting split rings normally, using shuttle1 for core thread.

5. When we get to the point when either shuttle1 thread is running out 
or we want to use up some of the shuttle2 thread, Turn the work over
(notice the shuttles have now switched positions).

We will now be working from the backside.

 6. Start next split ring with shuttle2 (1st side of SR made - notice core thread). 
In case of fs/bs tatting, use reverse order of stitches (RODS) - 
ie. second half stitch, first half stitch. Stitches are flipped.

7. Now work 2nd (unflipped/reverse stitch) side with shuttle1.

Make discretionary changes in case of directional or frontside/backside tatting. 


 8. Pass shuttle2 over-under, through the ring.

 9. Shuttle2 is now on the ‘front side’ and ring can be closed.

10. Continue working a few rings with shuttle2 to use up same amount of thread as shuttle1, 
or add new thread (2nd scenario) as the case may be.

Notice there is absolutely no difference in and between split rings 
whether they are worked with shuttle1 or shuttle2 !!!

Hope this is of some help. 
No doubt I will inform (and update with link here) when this is converted to a pdf; but in case you miss the notification, you can always check here.

I look forward to your feedback and suggestions, or tips on how you do it. Please do share.  

I like switching options in tatting and hope you do too.
happy tatting J