Showing posts with label Cluny tatting tutorial. Show all posts

Thursday, 29 November 2018

4 colour broad Cluny tatting

Pin It now!
Final installment of colour Cluny tatting pictorials.

This collage shows the progression of Colour/striped Cluny Tatting pictorials I shared this year. While stepwise directions are given for regular tallies (and a broad one below), the same concept can be applied to Hanging Cluny Leaves, as seen in the collage center.

Four-Colour Broad Cluny Leaf
(5 threads and 4 colour stripes)

Using 4 colours for Cluny tatting meant the coloured stripes would show better in a broad tally. Hence I resorted to a 4-Warp loom and also changed the leaf shape a bit.

Notes and Links :
  • My one small step really comes in handy here since multiple loops need to be closed in the end. It is done Twice in a 4-Warp loom because there are 2 top loops to close at the end.
  • Continuing with the braid from the 3 colour tally, I made a split ring, encapsulating the pink and yellow threads on either side. Then I brought in the 5th thread – blue and mustard was again used for the loom.
  • I recommend hitching the loom before actual weaving commences. These year-old pics do not show that step.
  • how to add new thread and hide the tail in the Cluny leaf.
  • how to hide loom colour blip on top.
  • Only major steps are shown below. eg. only one pass of a weave/wrap is shown. But remember to bring the thread back to the side where it starts.

Brief  Pictorial 
1. This is a 4-Warp loom. In order to close tally on the loom itself later, 
One Small Step is done twice – under the AB bar, and again under EF bar.
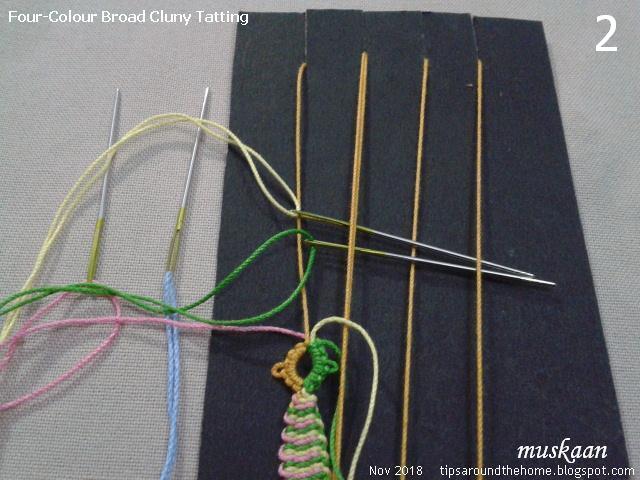
2. Bring 2 colours/threads to the right side, making a pass (under-over-under).
Before this step, I now find  hitching the loom helps center the tally and hide any colour blips. (not shown here, since these pics were taken a year back).

3. All 4 needles/threads are in place, 2 on either side.

4. Start weaving with green keeping yellow below: over-under-over-under to the left. 
Return to the right : under-over-under-over (not shown) to complete 1 weave or wrap.

5. Pick up pink from the left, entrapping blue within and move to right : over-under-over-under. Return to left : under-over-under-over (not shown) to complete 1 weave/wrap.

6. Pick up yellow, entrapping green, and make 1 weave/wrap as in step#4.

7. Pick up blue, entrapping pink, and make 1 weave/wrap as in step#5.
Remember to keep tensioning and packing down the weaves.

Note: In this manner, each needle/thread returns to it’s starting side, 
making a single weave colour strip.

8. Repeat from #4 to #7 to desired shape and size.

Note: colour placement and width of each colour strip depends on pattern and desired effect. 
(In the flame here I used 3 colours with broader stripes at the base)

9. The broad 4-coloured striped tally is complete.

10. Closing the tally and avoiding colour blip : 
bring pink & blue needles from under the AB loop and close loop by pulling downward at BC.

11. Pass green & yellow needles through the EF loop from above, ….

12. … pull off the EF loop from loom and close by pulling downwards at FG.
Then pull the remaining single loom thread upwards at I to finally close the tally (not shown).

13. One broad 4-colour striped tally made. 
The pic shows the tally first from the front, then from the back.


This collage shows the application of coloured/striped tallies in various projects.
3-colour pendant and diya flame prototypes.

I have a couple of practice patterns on the draft board for 3- and 4-colour Cluny leaves but may not be able to get to them till the new year. But stay tuned, one never knows when inspiration to weave may loom large on the horizon!
There are definitely some non-Cluny patterns in the next few posts! 

Saturday, 6 October 2018

3 colour Cluny tatting

Pin It now!
In the 2-Colour Cluny we worked with 3 threads – one on the loom and 2 for weaving. I showed how to add & hide the 3rd thread, how to alternate the 2-colour weave, and how to avoid colour blips when closing. We now move to 4 threads where 3 will be used for weaving. Since they are all different colours, we get 3-coloured stripes or bands on the Cluny leaf.

These pics were also taken last December. I discarded an entire set of pics for the 3-colour Cluny (3-CC), and re-photographed with more comprehensive steps, but have included 2 from that batch here. That first 3-CC is the one just before the split ring in some of the pics.

If I were to tat a 3-CC now, I would definitely follow Edwige’s first step which I called ‘hitch the loom’ to remove the blip at the bottom of my tallies. 

Three-Colour Cluny Leaf
(4 threads and 3-coloured striped Cluny leaf)


Try different number of passes or wraps for a banded or graduated effect. eg. in the collage above, the pendant is a hanging Cluny where I started with 2 wraps of each colour twice, then narrowed the stripes to 1 wrap each. A crystal bead had been strung on the loom earlier, between Warp1 & Warp3 (ie. the top loop).

Choose any order of weaving, place 2 colours on the left and 1 on right, and so on. Lots of possibilities!

I have used a card loom. But choose a loom of your choice - the principle & concept remains the same. 

Loom/Warp thread : mustard 
Weaving threads   : Colour 1 on the right – green;
                  Colour 2 on the left – pink ;
                  Colour 3 on the right – yellow.
Sequence of weaving : green, pink, yellow.
1 wrap/weave = 2 passes (across Warps and back to starting side)

 1. Wind the loom as usual, with 3 Warps, using mustard thread.
One 3-CC has already been made, followed by a split ring. 
Pink is hidden within the left side & yellow on the right side of the split ring.
I have threaded the weaving threads. Tapestry needle works well, but shuttles are fine, too.
TIP : Place the needle(s) on a flat surface when not in use, to avoid tangling.

 
2. Move green and yellow to the right – Under, Over.
NOTE : In order to avoid any colour blip, hitch the loom with the colour of your choice. 
(not done here, unfortunately)

3. All positioned, we are now ready to weave.

 
4. Move green to the left for 1st pass (Under, Over, Under) …

 
To add new thread: This is the stage where new thread can be added. In case of my first tally, I had to add yellow colour. The collage shows how I trapped the new thread within the first green pass. The tail can then be lined along/parallel to Warp2 or Warp3 to hide, and snipped after a bit of weaving. See adding new thread options here -

5. and back to the right for 2nd pass (Over, Under, Over).
1 wrap/weave complete.

 
6. With pink thread -
1st pass to the right (Under, Over, Under) …

 7. and back to the left (Over, Under, Over).
1 pink wrap made.

Keep packing down the weaves.

 
8. With yellow thread, keeping it above the green –
1st pass to the left (Under, Over, Under) …

 
9. and back to the right (Over, Under, Over).
1 yellow wrap made.

3 wraps made so far, one in each colour.

 
10. Start with green again, keeping it ABOVE the yellow.

TIP : Leave some slack along the edge, enough to span the 2 coloured wraps before it comes into play again. Pulling it too close will distort the tally edge.

 
11. Repeat steps 4 to 9 to desired size, shaping the Cluny leaf along the way.

 
12. To hide colour blip :
Insert all 3 needles through the top loop from below….

 
13. … threads are emerging out through the top loop now

 
14. To close tally - 
Remove top loop and start pulling Warp2 downwards till the loop disappears completely.
Notice how all 3 colours are emerging from the top, covering/hiding the mustard loom thread. 
For the next element, we can easily pick the colour we want to show.

 
If we skip step #12, this is what happens (tally on right in pic) – In my first 3-colour tally I forgot to pass the green thread through top loop before closing. That thread emerges from the right side, making it untidy and leaving some mustard blip.

 
15. Slip the bottom loop off the loom and pull Warp2 upwards to close it.

 
16. One 3-Colour Cluny leaf complete!

See the tiny mustard blip on the right side of tally base? 
This is the blip that hitching the loom prevents! 


My pictorials show only the basic Cluny leaf being worked in colours. But as I pointed out at the start, this colouring of a Cluny leaf works just as well for a hanging Cluny leaf, a Split Cluny or a broad Cluny (which will be the next in this 2018 Cluny tatting series). 

As a reminder, here’s a throwback pic of my trials shared here. Most of these are hanging Cluny leaves. I was trying to get the 'hang' of coloured Cluny tatting!


Monday, 24 September 2018

Cluny Tatting Basics

Pin It now!
Last year, Georgia asked me to do coloured Cluny Tatting on a box loom starting with the basics. I used a card loom (for ease of photographing) which is exactly the same as using a box loom, except for the hollow depth of the latter. This space is created on a card loom when the Warps are pulled tight and the card curves slightly. Or by inserting a pencil or cardboard wedge to raise the loom threads (see Fig1). 
Fig1 - Card Loom with raised Warps
Secondly, while a flat card loom has notches/slits, the 3D box loom has knobs around which the thread is wound (see Fig2 - it is Tamie's pic from the Online Tatting Class) .
Fig2 - Box Loom (pic borrowed from Tamie)
All pics were ready in December 2017. But it has taken over 9 months of gestation to see the light of blog! And now when the time came, it seemed better to start with the very very basic steps which I hadn’t done previously, and then progress to colours. This can act as a refresher as well as to showcase my little tips/tweaks for ease of comparison and reference. I am not happy with the picture quality in my 2015 Cluny Tatting series. Hence this post will contain new pics, though some of the steps may have been covered then.
Due to this change, I will shift the overview and notes to next post where we start with 2 colour threads.


Cluny Tatting - the Basics 
This covers winding the loom and making a single coloured tally

Winding the Loom

A cardstock loom has been used throughout. 
The same principle applies to any kind of loom, including one’s hand.

Yellow shuttle is used to wind the loom (Warps) and red shuttle will be used for weaving. Both shuttles have same colour thread.
There are slits cut into the card loom where thread is inserted. In box loom, the winding is around the knobs. 
I started CTM, and made a ring : 3-3-3-3 before winding the loom.

 
1. Insert thread through A and out through B
2. Insert thread through C and out through D

 
3. Insert thread through E and perform ‘one small step’ from behind 
(this small step is not possible on a hand loom)
4. Pass shuttle through the back loop of A & B. 
This step ensures that closing of the tally can be done on the loom itself.  

 
5. Bring the thread from E out through F …
6. … and in through G (which is the same slit as C). 
This is optional, but I find it keep the loom thread taut at all times 
and the loom shuttle out of the way.

To raise the Warps, a folded card wedge (or pencil) is inserted at the top.

7. This side view shows the raised Warps clearly.
The loom is all set and we are now ready to start weaving our first tally.


Weaving the Tally
basic Cluny Tatting – with same thread (colour) in both shuttles.
2 threads ; 1 colour

 1. Since the previous element is on the left, 
we need to bring the weaving shuttle to the right to begin. 
Hold the ring in a pinch and pass shuttle Under and Over.
NOTE: Instead of simply passing the shuttle across, sometimes a half stitch (flipped or unflipped) is made to secure the base. I have not done it, because at times the stitch knots up for me.

2. Shuttle is in position now, and ready to start weaving.
(though not shown here, keep the ring & Warps in a pinch, as seen in Fig5 below)

 3. Move to the left – pass shuttle Under-Over-Under. 


4. 1 pass made


 5. Move to right - pass shuttle Over-Under-Over.


6. 2nd pass made 
These 2 passes form 1 wrap or weave.
Nudge the thread towards the base to keep all passes close together.

 7. Continue weaving and shaping the tally.
One tally made with 6 wraps (12 passes).


We can now begin to close the tally. Keep tally in a pinch to avoid distortion.

 8. Discard the wedge. Remove thread from slits A & B. 
This is the first loop that needs to be closed by pulling B-C from the lower end. 
Notice how that one small step (Fig4 in Winding the loom) 
has kept all other threads in place on the loom.


9. The A-B loop disappears.
Now we need to close the lower loop. 

10. Remove thread from E and start pulling upwards. As the lower loop (C-D) becomes smaller, remove it from the loom and close completely.
In this case the loop is twisting. Inserting a crochet hook through it weighs it down, 
allowing for a smooth knot-free closure.


11. All loops closed. 1 tally or Cluny leaf or petal made.

In the next post in this series, we begin working with a 2nd colour. All updates will be listed in the My Tutorials page. For lots more tips, resources, and potential, check out my 2015 Cluny Tatting series.

…to be continued