Showing posts with label SSSR Takeda style. Show all posts

Tuesday, 16 June 2020

whimsical interlacing

Pin It now!
INTERLACED  RINGS  using 2 shuttles
(SSSR – single shuttle split ring method)  


When I first experimented here by reducing the number of shuttles, I thought this was a do-able but whimsical technique with very limited application. 
However, a couple of interested tatters, including a request, led me to post this pictorial. And as I went about it, a few designs cropped up in my head. I will try to tat 1 or 2 motifs for practice patterns later.

Skill required : how to make SSSR, Mathew Takeda style. Several resources, including Sabina’s pdf, are listed here (scroll down to RINGS -> SSSR).

This pictorial covers only front to back (over-under) movement in detail. The same concept applies to back to front movement as shown in my earlier posts here and here.

For practice, wind 2 shuttles with thick threads in different colours. Join them. I made a short picoted S-chain.
Each ring is : SSSR: 5-5/10.
The starting pair of rings is closed a wee bit differently than the rest of the braid.
For 1st pair of rings :
1. Leave a bit of bare thread at the base, before starting ring.
Using shuttle1, start Ring 1: 5-5

2. Pull up a long loop from the shuttle

 3. and finger-tat 10 ds to complete the ring.


 4. Partially close the ring leaving just enough space for shuttle to pass through.


 5. Pass shuttle2 front to back through the open ring and tat 5-5


 6. Again post shuttle2 front to back through the same open ring


 7. This is how the 2 rings will look. Ring1 is still open, and interlaced Ring2 is partially tatted.


 8. Now start closing Ring1 by pulling the core thread part of the loop


 9. Ensure the loop is at the back of work, hence pass it through Ring2


 10. Then pass the starting tail through this loop in order to anchor the thread (otherwise the ring will unravel)


 11. and completely close the ring. Pull out a loop of shuttle2


 12. and finger tat the 2nd side of the ring.


 13. Tug on the loop to close ring


 14. Pass tail through this loop to anchor


15. and pull shuttle2 thread to remove all slack from the loop.
The starting SSSRs are interlaced and complete.

For 2nd and all subsequent pair of rings :
Leave a tiny bit of bare thread before starting each ring.
 16. With shuttle1, tat Ring3 just like Ring1, closing it only partially.


 17. Interlace shuttle2 ring and tat the first half.


 18. Close Ring3 but leave the finger loop open.


 19. Complete tatting Ring4 and close it, leaving the finger loop open. Notice the loops from each shuttle at base of respective rings.


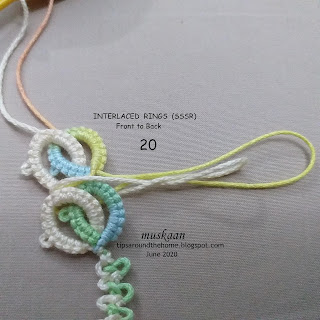
 20. Now, pass the tail through BOTH loops simultaneously, to anchor the rings,


21. and tug the respective shuttle threads to remove all slack from the loops.
Second pair of interlaced SSSRs completed.
Repeat steps 16 to 21 for desired length.

The next 2 pairs shown in the above pic are interlaced back to front. All steps remain same (from #16 onwards), except for posting shuttle2 back to front twice.

Interlacing with SSSR - My Thoughts and Comparison :
  1. Fewer shuttles required. But this also limits the number of colours that can be used.
  2. Basic interlacing movement and effect remains same as for split rings.
  3. Each pair of SSSRs is brought together at the base (due to the anchoring loops) unlike the linear path/separation for SRs. This is a visual effect, too.
  4. When using interlaced SSSR in a motif, the pair has to remain unattached to previous elements in order for the anchoring loops to pass through unhindered. Some patterns may get around this dilemma, but the range becomes limited.

I had also wondered whether Dora Young’s knotless rings can be used in such interlacing. As I thought over it more, I realise it will be very cumbersome, if at all, to accomplish the interlacing. One will have to go back and forth to tat a pair of rings completely. I’m not in a mood to try it ;-P


Sunday, 1 December 2019

heartland basic pattern

Pin It now!
Snowflake #20A in Land of Laces’ 25 Snowflake Project 


Here is the pattern for the snowflake I showed yesterday. There is a 2nd version with colourful heart motifs, but let me get this out of the way, and I will upload that pattern tomorrow, although you can see a few glimpses below ;-D. I apologise for repeating the same snowflake, but it takes time to present ….

Heartland Snowflake patterns
Version 1 – basic & continuous

This snowflake is tatted in many individual parts, but is can be worked continuously without cutting thread. Options/alternates are indicated in italics & colour.
In Anchor size 40, this flake measures 7cms. The hexagonal side is approx. 4cms.
Choose your favourite method of making Dimpled Rings for the hearts. I chose Sue Hanson’s method (Method 2).

Abbreviations/Notations, in order of appearance.
ctm = continuous thread ; dRing = dimpled ring ; vsp = very small picot ; sp = small picot ; p or - = picot ; + = join ; rw = reverse work ; ch = chain ; -- = long picot ; SSSR = single shuttle split ring ; SS = switch shuttle ; R = ring ; MP = mock picot

Round 1 - ball and shuttle, continuous thread.
2 shuttles, ctm, if working continuously
[ dRing1: 6 vsp 7 p 2 sp 3 + 2 + 7 vsp 6. , rw
ch: 1-1--1--1-1 , rw. ] x 6
In order to climb out, tat last chain as a split chain, then climb out with a
split dimpled ring : 6 vsp 7 p 2 sp 3 + 2 / 7 + 6. Continue to Round 2, leaving mock picot space

The topmost pic shows the inner round without the decorative picots.

Individual Heart – single shuttle only.
dRing1: 4 sp 2 sp 10 sp 4 + 10 sp 2 sp 4. dnrw
SSSR: 5 -- 5.
Make 6 such motifs.
This step is omitted if working continuously.

TIP : I tatted over the starting tail, hiding it in Ring1, and using Takeda’s SSSR technique, the end tail gets hidden in Ring2. No sewing in ends! But I snipped off close Only After each motif has been joined in Round 2, to avoid any mishap.

Round 2 - 2 shuttles,  ctm.
Join to center of any inner heart.
Ch: 10, SS. Leave bare thread space for a mock picot before starting R.
R: 6 -- 6. SS
[ Ch: 8 lj(heart#1) 2 lj 4 Under-Over join across base of ring, making and snugging 1ds over the intersection*, 4, lj 2 lj 8 , SS
R : 6 -- 6. MP, SS
Ch: 10 lj to next inner heart, 10 lj(MP) ] x 6
For last motif/repeat, make only 10ds chain and join to inner heart. Tie & cut.

Note: the mock picot is asymmetrical, so that when adjacent chains are attached to it, the ring appears to be in the middle.

* this 1ds is just something I tried in order to make the chain look continuous. It is optional.


For continuous tatting, I am only including the 'altered' part; rest of Round 2 pattern remains same :
….
[ Ch: 8, drop picot, 2, drop picot, 4. rw
dRing: 4 +(drop picot) 2 +(drop picot) 10 sp 4 + 10 sp 2 sp 4. rw, SS
R: 6 – 6. SS
Ch: 4 + 2 + 8, SS. …..
Continue as per above pattern

I hope this is clear and without error. 
Pattern for rainbow version of this snowflake tomorrow ....

Tuesday, 13 June 2017

undulating with one shuttle

Pin It now!
single shuttle medallions with tatting pattern

Thought I’d take a mini break from the project I’m working on (forgot to ask permission for sharing, so we’ll have to wait a while longer) to keep my blog alive ;-D
These were done earlier in the month, continuing with the theme of single shuttle medallions.
Undulating !
single  shuttle  medallions
There are 2 versions, with more to come – there is so much scope in the basic idea. What I showcase as Version 2 was really tatted first, but the pink one is pretty generic with huge potential, as seen in the montage below ....

version 1  prototype
This is a simple braid of half closed or half rings (HR), each of 15 stitches.
In size 20 thread, I used a picot gauge of ⅜ inch for bare thread space of half-closed rings.
Reverse work (RW) after each half ring so that alternate rings face in opposite directions.

8 half rings can be joined back into a square.
10 half rings can be joined back into a star or flower.
… and so on.
Add picots for securing the inner rings, and decorative picots on outer rings.
A pearl in the center of each half ring would look pretty for jewelry.

version 2  prototype
This is made in 2 continuous rounds, with a rosette center and half rings (HR) around. A single shuttle split ring (SSSR) is used to climb out.

Leave a tail at the start in order to secure the last SSSR*.

Rosette (worked in clockwise direction from front)
Ring1  : 3 – 5 – 5 – 5 – 5 – 3 DNRW
Ring2  : 3 + 5 – 5 – 5 – 5 – 3 DNRW
Ring3  : 3 + 5 – 5 – 5 – 5 – 3 DNRW
SSSR4 : 3 + 5 – 5 / 5 – 5 + 3 . Pass tail through the loop before closing ring. DNRW

Outer round of half rings (worked clockwise from front)
[HR1 : 15 RW    (⅜ inch bare thread space in each half ring)
HR2 : 15 LJ , RW] x 4

* The last SSSR has to be joined to first ring, and I chose to do it Takeda-style, passing the starting tail through the SSSR loop before closing it finally. 
Tug on tail and then sew it under caps of ring to hide. 
One can use Dora Young’s split ring technique, too. Some SSSR tutorial links are listed here.

Add decorative picots or beads as desired. These can probably make nice pendants & earrings ?


I was hoping to make many more variations of the above, and more versions. But all that is taking a backseat.


Okay I’ve had my rest, unwinded a bit, and some of the blocked pieces must’ve long dried. Back to my secret project, then…

More from single shuttle medallion challenge - PART 1 ; PART 2

Happy Tatting !