Showing posts with label 3D rings. Show all posts

Sunday, 29 September 2019

the jinx of 13

Pin It now!

I don’t much care for the supposed jinx of this being the 13th flake ;-P But this back from the old snowflake/star has me stumped for a weird reason. It uses my Overlapping Split Rings effect. More effects here, including a square arrangement.
MUTANT  SNOWFLAKE - 
design evolution
Here’s some history –
1. This was a trial prototype from 2016 in Anchor 20. At 5 points/arms, it lays flat.

2. Elaborating on the idea, I converted it into a 6-point flake using Anchor Pearl cotton size 8. There was some cupping. I left it in my tatting box overnight and in the morning, it was pretty flat, and more so after some quick blocking.

I went back to my Jottings about cupping/ruffling and worked in the corrections in next trial... 
Basically cupping occurs when outer round is tight. To avoid it, decrease inner round or increase outer round.

3. Wondering how it would look in a single colour, I chose Anchor 20, but the center rings are 1 stitch short (to reduce the center and tackle cupping). Major cupping which did settle after tugging and blocking!
The split rings have 1 extra stitch and this translated into a slightly different more roundish overlap.

4. Fell back on the maroon pattern using Lizbeth 20 threads. And guess what, I had to make 8 repeats for the flake to lie flat by itself!

Pearl cotton differs in it’s looser twist when compared to Lizbeth, but they tat up to the same final measurements. So what just happened?!!

I was ready to share the 8-armed snowflake which is part of the reason it is called Mutant. Seems like the thread and picot characteristics can lead to anywhere from 5 to 8 arms ;-D
It is a mutant in terms of it’s faux Celtic effect. Not true Irish, a bit of a freak ;-P

The online tatting world has blessed me with some excellent friends. Jane McLellan came to my rescue recently; this time is was Ninetta Caruso & Anita Barry.

They sent me possible reasons, solutions, options and enthusiastically volunteered to tat the flake, too. They were ready to count from the image, but I managed to quickly type them some shorthand notations. They will be doing it today.

Would you like to read what these experienced designers/teachers have to say? It is a design bonanza - insightful designing tips, and if you are interested, I’ll share in my next post.

So, what do you think – would you like to tat this 8-armed snowflake or are you a stickler for 6 dendrites?!

UPDATE (Oct 2025) - Unfortunately I haven't yet been able to put together a post about our joint experience, observations, and the final pattern. However, Ninetta had shared a pic of her lovely, vibrant version here - https://ninettacaruso.blogspot.com/2019/10/distractions.html 

Tuesday, 14 April 2015

parallel tracks

Pin It now!
Ninetta’s Rings !
Update : Ninetta has called her invention/technique Curled Rings, here
A pendant from a floral beginning !
Parallel tracks. Or maybe ‘multiple tracks’ would better describe the scenario.
I’ve been sidetracked by a “sidetrack” even as I was working towards an upcoming deadline, besides the stalled progress on the Wiosna doily and my Inkscape diagramming !!! Make sense ? Well, let’s unravel it a bit…focusing on 2 main tracks

Track 1
While I waited for the ‘survey’ results of my colour dilemma on Renulek’s Wiosna doily, here, I took up sewing as a means of distancing & distracting myself. Among various odds & ends, I needed to sew a nightie as part of an anniversary gift. Hence a deadline awaited. Almost 2 Years back, I had tatted a broad lace for sleeves, for myself. But now when I decided to use them for my MIL they needed one extra repeat each. So got down to it….

Track 2
But it’s never that simple, right ?! I admired Ninetta’s inventive folding of rings here, but got literally “sidetracked” by the edging here . I just Had to give the technique a go.
In my very first attempt, the yellow ‘flower’ is folded horizontally a là Ninetta. But I can never let things be. So for the green ‘leaf’, I tried to fold it vertically. Well, it didn’t turn out neat (some of it only showed up later in the photograph close-up, boohoo), but it is definitely do-able . Size 20 scrap pieces of threads used & finger-tatted.


Track 1
Went back to my sleeve lace & completed the flower motifs.
While the motifs are done, there is still a lot of finishing in terms of joining, adding & extending edgings, as well as bringing it all together for the nightie. Not to mention the actual cutting & sewing of fabric, then attaching all the tatting to it! More on that in the future ….
But before getting to the attachment & lace, my itching fingers & overactive brain got the better of me.

Track 2
This time I took up size 40 threads, intending to make a proper 3D flower, with a brown centre & yellow petals. (I still have limited colours in size 40, & didn’t have the ‘time’ for silk threads, especially in a learning trial).
But here, I did not fold each ring. Instead, made 3 brown rings & then pulled out the thread through all 3 picots, made a Lock join, & got them folded.
Similarly, for the yellow ‘petals’. Made 1 large ring (52 ds total), then one onion ring, then another large ring (where the picot was a bit offset, not in center). Again, I pulled out the thread through picots of all 3 rings together, secured them with a Lock Join to form folds.
Extremely difficult to photograph the minute 3D piece!
Each ring folds differently ! I tried various angles to capture that, but it does not come through.The camera lens may capture finer details (& all the errors!!), but the reading glass lens captures the wider, bigger picture.
Now it was time to finish off the piece. For this, I made 3 concentric/onion rings in 2 colours :
Folded them over. Hey, it looked like a pendant !!! Sewed on a bead (sorry, Jane ;-P. sewing a bead later works when it wasn’t preplanned or intended. Read her valuable input here ) , inserted a gold chain through the folded triple onion rings… (The yellow rings could've been larger still, or the brown ones a bit smaller) 

I apologize for the not-perfect, not-professional depiction. My only excuse is that I like to share ideas ASAP & don’t have the finesse for either colours, or tatting. But I do hope that some ideas will strike up more ideas & some creative tatter will pick it up to create exquisite pieces …

I believe that there is Tremendous potential in these Curled / Folded rings 
for 3D tatting, freeform stylized work,  jewelery, etc.

Okay, now it definitely IS time to get back on track. The Wiosna, though will have to wait for another few days, till I get the lace tatting & nightie cutting & sewing done. (A whacky idea for the Wiosna is causing eddies in my brain. It's a fun idea, but will definitely hurt the sentiments of purists, hence I hesitate to share it ....)


Jumping Tracks
Oh, and I almost forgot of my earlier foray into another learning Track (jumped tracks from the Wiosna to this). Again, thanks to Ninetta’s diagrammatic pictorial that she so generously shared here . She applied modern tatting techniques to a vintage pattern.
It took some getting used to (both the diagram & the tatting) ; the 1st 2 motifs were a bit fiddly & I made some error in following the directions in the diagrams. But the 3rd one came out right & her diagrams are truly brilliant.
I also realized that picots on the Floating Ring should be made longer than normal for the centre to lift itself vertically.

Ninetta's Layered Rings
For the 4th ring, I tried a Josephine Ring (JR) as a floating ring (FR). While it should’ve been larger to show the characteristic undulating effect of a JR, there is still a perceptible difference between a regular FR & a J-FR. The latter seems to curl inwards, & the former seems to stand up more.

 I hope to use this technique, too, someday

My sincerest thanks to Ninetta (((hugs)))
for sharing her tremendous talent & innovation
All the discrepancies & limitations are solely mine.

Happy tatting :-)


Motif #17/II for 25 Motif Challenge

Wednesday, 12 November 2014

Perpendicular Concentric/Onion Rings

Pin It now!
Tatting Tutorial

I am taking a short break from the Deconstructing Patterns from Magic Square series to post a couple of tutorials. Will return to it soon.
The following is an elaborate, step-by-step explanation of how I did the perpendicular arrangement of Josephine Rings for the centre & buds in the Tiny Heart Poppy flower I shared here.

Perpendicular Arrangement of Concentric Josephine Rings

My tutorial involves Josephine Rings in 2 types of Concentric Arrangement :
        I.      Normal/Flat, same-plane, concentric Josephine Rings, &
     II.      Perpendicular, two-plane, concentric Josephine Rings

I have not tried this with normal rings because they are not as dense & hence tend to be more floppy than JRs. However, with metallic or nylon threads, this might be overcome. Secondly, the shape may not be as circular as a JR.
It, may , however, be worth a try ….  Maybe with Padded Stitch Rings ?!

Abbreviations/terms Used :
JR – Josephine Ring ; hitch – half stitch ; SSSJR – Single Shuttle Split Josephine Ring

I. Normal Concentric/Onion Rings 
Normally, in concentric rings (onion rings), after making the 1st ring, one would start the 2nd  or outer ring by forming the loop around the periphery of inner ring, in the Same Plane (in geometric terms). These are the ‘normal’, ‘flat’ onion rings we come across. So if the 1st ring is in the horizontal plane, then the 2nd ring that goes around it, will also be in the horizontal plane.

Refer to Figs 1 & 2 below . I have used size 20 yellow thread .
Fig 1
Fig 2
Start with normal JR1 - 10 hitches. Close ring. 
JR2 - 21 hitches . Close ring. 
This is how they will look when both JRs are closed. They lie in same plane, flat, and are like normal ‘onion’ rings, except that we’re working with Josephine Rings here.
This set has been made for comparison purpose only.

II. Perpendicular Concentric/Onion Rings

In this case, the 2 concentric/onion rings are in 2 different planes geometrically. Each plane is at right angles (90˚) to the other. Hence these can be termed as Vertical or Perpendicular  Concentric/Onion Rings.

Fig 3
For clarity, I used size 10 variegated thread here, such that the 2 rings come out in different colours (inner white & outer pink).

JR1 - 15  (white). Close ring. (adjacent Fig 3)

JR2 - 21. Before starting JR2, hold JR1 at base and bring the shuttle thread in front, to 'midpoint' of JR1 & make loop over and across the base ring, (but around the inner ring for final overlap). Figs 4 & 5 below.
Basically, one is turning JR1 at a 90° angle on Y axis. 

Fig 4
Fig 5


Fig 6
Fig 7


Start JR2. Fig 6 shows 3 hitches made.

Continue, counting the hitches as you go, till you reach the top of the inner ring. This is the approximate halfway point, & the outer ring will now start to descend on the other side of JR1. Fig 7.
The number of total hitches needed for Outer JR may vary with thickness of thread used, one’s own tension, etc. Hence, it is a good thing to count upto this halfway point, to get some idea of how many more hitches are needed to complete the outer ring such that the inner ring is snuggly enclosed/enwrapped. (for instance, when using size 20 yellow in my Tiny Heart Poppy, I required only 15 hitches to complete JR2 when JR1 was 10 hitches)

Thumb Rule for calculating number of hitches required for Outer Ring (JR2) :
Twice the number of hitches upto halfway point + Hitches needed to span the inner ring top hitches on both sides).
Thus, in this case, JR2 = (8x2) + 5 = 21 hitches
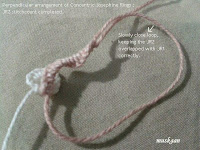
Fig 8
Now that JR2 is complete, slowly start to close ring, keeping the inner ring in position, sitting snuggly within the outer ring. Fig. 8 above.
Fig 9
Fig 9 shows the Perpendicular Concentric JRs from various angles. I made another in white (size 10) & one in yellow (size 20) & all 3 sit comfortably within a shuttle bobbin !


Tabular Comparison of Concentric / Onion Josephine Rings
(refer to Fig 10 below)
Normal Concentric/Onion Rings
Perpendicular Concentric/Onion Rings


All rings in same plane
Rings in different planes
Ring2 is made Around the periphery of Ring1
Ring 2 goes Over & Across/Around Ring 1
2 Dimensional effect
3 Dimensional effect
Rings lie flat (180˚ between 2 rings)
Rings are perpendicular or at an angle to each other (90˚ between for 2 rings)
View from top : only single line seen
View from top : 2 lines crossing at right angle


Fig 10

Some  Possibilities & Ideas

1. As beads ! Immense possibilities. Can be made with metallic, nylon, or silk threads .
Use within other motifs/medallions/braids, or as a string of tatted ‘pearls’. One can go from one perpendicular concentric JR bead to the next via a chain or thread space.
2. OR make the outer ring SSSJR ( I’ve tried this SSSJR & it works ) !

3. Add a medium-sized bead in center of JR1 and then make JR2 .
4. Medium bead in center and 3 overlapping JRs using thin thread ? 
5. Make perpendicular JRs, but JR2 as split ring, then add bead, … repeat with alternate JRs & beads to desired length, for a mixed tatted 'bead' and seed bead necklace.

6. Use different colours for each JR and / or bead.

7. For JR2, add a few variably padded hitches on top variably for graded effect.
8. Add decorative picots on outer JR for lacy / flowery effect.

9. In Tiny Heart Poppy, I used Jane Eborall’s Josephine Ring technique for the outer JR in buds. Love the woven texture, although difficult to photograph clearly ! This, along with auxiliary thread, increased the size of the buds.


10. Extension of the Technique to other elements : How about using Block Tatting to complete a turn around itself, & joined to the beginning, to form a cylindrical hollow ?!!

These are just a few of my thoughts. I’m sure all you creative talented tatters will come up with plenty more :-)

Now I really must get an appointment for a manicure … sorry for the grossness ! My earlier set of pics, with smoother shinier skin, had to be discarded coz the threads didn’t work well.

I will, next, describe & illustrate how I used auxiliary thread to make the buds in the 3D Poppy referred to above. It is a simple technique solution ...