Showing posts with label Richard Embrey. Show all posts

Friday, 18 September 2026

DAL2026 roundup 4

Pin It now!

 And the final round-up of my design-along or DAL 2026 Challenge is here! I do have a commitment from a designer that she is working on it, but no images so far. And just as I am writig this, one more has come in! Despite my intention, it took me several weeks to post the challenge in the 3-D Tatting group and we have two models, each constructed so differently!

Scroll to end of page for relevant blog links

We also have a surprise extension of a motif! Last time it was tessellation of motifs, this time it is Barbara Arango's extension of her motif into a round doily with the addition of several rounds! She's calling it 'Rachel'.  

(extended pattern received)

19. Kaye Brown-Judt - saw an oval in the starter motif and designed 2 rounds around it! She shared it with her tatting group and several of them will be tatting it for their next show-and-tell!
(pattern ready)
I find Kaye's design videos/lessons which she uploaded for TOTC are exceptionally good ... to me she is the best design teacher in terms of her approach, clarity, ease, and perspective! So much to learn from her.

20. Jiamrat Supapol - a beautiful design and shape with lots of thrown rings thrown in! I think it has an oriental appeal.
(pattern ready)

21. Richard Embrey - If I remember correctly, nobody so far has used either beads or doodads in their designs. So Richard has that honour along with a 3D version! ! 
Version 1 - He had these butterflies stashed from years back and decided to use them for his design
(pattern ready)
Version 2 - Such a different look simply by extending the arms! 
(pattern ready)
Version 3 - a 3D cup holder ....  
(pattern awaited)
... which also doubles as a lid!
Richard has written the pattern but Palmetto Tat Days prep has gotten in the way of his review. Hence a delay in the pattern.

22. Liyarra - faced a bit of a cupping problem at the final join and it was a fun learning experience trying to figure out how to flatten it out. 
Notice all the different meandering designs-within-design?!
(pattern ready)

23. Margaret Davies - always ready to participate, created this expandable pattern with simple rounds!
(pattern ready)


24. Vicki Clarke (Victats) - answered my call in the 3-D Tatting group for 3D versions, with this pumpkin or apple. The center rosette is modified inspired by the 3D centres by Teri Dusenbury.
She explained her process and count but has offered to send a better presentation soon.
She has since tatted one more model in red and larger, which she shared on Instagram!
(pattern shared)

25. Sally Biggers - despite her busy schedule, played with the design creating this snowflake-like motif!
She's caught up with Palmetto Tat Days hence the pattern will be delayed.        
(pattern awaited)

26. Padma Mandayam - sent this lovely version with 3 additional rounds just as I was about to finish and upload this post!
(pattern ready)

There are two more tatters who had participated, one of who did not continue beyond the starter motif, and another who worked out two trial pieces but hasn't found the time to continue. Their pics are in the master copy, but the roundups are only for completed pieces.

So, a total of 28 participants, with 26 completing their challenge and so many who tatted multiple versions or numerous rounds!

With additional patterns arriving almost daily, I am neck-deep in doing the presentations. Nevertheless I hope to share the master doc with you early next week. The PDFs that remain will be uploaded and the doc updated in the near future.

Related posts - 

Many many thanks to All participants for playing along with beautiful projects and also sharing their patterns for the community!

Wednesday, 31 January 2024

helix tatting pictorials

Pin It now!

Caps in, counterclockwise spiral

I was testing a pattern for Richard Embrey and I needed to understand clearly (through action) how to achieve a particular effect. While I had dealt with the concept here - https://tipsaroundthehome.blogspot.com/2023/12/about-helix-tatting-and-more.html, I needed more clarity on the actual tatting since four visual effects are possible. 

positioning for last stitch for Caps out effect

It bothered me not being able to identify the path clearly. Just one final stitch in the first row makes the difference! I needed this study.

Secondly there was a stimulating discussion that this technique is macrame and not tatting. If the very basis of tatting is the flipped/transferred lark's head knot (called double stitch), then helix tatting is definitely tatting since chain segments with double stitches are made. And besides the tubular I-cord, numerous shapes can be created, and rings and chains can be thrown off at any point.

Helix tatting basic trial

Thirdly, I couldn't find any really close-up pics of the steps/process. This led me to a quick, very basic pictorial using thick knitting cotton and only 4 threads. However, on it's own, this might've led to some confusion or disinterest. And like most of my work, I delved further, resulting in this presentation pdf.

Helix Tatting Pictorials and Effects (and Tips) - https://drive.google.com/file/d/13dPVQGsmAQU6OS4FrP3YCFgXokdiJVvs/view

HT Caps out, clockwise spiral 
The second pictorial uses 8 shuttles, but instead of starting CTM, I simply tied a loose knot. The fun part of this is that the tails can be hidden later within the hollow.
If one runs out of thread, it is easy enough to add new thread leaving the tail in the hollow!

And simply inserting a skewer stick and rotating the tatting helps the stitches to arrange themselves neatly!

These are the 4 effects together. The left pair is Caps out and the right pair is Caps in. The difference is visible in the texture, width, and direction of the spiral.

I haven't decided what to do with these samplers, hence the tails are left unhidden. Besides the 3D candle I mentioned here, I have a few other ideas in my head. Let's see if they get translated into thread. 

So that's it for now. Hope you give it a try if just for a lark! 
I have another pictorial lined up to share, again arising out of my errors and dissatisfaction.

Sunday, 10 December 2023

about Helix Tatting and more

Pin It now!

In late October, while working on the Dictionary part of ‘The Six Ts of Shuttle Tatting’, Anita introduced me to the term Helix Tatting and the developer of the technique, Richard Embrey. We worked on a definition or description to include in the dictionary and I also tried my hand at a quick trial to get a feel for it.
My very first trial (with mistakes) without shuttles

While I don’t want to reveal the definition, I will certainly do a sort of comparison to put things in perspective. Richard came up with this technique in 2019 while trying to make an I-cord in tatting when he couldn’t find a tatted equivalent. It started out as a tatted tube or cord but has since evolved and diversified into many more shapes, including a coronation cord and a fish! As always, it is our imagination that gets us soaring into new skies.

UPDATE - https://tipsaroundthehome.blogspot.com/2024/01/helix-tatting-pictorials.html  -- Includes PDF OF HELIX TATTING Pictorials 

Let me list down the major characteristics of Helix tatting (HT) as well as include links to visually similar techniques. Please note that a lot of these are my own thoughts and notes. Feel free to critique or suggest.

1. It is basically a 3D hollow cord or structure, made solely of chains, using multiple shuttles (4 or more). The outward appearance is like a spiral, especially visible when different colours are used.

2. Each shuttle alternately and sequentially acts as an active shuttle to become the core thread, and then  as a ball thread to form the stitches.

3. It is NOT bauble tatting, though it can be considered to be a variation. No separate ‘ribs’ are added for a scaffolding. Instead, each shuttle, in turn, acts as a core thread and provides the necessary stability to the structure. It also 'locks in' the previous segment when shuttles are switched.

4. It is NOT a continuous spiraling chain since short segments are made with a sequential change of shuttles. Each segment can consist of merely 1 stitch or as many stitches as one desires to create a broader shape. Two or more stitches give a more distinctive spiraling of the colours. The spiral is directional and there are ways to determine beforehand which direction one wants the spiral to run.

For instance this 3D Pond Reed prototype I had made back in 2014 using 2 shuttles– it is a continuous chain spiraling around itself, where I used the slope and roll joins to hold the shape. Clearly it is very different from HT.

5. It is NOT block tatting, though chain segments are apparently ‘stacked’ over each other. No lock joins are used. However the outward appearance can be confused with tatted ropes, with or without beads. Ninetta has done a wonderful study of various ways in which these 3D tatted ropes can be made, with links to respective tutorials. A couple of them even create a spiral effect! https://ninettacaruso.blogspot.com/search/label/stacking

6. HT is not limited to merely spiraling chains. With so many shuttles in play, it is easy to throw off rings and chains, use beads, add picots, and so on. Versatile.

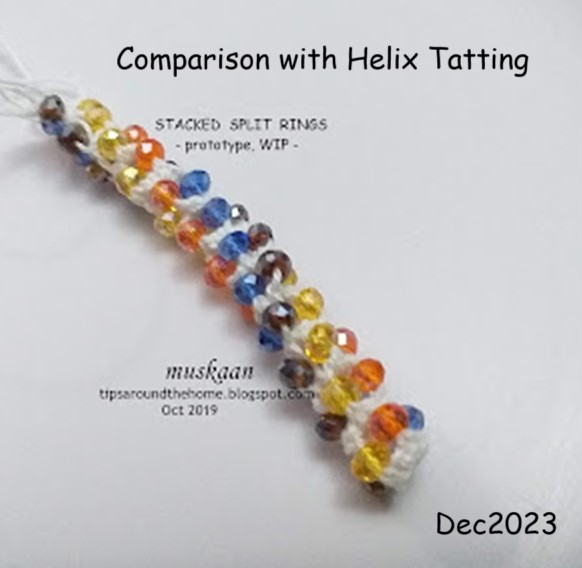
7. There is another tatted tube example where we use stacked or layered split rings. No chains involved, only rings. And if the picots are shortened, the stacking will be that much closer. Clearly this is not HT in any sense of the term, except that it is also a form of continuous tatting for a 3D hollow tube.

tatted beaded rope made with stacked or layered split rings - https://tipsaroundthehome.blogspot.com/2019/10/tat-beaded-rope.html

See Ninetta's version of a spiraling tatted rope made with interlocking rings - https://ninettacaruso.blogspot.com/2020/08/gold-rope-chain.html 

8. BUT, there is something that definitely follows the same principle and concept as HT, and also gives a directional spiral! It is called Mac-Tatting (MT) and was first developed by Usha Kota in an attempt to imitate a crochet braid in tatting – it was a flat braid, worked too and fro. However, when I understood what HT was, it immediately crossed my mind that MT could be similar if worked continuously. And YES, it is the same, except that we work with unflipped or reverse stitches rather than flipped or double stitches! And you get a spiral, though the stitches face down while in progress. 

Helix tatting & Mac-tatting trials, together
In my first attempts, I found it easier to work the Mac-tatting version - I had a better control of the threads and there was no tension issue. Helix tatting is fine once you get into a rhythm, but it requires more finesse. And managing all those shuttles can of course be an issue.


A couple of weeks back, Richard was invited to TOTC as a guest teacher to demonstrate the Helix Tatting technique. You can watch the video here - https://youtube.com/live/DXO9Pm0fq1U
Bonnie Swank shared her notes on how to do HT with needles. Richard also shared a practice pattern called Watermelon Dreams, with the class. https://www.theonlinetattingclass.com/patterns
Creative members have already shared a couple of clever ways to organize their shuttles to avoid tangling. I simply laid them down spread-eagled, on my bed. I did find that it is better to leave a longish length of thread to avoid frequent winding/unwinding; and since it is only 1 or 2 stitches each, the long length is not a bother. 

I am test-tatting a pattern for Richard for his upcoming book. It is called Watermelon Dreams Beaded Helix Embellished Earrings. 
It took me a few hours to find and empty all my shuttles, glue the numbers (I did it on both sides, LOL), string beads and wind the shuttles. 
In progress.
I've completed Round 7. My version is a Caps In spiral where the double stitch faces inside the cord and tatting progresses in a clockwise circle. 

That’s it from me for now ….. Welcome your thoughts.

Many thanks to Richard, Anita, and all the creative minds mentioned above!