what you ask ? the dot picot !!
It was my pleasure to test tat a
couple more medallions with dot picots.
And I finally nailed
it ;-P
Thumb nail – my key to a good dot picot .
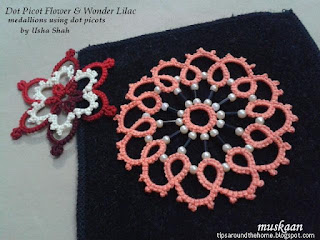
Dot Picot flower
Usha Shah
It is always a good idea to study
the sample or diagram. When I see chains with a lot of thrown rings, I prefer
tatting these frontside. Hence the inner rings were worked backside.
It is a 2-round medallion worked continuously. I climbed out with reverse join
instead of SLT.
If you look closely, a couple of
the dot picots have some thread showing – the ring did not close completely. I
struggled a bit, just like I did before, with closing this tiny ring.
Till I stumbled on, for me, the perfect
solution : Start closing the ring as you normally would. Towards the
very last part, hold the stitch in the little crevice between the thumb nail
and the flesh. Then pull the remaining thread taut and close ring fully. Worked
every time as is evident in the much better tatted next medallion ….
Measures 2 inches in size 20
Anchor
Wonder Lilac
Usha Shah
This delightful medallion was a
pleasure to tat (despite the beads, yes
!), now that I had the dot picot under my thumb :-D
Instead of a regular ring, I
started with a SCMR.
And instead of all those
paperclips hanging from the long beaded picots (LBP), I measured the length
required using a picot gauge. ½ inch was sufficient for these 3 beads.
Continued tatting without beads to complete circle....
I left the first 3 LBPs with
beads and paperclips for purpose of comparison.
The 2nd round was
easy-going, loading beads with a crochet hook immediately before joining.
I believe thread also plays a
role in the making. This medallion is worked in Red Heart size 20, which is a
bit smoother and less tightly wound that Anchor crochet cotton in same size.
Both these, and more, patterns will soon be posted on Usha’s blog.
Take a pleasant walk through
her creative journey dotted with picots here (pun intended)
UPDATE (May 7): pdf for both patterns now shared on OTC
Many
many thanks to Usha for sharing her patterns :-)
and happy tatting always J


Interesting patterns, I look forward to seeing them, dot picots, I like the flower could be used in so many different ways.
ReplyDeleteI love how the beads echo the dot picots. Dot picots are on my to-do list!
ReplyDeleteClever title! I did try the dot picots, and I found they were quite fun! Thanks for sharing your enthusiasm and your beautiful tatting. I love reading about what you're doing!
ReplyDeleteAn interesting looking technique. I should stop by the Online Tatting Class on Monday for the lesson :)
ReplyDeleteFabulous motifs!! :)
ReplyDeleteThank you all so much for your lovely comments :-)))
ReplyDeleteThis technique is a life-saver for people like me who try to stay away from beads and picot gauges , but have a preference for texture ;-D
Hope we see more of these dot picots applied to our tatting.
Muskaan how nicely you study n explain each pattern!!!! Working of Inner rings backwards and reverse join are perfect methods to get better effect of tatted motif on front side. SCMR in second motif is good option to make beaded inner ring. I thank you from my heart for test tatting dot picot motifs and helping me to prepare pdf pattern for online class.
ReplyDeleteWell, you certainly kept me busy, Usha :-) But I enjoyed the whole journey along with the tatting. And it also helped me get rid of my 'fear' of Google Docs!
DeleteDesigner's appreciation is precious, thanks. All the very best for class :-)