Thursday, 1 April 2021

o happy day

Pin It now!

What better than International Tatting Day, to remind us of the collaboration for Endrucks 1920 Project where tatters from around the globe have volunteered to modernise the 100 year old patterns from her German book ‘Die Schiffchen-Spitzen’.

article by Carin Jansen in Kantbrief March 2021

One such contributor we’d like to thank today is Carin Jansen who you will recognise immediately as the designer of the beautiful Angel Doily TAL. It was only because of this Endrucks project that I became aware of her blog and work and found the doily pattern that led to another small group tat-along I've been posting about!
She not only contributed, but also got us published in Kantbrief, a Dutch lace magazine (pic above).

Carin volunteered for first one, then a second pattern (happily, we’ve had many such volunteers!) and did an amazing job of putting them together with clear diagrams and a bilingual presentation – both in Dutch and English.
She first chose pattern #32 since there was no block tatting. It is worked continuously from one end to the other and then returns back to complete the symmetry. I love the mock 2-coloured onion ring effect between motifs - and here it looks like a bead connecting the rectangles!

Diligence is never far from a tatter. Two pattern #19 models worked in different sized threads but by switching the colours, a completely different effect emerges! As with most of Endrucks’ patterns, this can easily be worked in one pass by crossing over to the other side on the return.
Here she has designed a new end and this adaptation would work great as a bracelet or necklace with the addition of beads and clasp! The large rings can encase a button or cabochon!

Both patterns have thrown rings, which tatters can do with a 2nd shuttle or needle, without breaking the curve of the chain below.

Even though the direct pdf links to both patterns are listed in the Project doc, I urge you to visit Carin’s blog. She is a talented 60 year young designer, author, blogger, and multi-crafter from Netherland. Get to know her better here! Her blog has some wonderful articles including Designing Takes Time and What is Tatting? as well as a couple more free tatting patterns. I've only been able to read her tatting posts so far, but there's a lot more.

And to repeat myself, we're published! Carin contributed her article on the Endrucks 1920 Project to a Dutch lace magazine ‘Kantbrief’ March 2021 and graciously sent me a physical copy! Wow, right?! You can read her article in her blog where there is an English translation alongside.

This is the only article on tatting, all others being devoted to other lace forms such as torchon, needle lace, etc. along with several schemata and patroons (patterns) which are inspiring to transform into tatted lace! 3 cheers for diagrams and images! But there is one article with an intriguing title – ‘Lacemaker and young gamblers’! Wish I could read Dutch.

And below is the sweet handwritten letter she sent .... the pleasure is mutual, Carin!

Her lovely letter that accompanied the magazine!
It has been a pleasure and honour collaborating with her and exchanging notes. She has been a real sport, enthusiastic and supportive. We sure hope she blogs more often and we wish her luck and success in publishing several more books and articles. And hope the future holds more creative contact between us 🌷🌷🌷

To paraphrase Ninetta Caruso, this is a community project and we invite everyone to join in. Please let us know where we can find your renditions and derivative tatting and use the hashtag #Endrucks1920Project on facebook.

You are welcome to join in any time, with shuttle or needle, as a test tatter or creative tweaker/adaptor. Contact either Ninetta or me - we'd love to include your work. All information, with links and updates, is compiled in the Endrucks 1920 Project doc here – https://docs.google.com/document/d/17LEVftXweztBIOWh4sL4BB7bX65ssoOsOn4oXIgCepY/view
A new heading – With Gratitude – is now in the Project doc. It lists our gratitude to each contributor with links to respective blogpost.

🌸🍫💕 Wishing everybody a very special and creative ITD 
– enjoy tatting, chatting, and chocolate! 💕🍫🌸  
🌺🌻🌼🌻🌺 A very special thanks to all project contributors 🌺🌻🌼🌻🌺

muskaan & Ninetta


Monday, 29 March 2021

2 sliding tips

Pin It now!
sliding in ...
I discovered this when working the Angel Choir doily in size 80. The joining picots were extremely tiny - mere stubs. Often it was difficult to insert even a fine hook through such a tiny space. However when I inserted the hook from behind/backside (in order to make a down join), it went in smoothly! Hmmm...
I believe the reason lies in how threads lie. The close-up of backside of picot (pic above) shows that the adjoining stitches are mere vertical columns, whereas the picot when seen from front shows 2 horizontal bars on either side (pic below).
These horizontal bars create more friction thus making it difficult for the hook to slide in. There is not as much friction from behind and the vertical threads make way easily to accommodate the hook.
Would you agree?
Even if I was not making a down join, I inserted the hook from backside... this 'opens up' the picot space and the hook can then be inserted from the front.
Try it if you remember, and let me know if it works for you.

sliding between...
Isn't it annoying when we find a slab or uneven thread in the middle of our tatting? And then one has to make forced decisions, snips, ugliness, thread ends to hide, whatever!
When we load our shuttles, whether winding the thread around shuttle or walking shuttle over the thread, it is a good idea to let the thread slide gently between finger and thumb so that we can catch any slub or thread deformity in time and take timely decisions.
I've never used a machine to wind thread, but if some of you have, can you slide the thread between fingers before it loads on the bobbin/shuttle? Or is there any other way to catch the culprits beforehand? How do you manage?

Hope these little tips are useful. Do you have a quick tip to share?

But before sliding away, would you like to see some magic or maybe it's an optical illusion?!

sliding in some magic...
Well, I have absolutely no idea how this came about but take a dekko ...
All 3 screenshots were taken 3 days back at the same time. Look at the thumbnail encircled in red. It shows my 2 quick tips post in the feed of my (above), Jane McLellan, and Ninetta's blog! 
The above thumbnail is of the 1st pic from my post - I had made it smaller to accommodate 3 in a row.
Spot the difference?😵
The ones in these other blogs show an image of the 4th pic from same post!
How'd it happen - any theories/solutions? It would be fun to replicate, eh bloggers 😄 

Friday, 26 March 2021

colour temptation

Pin It now!
 
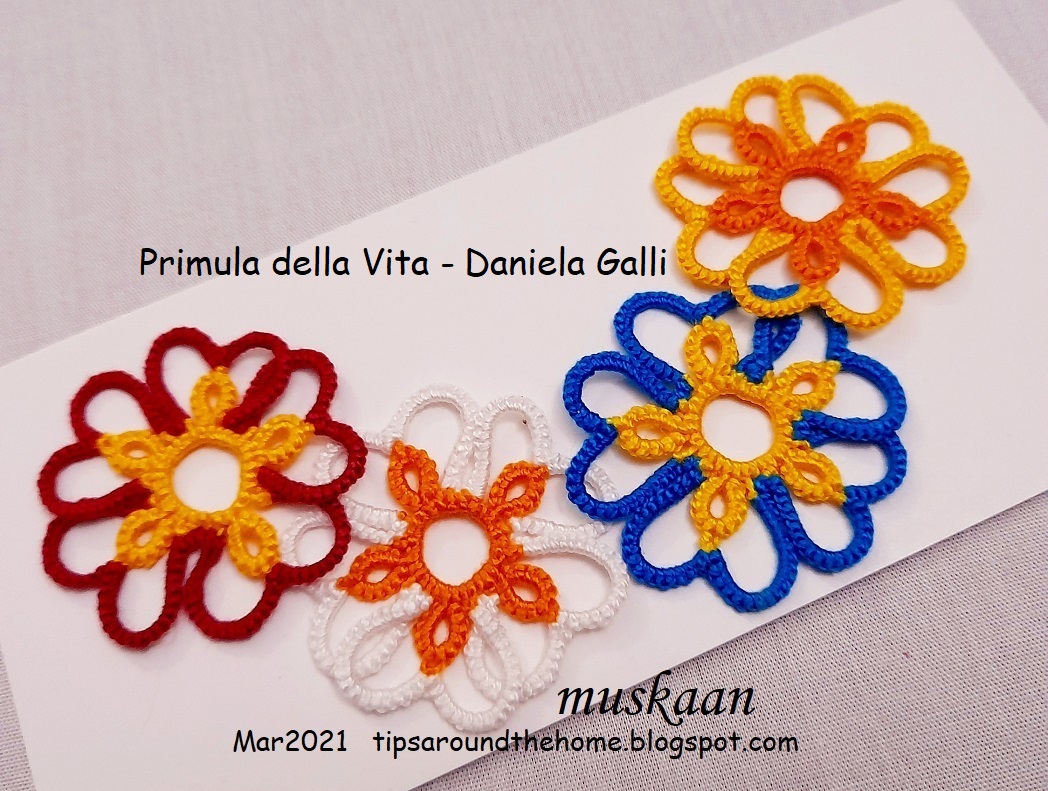
Nefertiti seems content with this necklace adaptation of Daniela Galli's Primula della Vita motifs😊
We are enjoying a long spring heading into the festival of colours (Holi) after which summer will set in (lunar calendars are way more accurate when it comes to seasons). No wonder I wanted to capture some of those colours in thread through this addictive floral motif shared by the very talented Daniela Galli for an event on facebook in early February.
Primula della Vita! And once started, I couldn't stop! Such a pleasing shape.
Each motif is 3.5cms in Anchor Pearl cotton size 8.
Would you believe that 3 years back I had saved an image hoping to convert the lovely primula flowers into tatting. That Primula mercerium image led me to this cluster which became my template for colour choices. This was my Mom's go-to flower to sketch! 
These are still unblocked and I like the slight overlap of petals! What to do now? A spring necklace! How to join? With leaves! 
On the top is the first leaf I tried, but cut off. Tried a few more ideas, including beads, and rejected all.
Finally settled on simple single-shuttle rings in different sizes. Strategically distributed to join adjacent motifs. 

Following 6 pics are close-ups where the 2nd of each pair has a Swarovski crystal in the center. Which do you prefer?
The core thread remains same through both rounds. After completing the central medallion, only the knotting thread was snipped off and hidden; a new colour was joined as knotting thread for the outer petals - false CTM method.
   
Tatting moves clockwise, all from the front. SCMR with thrown rings, climbing out with mock picot, and lock join are the only techniques for motif. 
TIP: Notice how I always use 2 metal jump rings? It is my way of assuring that even if thread slips off one ring, the other will hold it, till we can fix and close the gap.

My favourite kind of tatted lace - a bit of freeform, overlap, flowers - bringing in Nature in some small way!
These are all the materials used. Anchor Pearl cotton size 8 threads and beads, crystals. The details are notated on the pic.
Crystals sparkle in real life and give weight, body, and a finish to the necklace. 

Many many thanks, Daniela, for this wonderful pattern! I thoroughly enjoyed this project and hope to that the motifs in future as well.
Currrently there's an Easter 3D egg and cute chick pattern that Daniela has shared with the Chiacchierino: Filo, Amore e Fantasia group, if you wish to join in. It's on my to-tat list for later, but these amuse-bouches are so tempting for a relaxing distraction!