Saturday, 11 June 2016

something new, something old

Pin It now!
all text in blue are active links 
test-tatting for Jane Eborall
do you really think her patterns need testing ?!

I’m sure we’ve all seen Jane’s latest necklace. It is such a beautiful piece – simple elegance ! So when the opportunity to test tat it came, I grabbed it, even though (or perhaps especially because) I consider myself bead-challenged.
Don’t get me wrong – I love beads & admire all the exquisite beaded tatting & tatters who can accomplish it. Beads add not just beauty & ornamentation; they have functional significance too – adding more colours, adding texture & dimension, bridging spaces, eliminating auxiliary threads, …. you know more than I do. It’s just that when I work with beads, my eyes get all beady, my threaded hands get all knotty, and my head goes for a long beaded spin ! Time seems to whirl away while my tatting seems to crawl. So beads go from affecting my eyes, to hands, to brain, and the whole Time dimension :-(
Trial 1 : vintage threads Anchor size 30 ; size 9 beads ;
finished length - 2"
Instead of the necklace, I chose to tat only the earrings. Loved it !!! It was fun because large beads were used & no stringing them; and a great learning experience. It also turned out a blessing in disguise, because this bead in SCMR has solved a problem I was facing with one of my patterns. Thanks to Jane at so many levels :-)
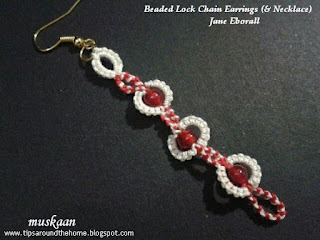
Trial 2 : Anchor size 20 threads ; size 6 beads ;
finished length - 2½
My Notes :
  1. When closing the SCMR half-way, keep enough loop space on either side of bead. This eases joining back. Learned from the 1st trial.
  2. There was some mismatch between threads & beads which has stumped me. But the pattern is very forgiving.
  3. Instead of lock join, I used the outer thread join (Teiko Fujito). With LJ I was getting a distinctly visually split ring (as seen in the lowermost ring in both versions ; see arrows in pic below). The outer thread join reduced the colour blip at both ends of ring, giving it more of a complete circle effect.
  4. Bead within half SCMR is a great bridging technique for making a pattern in one-pass !

I didn’t have to refer to any tutorial ! My beads & attaching findings learning is taking shape ;-P

◘◘◘◘◘◘◘◘◘◘

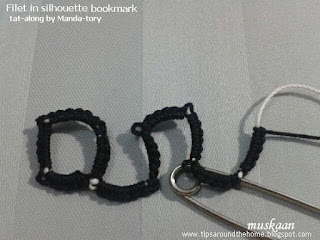
Filet in Silhouette

I had been admiring Amanda’s filet tatting projects on Craftree for quite a while. Recently she offered to create a tutorial tat-along. How could I stay away ?!
Finally started yesterday. Went pretty smoothly.
Her directions & instructions are very clear & well laid out. 
Related Links : Craftree thread preparation ; Lesson 1 ; Lesson 2
My Notes :

  1. I used size 20 thread, hence increased chain stitches to 6ds for each chain segment.
  2. Ch5 can be made to face outwards as Ch1 & all the other chains in that ‘line’ (eg. Ch9, 13, etc).
  3. I used directional (fs/bs) tatting.
  4. The striver acts as a tiny picot gauge in position B, when used after the SLT . In position A, it acts as a barrier while including the tiny picot.
  5. Not all chain turns require an SLT & SPB. I could accomplish most of then with SPA, which, in effect incorporates an SLT, but around the striver.
  6. The construction using the strivers & SLT is also reminiscent of the Celtic Knotted Picot discussed in the overhand tie here
Incidentally, I have used what I called the “SLT picot” in Round 6 of Renulek’s Wiosna last year ! I wanted to change colour midway through a chain, but the pattern called for a small picot too (see pic below). I didn’t use a striver, just SLT, then a small picot. SLT or overhand tie helps to switch shuttle positions.

So, Lesson 1 (partially) is how far I got when I had to break for dinner & chores. But it must’ve been on my mind 'coz I filleted my own finger !!! Gotta give the shuttles a break :-(

◘◘◘◘◘◘◘◘◘◘

A doily tat-along by Renulek
Rounds 9 & 10 (size 40 cream Anchor thread)

Round 9 measures 10½”
A simple rings and chains round. So I went with direct tatting (reverse stitch) for the chains. I find it easier/faster to switch shuttles & work from the front than reel in & reel out the bobbin in main shuttle & reverse work. Worked counter-clockwise.
Yes, there was some ruffling, but Renulek had assured us that it will go away in a few more rounds.
Split chain to climb out to round 10

Round 10 measures 11½” 
Went with normal 2-shuttle tatting, since there were frequent floating rings. Didn’t make sense to do direct tatting. So working in clockwise direction, with reverse work & switch shuttles.
Again used a split chain & split ring to climb out for round 11.

◘◘◘◘◘◘◘◘◘◘

That’s all there is for now. I have finally taken photographs of my recent projects, so you can expect more posts soon :-)
Thanks for reading along …
and
many thanks to Jane, Manda-tory, & Renulek 

Wiosna 2016 Rnds 1-3 ; Rnd 4 ; Rnds 5-6 ; Rnds 7-8


Tuesday, 7 June 2016

connecting with joins

Pin It now!

Wanting to get back on track last month, I chose a ‘simple’ one like Day 10. But as always, I have a penchant for complicating everything ! I have continued to play with colour combinations & placements in this snowflake, too.

The Tenth Day of December Snowflake
Lene Björn

Con-joined !

Visualization : The USP of this snowflake, for me, is the elegant curves of the long chains, which I wanted to highlight in a single colour (yellow here), keeping the rest of the pattern in the background. Could this be accomplished without an overhand tie, since the SLT would create a slight dent or break in the chain ?! If not SLT, then what else ???  


Round 1 – measures just over 1”
3 strands of Anchor embroidery cotton : 0325 .
Techniques : single shuttle, rings-only, join last ring to first ring, hiding ends with SSSR, and hiding ends with whip stitch.
Simple round. To avoid hiding ends, I used SSSR for last ring . And hid the other tail with whip stitch on pink segment of 1st ring. 
The whip stitch really works !!! Much easier, too, and I have been using it this past month. Thanks Carollyn !


Round 2 – measures 3¼” final
Anchor Size 40 yellow 4054-0293 in shuttle 1
Anchor Size 50 lavender 4054-098 in shuttle 2
Techniques : 2 shuttles, mock rings, Reverse Join (RJ), outer thread join (otj) , ball thread join, folded chain, picot joins (PJ), floating or thrown rings (FR), decorative & graduated picots.
fhs - first half stitch ; shs - second half stitch ; vsp - very small picot

To fold chain, start with a very small picot followed by seta (2fhs) or by setb (2shs). Folding the chain automatically reverses work, re-positioning the shuttles/threads. The same is true for reverse join, where shuttle positions get switched. Hence, one may have to continue to tat from the back side, even though this has not been indicated in the pics. (Please note : all pics, except #6, are taken from front side, even though work may have been reversed)

Working Round 2
Except for the lavender floating ring, all tatting was done with shuttle 1 .

1. Mock ring in order to split it into 2 colours. Reverse Join used to link to Rnd 1.
I also experimented with outer thread join, but preferred RJ. 

2. Fold chain (vsp, seta) at end so that lavender thread comes to the left ; 
normal picot join to vsp of previous chain to make a 2-coloured mock ring (inset)

 3. Make last picot of floating ring very small ; fold chain (vsp. setb) at end .

 4. Reverse Join to Round 1 ; again complete 2-coloured mock ring, but with reflected colours.

 5. Ball thread join to vsp on lavender floating ring. 
Now there are yellow picots on either side of lavender ring !

6. (as seen from back) Make normal picot on chain; fold chain ; 
Reverse Join to Rnd 1, and continue from 1.
  
My notes :
  • To compensate for difference in thread sizes, I added a few stitches to size 50 lavender in Round 2.
  • The picots on both sides of the lavender floating ring should’ve been longer. This would’ve prevented the yellow chains from being pulled into an angular curve. The yellow chains stayed continuous, no breaks or colour blips, but the elegant curves were lost due to the picot lengths.
  • It was only after the 2nd join, that I realized that the picot colours on either side of the lavender ring were different !!! (arrows in pic below show the mismatch on either side of lavender rings)
    The ball thread join came in handy here. I chose yellow picots, but the alternate is equally possible – keeping all picots lavender. (pic #6) Hmm, yes, I should've gone with lavender picots ! 


Outer thread join is something I have used (& spoken of) in my patterns for a long time, without knowing the correct name. It is Teiko Fujito's "outer thread joining method". I even confused it with the slope & roll join since it's construction is basically the same, except that one ‘pops’ the shuttle thread through the picot. This ‘pop’ encapsulates the core (SH1) thread, giving a blipfree join. The formative movements are the same as split ring joins . 
And the fun part is that shuttles can be switched in function, but the result will remain the same !!! (more on this in a future post - Part IV of Joins in Shuttle Tatting series)


My visualization did not take shape, but the happy note is that I could figure out how to choose a path(s) in order to reach the destination. Learning never goes to waste, and my growing repertoire of tatting techniques & diverse joins afforded me this freedom. I may tat this one again.


I have completed Day 7 using 3-coloured onion rings a long time back, but haven't been able to put together a post. Am currently on the last part of Day 17, where again I have used the running scroll to create mock rings in same colour, without SLT. That takes care of 10 snowflakes. To be on par, I still need to tat 2 more snowflakes this month.
Renulek's Wiosna Round 10 is over, but needs to be blocked before photographing.

happy tatting :-)

Lene's Snowflakes Day 1 , Day 2 , Day 3 , Days 4 & 5 , Day 6 , Day 11


Monday, 6 June 2016

in silent mode

Pin It now!

The Eleventh Day of December Snowflake
Lene Björn

Playing with colours and floral effect

Round 1 – Anchor Mercer size 40 black. ¾”
Used scrap black threads. Single shuttle & ball.  Ring 1 – normal, then added ball thread and next 4 rings are SCMR, last ring either SSSR to hide ends or normal ring.

TIP : Gapsosis helps


Round 2 – Anchor embroidery cotton, 3 strands. 3¼” 
SH1 : magenta/plum 069
SH2 : variegated  1305

TIP : Fold trefoil when starting chain, to keep the chain flush.

Other techniques : All normal picots. Directional tatting. Picot Joins (up & down)


Related PostsGapsosis can be good
Day 1 , Day 2 , Day 3 , Days 4 & 5 , Day 6