Pages

Sunday, 28 July 2019

budding dahlias

Snowflake #6 in Land of Laces25 Snowflake Project !

By the skin of my teeth! The new keyboard arrived last evening and I’ve been working to get the pattern out alongside the new snowflake. Phew, made it! Staying off the net helped me reboot as well ;-P
So, taking your feedback into consideration, this is what I’ve come up with.

  Budding Dahlia Snowflakes  

You are in for a treat again, with 4 patterns in one! 16 patterns (main plus variations) have now been shared in the past 6 weeks - not bad at all!

I used seed beads between the mock rings to add colour, stability, and a better finish.

There is one unflipped half stitch right after closing the mock ring to lock it into place, then the bead is moved in place from shuttle1.

I think these look cute and can be used as embellishment in so many different ways!

But to challenge myself, I tried adding more rounds. This is the medium-sized version made with ball and shuttle since the Josephine rings at the tip are mock rings in order to create a pointed chain.
I have listed numerous other ways in which one could make pointed chains for an overall different effect. eg. a seed bead, dot picot, right angle, mimosa knot, one-stitch scmr, SLT, pointed chain, etc.
Wanting to keep a connection to the JRs on rosette, I stuck with JRs throughout. But I’d love to see diversity.

This is the large version with dahlia in mind. It continues from the medium version and is worked similarly, but free-form, with petals of differing lengths.
This is undoubtedly a flower flake pattern!!!

Some petals are lock joined to a free picot on round1, but most are joined to the space between 2 chains in round2. Use a finer crochet hook to pull up a loop for joining. Petals are also linked to each other towards the base – after 2 or 4 stitches.

And a bonus sunflake variation! I tweaked the count of this maroon trial, since some of you liked it. This requires 2 shuttles and the difference in the chain arch when a JR is thrown versus when it is a mock ring is clearly visible here - the smooth chain versus the pointed chain.


All previous patterns are listed under Snowflakes here  


Friday, 26 July 2019

h hit

I don't swear, but if I did, this is how it would come out "h hit" !!!
In one of her recent posts, Ninetta talked about 'the missing e'... My keyboard decided it has had enough of 'o' and 's', sigh. ;-P

I've tried to insert (copy/paste) the missing letters, but it's no fun, except for the weird-looking words and sentences (if one can call them so) that form :-D My autocorrect also decided to take some downtime!

The new keyboard should arrive soon. Till then, please excuse me for not responding to emails or commenting or facebooking. I'm taking this opportunity to stay away from the net as much as possible and 'de-toxify'. And enjoy my tatting :-)   SO there !!! ๐Ÿ˜ƒ๐Ÿ˜„๐Ÿ˜†๐Ÿ˜‰


Monday, 22 July 2019

let it go


… or not – that is the question!

I skipped this Sunday’s snowflake (we started with 28 weeks for 25 flakes, so …). For one I felt drained with all the pattern writing – some of the patterns are really tough to get through in as simple a format as possible. 
For another, I was simply unhappy with all my attempts. To the extent that I kept picking up a different pattern to work up! Look for yourself …

I designed and tatted this in 2016 as a first round. I really like it and can’t seem to let go of it, but creating another round has me stumped. 

Disregarding my past sketch (see the brown in lead pic?), I tatted this last week. 

This yellow/green one is another attempt at an outer round. It ruffles when tatting but lays flat with blocking.
What is your verdict?
TรตT
Then I tried to extend this small vintage snowflake. Those long chains are meant to be narrow. I like the shape they create individually & collectively, but clearly too large for this center. Having run out of thread, I’ve left it for now.
TรตT
This is another flake that emerged from my mistake here. I made the left one in Dec 2018, but there is significant ruffling along the periphery, hence did not share. I’m giving it another go, using a larger center, but keeping the outer arms same. It should work, right?
It is worked in one pass, but during trials I like to work rounds separately so that one can snip off and discard parts instead of the entire tatting.

 Along with your verdict, suggestions for names will be most appreciated :-)))
TรตT

And before I sign off, here’s what Barbara Slodka shared with me. Dani Rotach’s Celtic Starfish from Finger Lakes 2015 Tatting Seminar. 
From what I can see, it also uses the same numerical formula for the arms, though it is so much more ornamental and more advanced than my MatheMagical star! Isn’t it beautiful?!


Saturday, 20 July 2019

live and kicking

...tatting in my pocket
2 years back (huh, July again!) I posted a few of my verses on ‘Tatting in my Pocket’. On 3rd of this month Noelene Lafferty – the originator – revived it in the Just Tatting group on facebook!
If you haven't, do check out all the new contributions members made there.


I wrote a new verse immediately …
((English teachers, please excuse the poor meter! ;-D))

I have simple Pony shuttles
Threads I have galore
With tatting in my pocket
I couldn't ask for more !  
- July 3, 2019

I also shared my old verses there. But it is so addicting – lines kept whirling in my head and even though I didn’t get around to sharing them on facebook, I’m doing them here now.

To save our ecosystem, I'd
like to plant many a tree
but with tatting in my pocket
I'm on a lace making spree !

Ma taught me cooking
Pa taught me cycling
with tatting in my pocket
my hands are always singing
- July 4, 2019

And then some more ….

Sitting in the balcony
Watching monsoon shower
with tatting in my pocket
I ... have the Power

I don't need yoga
Nor do pranaayaam
Tatting in my pocket
Is my way to Dhyaan
- July 7, 2019

And more recently in O’Claire de lune’s post on lace v/s tatting, this is what I posted

In the world of lace
Tatting has no place?!
Tatting is alive in my pocket
‘n’ will ne’er vanish without a trace.
- July 17, 2019

The flower in the pics is an old prototype - the 3D Carnation. Tatting is alive and kicking !!!


Thursday, 18 July 2019

magic revealed

magic revealed
Snowflake #5 in Land of Laces25 Snowflake Project !

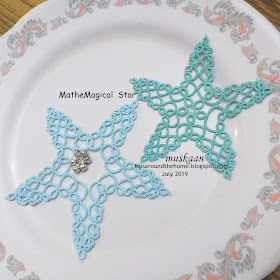
MatheMagical Star

It’s a simple case of counting – in decreasing order, then in increasing order. This forms the 2 sides of an arm, tipped with a clover, and an additional ring at the base, between each arm. The base ring is of same size as the one with which the arm starts/ends. Clover has same sized side rings as the ones we end the count with, with a larger central ring.
All rings are bilaterally symmetrical, hence I remember them as a 9 ring or 5 ring, etc. instead of an 18 (9+9) or a 10 (5+5) ring.
Thus in the large 9to4 version, I go up an arm with
base 9,
arm up 9,8,7,6,5,4,
clover 4,7,4
arm down 4,5,6,7,8,9,
repeat.
Easy to keep track!
Each pair of sequential rings is separated by a chain. Each segment of chain (separated by a picot) has the same count as the ring adjacent to it.
Perhaps all this text has you confused. If so, simply click on the pdf and read/see for yourself, where I have shared counts for 4 versions, and you should get an idea of the possibilities and tweaks you can make yourself.

I must thank all the enthusiastic responses to my query – here and on facebook, including some valuable suggestions, which have hopefully been incorporated in the presentation with some success. However, if there is any difficulty, please don’t hesitate to ask. It wasn’t an easy presentation, sigh.

  1. Keep all picots normal sized.
  2. It is a pretty forgiving and versatile pattern and all versions lay flat.
  3. While working the ring pairs, avoid gapsosis. This pattern provides good practice!  
  4. Fill up the main shuttle to capacity, since the large version consumes a lot of thread. I use Pony bobbin shuttles which are relatively smaller sized.
  5. 2 shuttles are required only if one is tatting the filled-in version. There are options one can use to still work with ball instead of 2nd shuttle, but I prefer the 2nd shuttle look.
  6. Since the star joins back to the start, picot join to the right is required.
 
I’ve included instructions for all 4 of these versions – large (9 to 4), medium (7 to 4), & small (5 to 2) ; open- & filled centers. Yet there is so much one can play around with! 

  Enjoy :-)

UPDATE: Using this star to decorate a bauble/tree ornamenthttps://tipsaroundthehome.blogspot.com/2021/01/wrapped-in-star.html
The same formula/algorithm is used for a tree and 2D & 3D bell patterns. Find the patterns here 
Sunday, 14 July 2019

counting magic

Snowflake/Star #5 in Land of Laces25 Snowflake Project

You are well aware of my mistakes in simple counting! Not this time. Using an elementary numerical sequence, I created a new snowflake … oops, star. So you understand why I am calling it the MatheMagical Star.

On the drawing board, it started off as a simplified, symmetrical spin-off of the Spin Away flake and can be worked with ball and shuttle!
I started with the 1st double ring (at the base) on top left arm, and proceeded to the tip of the arm decreasing each ring by 2 stitches.
I didn’t like the ring facing inwards between 2 arms, so changed direction from the next arm on.
The tip was going to be a single ring, but to avoid floppiness and to get a gradual gradient, I chose a clover….


As this progressed, I kept getting an uncanny feeling like it’s been done before. I first searched my blog and perhaps this is what caused the recollection – Sparrow Kelly’s ‘Celeste’

Hunted online (Google, Craftree, pinterest) for more snowflakes and stars and came across a few that seemed similar at first glance, but they all have single rings along the arms, not double rings. Usually the chain segments differ as well. 
However, if you think it’s been done before, please do leave a comment with details.

Started out as a snowflake, but could only fit in 5 arms, hence a Star Is Born!
Deliberated for ages whether to fill in the center or not. One of the ideas was this snipped off star from my doily. The 5 chains fit perfectly, but design-wise it is a misfit, right?

Another idea was to have inward rings. I tatted each ring individually to get a feel.
At the time it looked a bit cluttered and I liked the outlined negative shape. Hence started in Lizbeth size 20.
It measures 4½ inches. (In Anchor size 40 it measures 4")
I visualised the open center as a frame for a little photo. Or to dangle a charm....

This one has silver gunghroos (bells) like the ones used in anklets. And they make a dainty sound when jiggled.
The lead pic has a real sapphire pendant. Conch shell was another idea I had.

Comparing the 2 together, the tatted center doesn’t seem too bad. What do you think?
Should there be an open center or a filled one?
Or would you like to have both patterns? Since I haven’t had time to complete the pattern presentation, it will help to know when I upload.

I am currently tatting another smaller version (therein lies the magic of maths) but with those rings filling the center. More in next post along with pattern. This evening I have a date at Wimbledon and ordering-in dinner, yeah !!! Will Federer's star radiance increase by another grand slam win or will Djokovic dominate?! 

Thursday, 11 July 2019

bunch of pattern updates


There are quite a few updates I need to share. I will be updating the respective posts, too. This is the reason I suggest going through the related blog post even if there is a pdf, since it is easy to add updates :-D.

Recently I realized that the pattern link was corrupted and irretrievable. This gave me a chance to add the Patchwork bookmark pic.
Here’s the new link : Snowflake (6-pointed motif) pattern

This doily has long measured picots which are Functional. I worked the doily in Anchor size 40, but what if one wants to use a different thread size?
I worked a short chain with same thread and found that a 7mm picot is equal to the width of 7 double stitches! And so on. Easy to remember and convert.
Just substitute 1mm tall picot with 1ds width.

You may remember that this is the round robin doily which Coretta had started. She graciously accepted to share the pattern link. It is a Google Docs link and the pattern presentation is a mix of 4 different styles, but will take time to clean up. 
Coretta also invites you to a new round of designing – continuing from the 5th round onwards. If interested, please leave a comment here or on her blog here (or on facebook or Craftree)
Here’s the pattern link : Hexaflower Doily pattern 

In the beaded version of this snowflake, there is another way to work with ball and shuttle, if you do not wish to use direct tatting (unflipped stitches). Simply make a SLT & reverse work to tat that chain segment. However, you may have to pre-string the large bead on to the shuttle thread, instead of unwinding. Many paths, but be vigilant.
I added the tip the next day, but blame the oversight squarely on my lack of focus due to fever.

And what's a post without some visual masala?! So here's some unfinished work.

Intertwining Bracelet - Anastasiya (Hobby Point)
Inspired by Aliona Racu’s bracelet in facebook several weeks back, I started this Ankars/Celtic  bracelet in June. 
For the pink pieces, I loaded one bobbin, then kept pulling out a length of thread to work the chains. Thus I got ctm with a single shuttle and fewer ends to hide. 
I’ve had all these pieces ready but need to continue watching the video to assemble them. And I just haven’t been in the mood – what with being consumed designing snowflakes et al ;-P

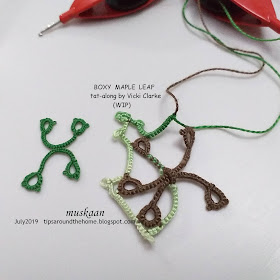
Boxy Maple Leaf – Vicki Clarke
Like last year, Vicki again did a very Canadian tat-along which I started immediately - twice in fact (the one on left is in size 40, the one on right is pearl cotton size 8). But somewhere along the way, I lost the will to continue. I didn’t like my colours, I didn’t like my tatting, and I couldn’t focus. I still haven’t cut off the threads, so I might get around to completing it someday. My apologies to Vicki for my bad outcome.

She then shared a 4th of July tat-along pattern – Rockets Red, in 3 stages, which turned into a lovely flower! Saving it for a future date.

On a happier note, though, I have done my trial for the next snowflake - well it turned into a star - and just need to work out the center. So stay tuned :-D

Sunday, 7 July 2019

dream castles


Happy International Lace Day !

Snowflake #4 in Land of Laces25 Snowflake Project on facebook & instagram

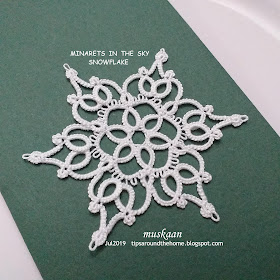
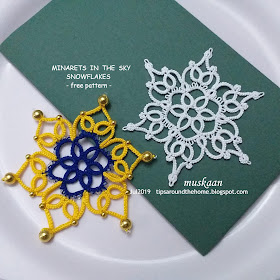
Minarets in the Sky Snowflake
November 2016 was when I first uploaded a collaged image of a snowflake I was working on.

I had worked a sample that September as part of the This Way of Tat? (TWoT) series – in fact it was meant as the final practice pattern since there can be a lot of directional changes depending on various factors. Well, that series is still in limbo, but I’m gradually sharing the patterns.
What I like best about this design is the dome shape created by changing the direction of chains. However, this is also the biggest ‘flaw’ in the design. It causes ruffling when tatting, and has to be blocked for flatness.
(In Lizbeth 20, this measures 2½” as a hexagon side) 
It is something I tried very hard to rectify, through numerous small tweaks in many trials but was unsuccessful. I will be extremely pleased if you wish to try your hand or leave suggestions.

There is hardly any ruffling in the beaded version where the small base rings are removed. However, the domes tend to overlap slightly.
The beaded version is quicker to tat as well and can be worked with one shuttle and ball if short chain lengths are done with unflipped (reverse) stitches.
UPDATE TIP : Instead of direct tatting, one can make a SLT and reverse work to tat the tapering chain segment, making requisite adjustments to bead, etc.
For the large gold bead on top, I tried using my Floating Beads method, but it does not give a snug and stable finish. After trying a couple of the usual methods, I finally settled on threading the beads as and when required and using the transparent seed bead as an anchoring bead.
I later added this Swarovski crystal in the center, although it can be worked in during tatting by holding it on a long picot in the first ring and joining across later.

While the white one reminds me of marble domes as in the Taj Mahal, the yellow & gold is for the Golden Temple in Amritsar. It is surrounded by water, though here the central blue is for sky with little stars.
Again, patterns for both versions are included in the pdf.
download Minarets in the Sky Snowflake pattern here

UPDATE : An adapted version is shared by Grace Atkinson where the overlap is removed and the flake lays fairly flat. Find the pattern and models in her facebook timeline or here  - https://tipsaroundthehome.blogspot.com/2021/03/minarets-take-time.html 

Wednesday, 3 July 2019

journey to 500th

A journey that started due to limitations of pinterest and continued to this 500th blog post! And this simple edging symbolises that journey - from sketch to lace.  
I'd dabbled in some paintings & doodles in MS Paint, but this was my first 'tatting diagram’ in July 2014. 
2014 was the year when I transitioned from traditional tatting to learning 'new' techniques,  methods,  experimenting,  consolidating,  applying, .... Help, encouragement and inspiration came from InTatters (now Craftree), tat-alongs, & numerous online resources including blogs. And later the Online Tatting Classes (including Design Class) & now facebook. Numerous individuals left their mark and continue to do so, many of who have become friends, diligent readers, and commenters. A truly satisfying journey in all respects.

So, the sketch remained only as my personal eye-candy, not knowing how to estimate stitch count and realise into tatting. (The original got lost in a crash but luckily I had this printout.)
In 2016 tatters were making those Concentric Rectangles doilies and I remembered this diagram. Was it similar and if not, could it be adapted similarly? Eliz Davis backed me enthusisatically and offered to test And make the entire mat as soon as I finalised it. 
This is what I did in July 2016. You can see it in this Nov ’16 collage.

Another 3 years had to pass before I picked it again on realising that my 500th post was round the corner!!! Okay, the July is purely coincidental, but it also happens to be the month I landed on earth! And 'muskaan' is a moniker I adopted due to trolling fears, but most of you privately know my real name. After so many years interacting with this lovely community I would reveal my name, but now I'm happy with the moniker which means 'smile' :-))))

500 posts in  years. Filled with so much of my learning journey from a transitional newbie to 'teacher' and ‘designer’, accepting and thriving on personal challenges. What started out as a blog of many things soon converged into tatting for lack of time, with only a smattering of other interests. And yet not everything has seen the blogging light! 

As a thank you, I dedicate this to the generous online tatting community and all my readers. The name was aptly suggested by Anita Barry (along with a few other wonderful options). I’m still working on the possibilities and will share patterns along the way.

Blogging has sustained and satisfied me in almost all spheres and roles. I hope you continue to journey with me, spicing up my blogging life :-) I regret not taking the name of every individual who touched and affected my tatting path but please know that you have become part of my treasured tatted lace.

Thank you, with a muskaan  J
ZYZ