Pages

Tuesday, 29 August 2023

make a forest

 Pattern for each of The Six Seasons of India derived from Frau Endrucks' pattern #14https://drive.google.com/file/d/1Gxz6Q4Qpz_7RtsEx4EFufsVvBYbH5Sfa/view 

Many thanks to Ninetta for reworking and presenting the E14 pattern which made it so much easier to follow, experiment, and tat up.

Please let us know if any link does not work.

The background is my month-old bath towel made from bamboo! Seemed appropriate, don't you think.
I was looking for a light-weight bath-size towel and hubby hit on this. Can't believe how light, super-absorbent, silky smooth it is and it dries super-fast, too, making it ideal for the rainy season .  

Hope you enjoy tatting the trees and creating a forest.

Related Posts -

Thursday, 24 August 2023

over the moon

 Two recent incidents, and I had no role to play in either.

A few days back I received the Summer 2023 issue of IOLI Bulletin! Although I had submitted an article it hadn't been published in this issue. Yet Liz, the editor, mailed me a complimentary copy! And I received it within 5-6 weeks. Ecstatic. 

Earlier I had received the Spring 2023 issue that carried my article. There was a lot of tatting-related articles and stuff in that issue, including Mike Lyons' article on Inkscape in designing. And because of this latest gift, I was able to read Part 2 of his article! Learned a few terms and a couple of shortcuts. Hope to apply them to my diagrams going forward.

But the more momentous and totally On and over the moon event is of course the soft landing of Chandrayaan 3 yesterday! Oh what joy, what pride! It is just something else, something special, something indescribable. 

Watch the live streaming (the Fine Braking starts at 39.00) here - https://www.youtube.com/watch?v=DLA_64yz8Ss

A shorter video posted on FB - https://fb.watch/mCGhOZC_WC/

To me there are parallels with my tatting journey. Just a few overlapping thoughts -

  • Use whatever materials and skills are available; don't wait for that perfect or expensive or imported thread or shuttle or that perfect stitch.
  • Learn from your mistakes and never repeat them.
  • Be Indian, contribute to your country's growth and improvement. 
  • Strive to improve your environment rather than whining or waiting for the government or others to change it for you. Create/Become the opportunity.
  • ISRO scientists are not necessarily from the elite educational institutes; in fact most are from government schools. They did not leave the country to serve another for personal gains and name despite opportunities and allurements.
  • Try to go where others haven't. Accomplish new things rather than simply following or copying.
  • Help others, spread and share your knowledge and skills.
I can't thank my scientists and engineers enough, and for the decisive and visionary leadership of some of our politicians! 

Happy dancing over the moon!

Monday, 21 August 2023

sneak peek variation

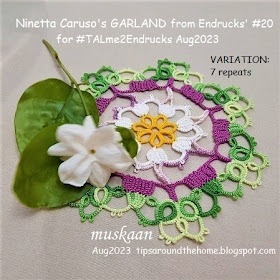
 This is my submission for our #TALme2Endrucks Aug2023 game of the month. It is a variation on Ninetta Caruso's Garland pattern derived from Endrucks' pattern #20. The pattern was shared in 3 parts during the 3 weeks, and a 4th part on some surprise variations will be shared in a couple of days. Here's a peek into part of what might be expected, ;-D

Most participants have already finished and shared their beautiful versions. So sharing my variation will not cause any confusion now.

It was meant to have 8 repeats and 5 rounds. I have 7 repeats and a 6th round of rosette motifs.
 
This interesting pattern is worked from the outermost round. It has onion rings with thrown rings.
Onion Ring with Thrown Ring. A few members seemed to find it difficult to understand. Hence I quickly prepared this pictorial using 2 colours to show which shuttle was in action. It is the same process as for the Happy Hands patterns from #1 (https://tipsaroundthehome.blogspot.com/2021/03/balancing-act.html). But each tutorial I referred to, was missing in one feature or other that was need for this particular pattern. Hence it was simpler to follow the steps of this pattern without the need for detailed written explanation.  

The 2nd round is worked on the inner edge of the previous round, made of block tatting 'flowers'. In my first repeats I am sure there are mistakes in the block (the very first one was snipped) - it needed mindful tatting.
I may not have gotten the shape of the flowers very nice, but the construction is very clever, as is to be expected of Ninetta.

The inner space is filled by working 3 rounds, this time in the 'proper' order - ie., from the inside out ;-D
The center rosette is worked and cut off. The thread for Round 4 is attached and worked around. 
The left one has 8 repeats, as per the pattern. This time I had counted and followed correctly, LOL.

Round 5 continues from the previous one without cutting and it is the round that connects to the outer rounds. It was only at the 'final' join that I realized there had been a miscount!!! Nothing to it but to bring out the scissors and snip snip snip.

Tatted Rounds 3,4, and 5 again, this time with 7 repeats, and joined successfully. However I did not wish to change the count which is why you see the slight curve in the linking chains. However I kind of like the organic feel of this imperfection.

TIP: To get a neat point in parallel chains or with chains that turn back, as in the middle round, I always count the lock join as one half of the double stitch. It leaves a much smaller footprint.

I had the pleasure of test-tatting and proof-reading this clever pattern back in June. Well I messed up with the repeats, but it gave us a variation that lay flat. So not much was lost.

For some reason the tinted green felt too overbearing. Hence I wanted to tone it down a bit. So after a long tatting break, I picked my shuttles for 2 nights in August for some 'mindless' tatting .....

This is what I came up with - repeated the inner flower motif around the edge. I measured the distance between the rings and the picots on the chains. It was a good fit!
Design TIP: I had initially tatted a 6-ring rosette. Surprisingly it did not look nice! So the 2nd one was made with 7 rings and these reflected the pattern well. So the first one was snipped off. 
 
I intended to fill in the space between the motifs with purple and white flowers connected with a plain green trellis. However, my tatting buddy Anita Barry, completely forbade it! She called it finished at this stage. To assuage my designing curiosity I might still try out one repeat, but not in the near future since I'm back in the no-tatting zone.

The model is worked in Anchor Pearl Cotton size 8 [green 0128; purple 00087; yellow 00291; white; tinted purple 5393. It measures around 12.5cms without and about 16cms with motifs.

I had a great time tatting it and apologize for the inadvertent error in counting. Must go back to a Maths refresher class! However yet again a mistake led to a slight variation - I should call it 'Mistake Designing', LOL.

Many many thanks to Ninetta for her beautiful pattern and all the work that went into it and into organising the game. 

Friday, 18 August 2023

differences

A few months back I worked on some lattice tatting samplers. 

This one is in Lizbeth size 10 threads. Each zigzag chain is made in a different shade. 

This one is in Anchor mercerized size 20 (which is almost similar in thickness to Lizbeth size 10) threads. Only two colours, worked continuously. 
But notice the difference in the stitches?!! 
The difference in how flat and even the chain segments are in the former? 
And not to mention the sheer joy it was to tat with the former, and that Lizbeth photographs so much better.

Hmm, there are tatters who can work with any thread and their results are always perfect and spectacular. Guess I'm not one of them! Threads seem to alter the visual appearance of my models, LOL.

LATTICE TATTING is simply stacked rows of zigzag chains, each trough joined to the peak of the  previous row. You can work it in separate rows, giving you the option to use several colours. Or work it continuously in one or two colours. 
Each zigzag chain is made with a segment of double stitches alternating with a segment of reverse stitches. This automatically creates the visual zigzag effect. Depending on the length of each segment, numerous effects are possible! 

https://tipsaroundthehome.blogspot.com/2020/04/picoted-s-chain-cords.html - picoted zigzag chain (1ds,p,1rs) with pictorial and explanation
https://tipsaroundthehome.blogspot.com/2023/07/tailed.html - single stitch zigzag chain (1ds,1rs)

The above sampler is worked with 2 shuttles loaded with 2 contrasting colours. To climb up to the height in order to start the next row, I used a Lock Chain.Lock chains can be considered a very basic zigzag chain where each flipped half-stitch is alternated with an unflipped half-stitch.

Somewhere in the 3rd and 4th rows I made a mistake while climbing out. I got confused and kind of winged my way through. Hence the chains are worse than the thread be blamed for ;-P Hopefully I will find the time to try it again in a better frame of mind.

Each row in this multi-coloured sampler is tatted individually using one shuttle and ball. The threads were a gift from a loving friend, Denise W (https://tipsaroundthehome.blogspot.com/2018/06/im-on-take.html). Took me years, but I've used the samples to fairly good effect, with some lengths still remaining.

I left the threads uncut and unhidden 'coz I have yet to decide how to use this sampler (a bookmark is my guess, which means continuing for some more length). 

Monday, 14 August 2023

almost 3 years

 That's how long it has taken me to complete the pdf presentation of pattern #37 from Eleonore Endrucks' 1920 book! I started tatting it in Nov 2020 (when we first invited volunteers) but encountered cupping issues. However as the list of posts at the end shows, it was never quite forgotten. I do so love the square/diamond motif in the center.

Anyways, so there were only two patterns of the original 44 left to be reworked and uploaded to the Endrucks 1920 Project. One was this and the other was by Krystyna. We gave ourselves an ultimatum to finish by July-end and also a bit of a competition to see who finishes 'first', LOL. Well, I finished last. I will share her work in the near future - it will require two or more posts!

Pattern #37 from Eleonore Endrucks' German book ‘Die Schiffchen-Spitszen’,1920, in modern and modified reworking (click to download)https://drive.google.com/file/d/180COMwnzgXXm_PphjUCD_qmq7xLMg4Pz/view

What I found truly fascinating was how we could play with the sequence of tatting and thence the direction of rings and the colour of elements in the central motif! These are all shown here in an earlier pdf      Square Diamond Motif from E37 pattern and options (click to download)-  - https://drive.google.com/file/d/1wqAPnOUZwLJ9tEUk55wDZhAMw2qCNFSj/view

Cupping: To solve the cupping issue, I did not want to stray too far from the original. Change one element and you might encounter a cascading effect! Hence little tweaks like one less round in the rosette, longer and false picots (which increase the span or width of that round) and longer chains, a couple of larger rings, seemed to suffice in keeping the essence of the original design intact yet laying flat. And catering to modern sensibilities, the climbing out pathway includes split chains and split rings. Although Endrucks' original stitch count and continuous path involving shadow chains is also indicated in a separate diagram. 

Cupping is a common problem we faced with Endrucks' doily patterns. Ninetta wrote a nice post on the issue - https://ninettacaruso.blogspot.com/2020/11/renewed-on-third-try.html

Anchor 20 (¬Lizbeth 10) June2022- 14 cms diameter

Pattern presentation and especially diagramming was quite a challenge. I kept having to retrace my steps. For one, it is never a good idea to have huge time gaps when working on a pattern or on it's presentation. Finally it evolved into something I felt comfortable with, using a different colour  for each round; bright pink for the climb-out path/element; etc. 

Anchor perle 8 (¬Lizbeth 20) Dec2021- 10 cms diameter

Test-Tatting: In mid-May 2022, when Sue Fuller was updating the Endrucks' Project page -  https://www.theonlinetattingclass.com/endrucks-class-project in their new site, I saw Vicki Clarke's beautiful model that she had worked somewhere around 2015-16. While her notes and presentation haven't been found, she graciously accepted to test tat the count I provided. More on her enthusiastic and systematic journey, with pics, in another post soon.  

Anchor 40 (¬Lizbeth 40) May2022- 9.5 cms diameter
Two-Part Tatting: This was yet another tweak I tried on Round 4, but not very happy with the result. Hence I haven't shared it. However, in this, I kept to the original in the number of rounds in the rosette. 
Both the red above, and this blue one are worked in two parts - cutting off after the diamond motif. It is good for trial purposes when only the in-progress round can be snipped off if it does not work (as seen in the trial pic) or if you wish to avoid the long split chain segment.

Just a few derivatives
Derivatives: As with most of Frau Endrucks' patterns, this one turned out to be quite rich in derivatives! Besides what could be done with the Square Diamond Motifs - applique, charms, earrings/brooch/pendant ; arranged or tessellated into bookmark, bracelet, cross, mat ; or joined into a 3D tree ornament, gift bag, and box; there were Heart motifs that arose, too! The hearts could be lined into a bookmark or edging, or used individually as motifs or jewellery or applique. Margaret Davies enlarged one of the hearts and even created an angel and bell from it. She recently used the hearts to make earrings for our game (https://tipsaroundthehome.blogspot.com/2023/07/wear-me-roundup-2.html). The angel was used in a previous game (#TagMeEndrucks Nov2022 ; TagMe roundup 1 ; TagMe roundup 2 ; TagMe roundup 3)
More future derivatives, variations, and applications will be found in the respective Directories!

E37 Patterns: Here are all the pattern pdfs we have from #37 so far - 
Doily - https://drive.google.com/file/d/180COMwnzgXXm_PphjUCD_qmq7xLMg4Pz/view
Square Diamond Motif (and Mat pattern) - https://drive.google.com/file/d/1wqAPnOUZwLJ9tEUk55wDZhAMw2qCNFSj/view
Eye Spy Heart #1 https://drive.google.com/file/d/1Auf-CIZYLUQdkA6jalQR4hkS7Ah-Deld/view
Eye Spy Heart #2 https://tipsaroundthehome.blogspot.com/2022/07/heart-pattern.html
Enlarged Heart https://drive.google.com/file/d/1G2AboS4amzg5HgLGKoZ6X-bGNrLZBLCt/view
Angel/Bell https://drive.google.com/file/d/1aq202-ESOzP_DLlA1bQ1mz3unyTTrpwr/view
SOUPy Vine bookmark https://tipsaroundthehome.blogspot.com/2023/07/soupy-vine.html

EP Doc: And as you well know by now, you can find all 44 patterns here in the Endrucks 1920 Project document here - https://docs.google.com/document/d/17LEVftXweztBIOWh4sL4BB7bX65ssoOsOn4oXIgCepY/view 

My sincere thanks to all my friendly and helpful tatters mentioned in this post.
It underlines the community effort - the hallmark of Endrucks 1920 Project!

Related Posts (chronologically) -