Pages

Tuesday, 29 August 2017

floating beads PART 1

Floating Beads – how to pictorials
Part 1
muskaan © August 2017
There are ways to dangle a bead in tatting such as Corina’s fringe, threading the bead when needed, using a long picot, to name a few. But what if one needs to dangle a bead inside a ring – a thrown/floating ring at that? What if the bead(s) that need dangling are large and would hamper tatting if pre-strung on a shuttle?

I came across tutorials and images of a bead in the center of a ring/mock ring, anchored at both ends. I was looking to freely suspend a bead in a thrown ring without distorting any tatting or unwinding any shuttle. After many unsuccessful or unsatisfactory attempts, I figured out this Floating Beads method and my first trials gradually led to many more applications of the method. This method both suspends and secures the bead(s) in an element.

After consultation with Stephanie & Georgia we settled on the term Floating Beads since the bead is not anchored at the other end, and does dangle or float. 
Perhaps it can be abbreviated/notated to FB ? What do you think ?

I will be sharing the various elemental applications over 3 or 4 posts including 1 alternate method (on Nina Libin’s suggestion) and the earring pattern. 
Eventually these will be converted into pdf  - I can’t decide whether to have them in one single pdf or multiple pdfs, and in which sequence. I hope you can suggest something going forward.

Introductory posts showing various applications: Bead(s) in rings ; Bead(s) under a chain

I.  Floating Bead in Thrown/Floating Ring

The method has 2 steps - step 1 to position, step 2 to secure.
Step 1 can be altered to suit bead size and numbers (this will be shared later).
Step 2 can be repeated if one wants the bead at a slight distance from the top.

Materials used
Shuttle 1 red; shuttle 2 blue; Anchor size 20 threads; 4.5mm Swarovski crystal bead ; hook to load bead

 1. Make a chain. 
 2. Before starting the thrown ring, pull shuttle 2 thread through bead.
3. Fold the loop back around the base of the bead; 
 4. Bring bead closer to base, rotate bead slightly so that the openings are horizontal.(see pic5) 
Keep the anchored part of loop under left hand finger while pulling on shuttle thread to tension the loop around bead. This takes a bit of practice initially.
Important Notes :
  • For the bead to dangle properly & avoid distortion, it is important that there is a tiny space on the shank, and the bead is just sufficiently snug.
  • In case of small bead, instead of looping back, pass shuttle 2 through the loop, position with rotation, and tension. Continue with next step.
 5. Fully enclosed but position can be unstable. Hence one more step to secure …
 6. Bring shuttle 2 thread around the bead …
 7. and pass shuttle through the loop. 
8. Tension it, making a half hitch or overhand knot at the base encapsulating the bead. 
Note : By repeating this step (on a longer shank) the bead will dangle lower.
 9. Start thrown ring with shuttle 2 normally and tat around bead. 
 10. Close ring
 11. Switch shuttles and continue chain.
 12. Floating bead in a thrown/floating ring ! No distortions !


My sincere thanks to all my tatting friends - Georgia, Stephanie, Eliz, Nina, & Usha - for their active interest and participation in this journey; and to all my readers who also showed an interest, leaving comments and sending emails.  

to be continued ...

Monday, 28 August 2017

enchained ruby and beads

cabochon tatting and another floating beads trial

Here's what I did last night , taking courage in both hands ...
Encapsulating a tiny gem - 1 cm x 1.5 cms. It is a lone ‘rescued’ gem from long back, without any holes to string. I’ve admired the fine jewellery work that Marie & Ninetta do, but couldn’t muster the courage (except here).
When I told Georgia a few weeks back about encapsulating the ‘ruby’, she sent me a few pics for inspiration, one of which was this. I remember Nin saying she worked rings on both sides along the edge and as soon as I got in the mood, I started.
Seeing her entire post now & this one, too, I realize my freestyle pattern is slightly different. 
I think I have a great memory, but memory doesn’t agree with me ;-P Should've taken the time to look for it earlier! Hmmm, but perhaps it would’ve been too wide for this tiny gem.
Using 2 shuttles, wound CTM with 2 strands of unmarked gold thread (is it metallic – at least partly?) I worked 2 rings facing either side, and then a chain along the edge before making next pair.  The flat side has 2 rings less for curvature.
To ensure the gem stays snug and secure, I wove one tail through picots of the underside rings.

I've encapsulated a shell, but it was much larger and worked in size 20. Here, I had to wear the magnifier continuously to avoid shuttle straying through the 2 strands. 

ËÌËÌËÌËÌË

A few hours back, yet another floating beads idea struck ... 

Floating Beads under a chain !
The smaller pearl uses a slightly different first step while larger crystal bead follows the original method.
I like how the chain maintains it’s curvature despite the dangling bead. Of course we can dangle the bead lower by increasing the length of the shank.

Now I really must get back to completing the pictorials …

enchained in tatting is a happy experience :-)


Saturday, 26 August 2017

floating in air !

Here's a peek into what I've been up to; why the Quatrefoil series is on hold... 
Floating Beads 
UPDATE : This pattern is now in pdf format, Click to download


I'm working on a necklace set with a smattering of beads and crystals in tatting.
It started out as trying to hang a large crystal bead inside a ring - a thrown/floating ring. Couldn't find any tutorials to create that effect.  
Tempted to ask my beading friends, but forced myself into figuring out a solution. Many attempts later, here's a pic of a couple of the 'uncut' or unraveled trials - the ones on the left show how the chain distorts. Then success (the 3rd from right) !!! 

This has been tested by Georgia, Eliz, Usha, Stephanie. Their valuable feedback will be included in the pictorial.


Gradually the floating beads method evolved. It works not only in thrown rings, but regular rings, (I snipped off the pink thread by mistake, hence couldn't complete the outer ring properly.)

and even a string of beads inside the ring !

And another idea struck - how about using the string as as a central picot ? 
I’m not sure whether this has/has not been done. Also one doesn’t need the exact floating bead method – it can be made with a simple long loop. But I’m merely showing how my brain worked at finding new applications/effects.

Then I wondered about using it on normal chains. Here I loaded the crystal teardrop on a picot, attached right back before proceeding. The inset shows it attached using the floating beads method. While the former is kind of flush against the chain, the latter is held at a slight distance as if on a shank. Instead of single crystal, a string of beads can be used.

While I haven't tried it on a mock ring or an SCMR, I don't see why it shouldn't work.

And whether you want to or not, I will bore you further with pictorials on how to do it ;-D Fair warning ? Patterns will follow much later, though.
I’m just so excited that I could figure out some beading for myself – getting the hang of it ;-P


Second reason for floating in air was the exciting attachment I got in my inbox. One of my patterns has been published in a Dutch magazine De Frivolité(k)ring alongside very talented and experienced tatters and designers. The booklet, published twice a year, is distributed among the Dutch tatting circle - Frivolité(k)ring NederlandIt’s in Dutch. I had asked for the pdf version, not the physical booklet.

Mari-jan had contacted me many months back but I had no idea which pattern they had chosen. Turns out it is the Curly Cross Pendant – the one I never got around to writing/diagramming a proper pattern for. And they’ve actually posted beautiful step-wise pics (without beads) with written pattern.


many many thanks to all I've named here. 
You make tatting so much more pleasurbale

twice the pleasure, double the twirls ….
happy happy dance !!!

Thursday, 24 August 2017

Vintage Edging 4

Here’s a respite from all those pictorials – another vintage pattern made modern and 2 separate rows converted to continuous tatting.

Vintage Edging #4
Needleart 1921 (vol 8 issue 3)

3 colours? Yes I went crazy! Remember that visit to my old craft shop after 4 years? These are a few of those lovely pastels I bought and was dying to try out! Size 20 Anchor Mercer cottons.

The 2 rows in this sampler are tatted separately using ball and shuttle. However the schematics provided in pdf are for one-pass tatting – climbing out with 2 consecutive split rings. It is pretty easy to convert vintage patterns into continuous tatting.

Learned a lesson from the CnC edging fiasco earlier. The first row should face the direction we tat in. Once this base is established, it is easier to orient later rows. 

I tried something different with the 2-coloured onion rings this time. After tatting the blue chain around pink inner ring, I made an over-under or alligator join, thus getting a complete blue circle around! No colour blips and pretty neat result, right?

Sorry no in-process pics – I was happily engrossed in tatting with these new shades!

Long picots on the onion rings are made using a ⅜ inch picot gauge parallel to core thread. Thus final picot is half the size.

Instead of lock joining the Row2 chains to these long picots, I made an onion ring join to avoid colour blips (I would’ve got pink blips over the blue picots). Then continued with a 2nd half stitch, counted as 1ds. Since core thread remained continuous, care needs to be taken when tensioning the chains.
Lock joining the chain would give a more pronounced/distinct dip.

Future Idea : Tat Row 1 and return back, interweaving the long chains. Then start Row 2 all around this ‘Celtic’ center.


happy tatting :-)

Tuesday, 22 August 2017

gauging the lie of the land

(Common Threads III)

When making a picot in tatting, there are mainly 2 factors involved.
Which 2 factors ? – the half stitch(s) on either side of a picot and the position of picot gauge !
An interplay of just these factors can change the look and effect of the picot, as well as it’s functionality.
Comparing 3 types of picots here - interlocking, Mrs. Mee, & tuft - got me thinking about picot gauges. Gauge position was very interesting.

It started as a deconstruction of the 2 factors in various picot types we know of, but that is a Huge study and I’ve only just bit a small morsel at present and will require more time and concentration than I can manage at present. But keep an eye out …
For the present, I’m sharing only the various positions of gauges (that I know of. I welcome more input).

Picot Gauge in relation to Core thread
& where the stitch faces

Vertical v/s Horizontal
These are the standard options that we are all aware of.
I’ve used a 8mm gauge vertically and a ½in gauge horizontally.

Notice (in traditional tatting) -
In normal rings and chains the gauge lies above the core thread, whether it is held vertically or horizontally.
Vertical position -  picot has the hand (for ring) or ball (for chain) thread wrapped around both sides and we get the same size of picot as the width of gauge. Stitch is formed at the base of the gauge since gauge is at right angles to the core thread.
Horizontal position – the hand/ball thread lies across the entire width of gauge and the resulting picot is half the length of the gauge. Stitch is formed at the side of the gauge since gauge is parallel to the core thread.

Common practice is to RW – reverse work after a ring to tat the chain. But what if we don’t RW, and work the chain directly using unflipped stitches?
Carollyn pointed out an interesting aspect with beautiful pics here.
(in direct tatting)
If chains are tatted directly using reverse stitch ie. unflipped stitches in reverse order, then the gauge is held below the core thread, vertically or horizontally.
It holds true for reverse rings and 2nd side of split ring as well .

This establishes that where the stitch faces while tatting decides where the gauge is held!


Picot Gauge in relation to Core thread & the Half stitch

Now let’s bring in one more factor – the half stitch where the picot is to be made.
In all the following pictures, I have used the 8mm gauge vertically.

Picot is simply a length of bare thread between 2 half stitches.
Let’s tackle the fhs - first half stitch first.
After 4 stitches, we want to make a picot followed by a fhs. Above pic shows fhs being formed. Let’s call the left part the arch which will be compressed into a picot, and the right part is the loop of the half stitch.

Gauge is held above core thread, under the arch.
Inset pics show the completion of the process to form 1 picot.

Gauge is held above core thread, through the loop.

Gauge is held below core thread, through the loop.

Similarly for shs – second half stitch.

Gauge is held above core thread, under the arch.

Gauge is held above core thread, through the loop.

Gauge is held below core thread, through the loop.

Can you identify the gauge positions for regular picots, interlocking picots, Mrs Mee picots, and the tuft picots that were described in this post ?


If this seems confusing, pick up some scrap threads and give it a quick try to discover the joy of versatility! And like I said, this is only a tiny glimpse into the beautiful world of picots.


Happiness lies at the Core of Tatting !
Stay happy stay tatting always :-)

Saturday, 19 August 2017

hiding on a whim

A week back I received an interesting email asking whether we can hide tails without sewing when ending on a split ring, something along the lines of Karen's video 161.
At the time I listed a few options/ideas for her to try while I recuperated….
(many more links listed in Tatting Resources page)
 
I've been very satisfied with my knot-free hiding using tatting over tails and whip stitching. But I do love a challenge! Couple of nights back I figured out a way (after 2 failed attempts where the ring unraveled as soon as I pulled to test it) to end on a split ring without sewing in tails and today I took pics.
And now as I prepare the post, looking for links, I find that Karen’s method is basically the same as Frivolé's with the addition of a lock join. This join helps to secure the ball thread further. Frivolé’s method was also demonstrated here by mytattingplace.
So my method turns out to be quite similar, too, if you scroll down !

Hiding tails in Split Ring without sewing
a pictorial
1. Start ring with Shuttle1. Tat till about the last 5- 6 stitches remain.
Then switch to Shuttle2 and complete the 2nd side.
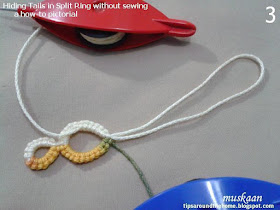
2. Going back to Sh1, pull out a loop and finger tat the remaining stitches as in a SSSR. 
(loop-tatting the stitches)
3. Carefully close ring, keeping ample loop length.
4. Pass Sh2 through the loop (over - under) and over it's own thread ...
5 ... to make a half stitch or knot with Sh2 thread.
Make very sure it is on the side of loop that does not slide.
 6. Pull on Sh2 to tighten the half stitch as much as possible. 
 7. Pass Sh2 again thru loop (under-over).
8. Snip off Sh2, leaving a short tail still encapsulated within loop as in #7. 
Pull Sh1 to carefully close loop, trying to snug Sh2 tail as much as possible...
9. Sh1 loop disappears completely and Sh2 tail is flush against the base of ring. 
10. Snip off both tails. Voilà!
Tug all you want but the stitches do not unravel!

I call it whimsical 'coz am unsure how useful it will be. The only scenario I can think of right away is in SR braids where one can safely end with a SR. Or perhaps if one encounters mistakes and needs to snip off to make corrections, then we can minimise tails and sewing.
Anything else you can think of ?

I still hope it may come in handy sometime somewhere.

Till then, happy tatting and hiding without sewing 

ps. I haven't converted this pictorial to a pdf. If anyone wants, please let me know ...or use the icon at end of page