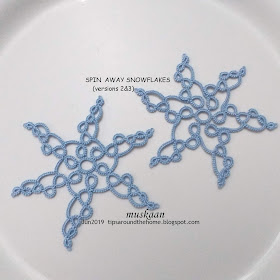
Firstly, thank you for your response to my design dilemma with respect to
this snowflake. I do love blogging :-)
Snowflake
#3 for Land of Laces
Spin
Away Snowflake
Here’s
what I have done with it finally....
I switched the rings around the central ring to face in the opposite direction, leading to the next rings having their broader side on the outside, and so on.
It gave me the long arms, but a broad base tapering naturally to the tip unlike the blue version previously where the dendrites appear spindly.
In that sense, the arm is an extension of the original yellow flake.
The 2nd chain segment could've been
shorter in version 3. Instead I changed something else …
This is the final version worked in Lizbeth size 20.
Can you spot the change between versions 3 & 4 ?
Which do you prefer - the green or blue one?
Since
there was no clear consensus, and I Have worked on them all, the pdf contains
all 4 patterns. You can pick and choose one or more, since each is a stand-alone.
I
also included the 2-colour version merely to show the working sequence of
shuttles.
The
snowflake is worked in one-pass by climbing out of the central ring with a mock
picot, as instructed in the pattern. However, here are a couple of alternate
routes …
- Pull out a length of thread
from shuttle 1, work the central ring and climb out with mock picot. Use
this tail to work the 2nd side of the first split ring, and
then add 2nd shuttle when the tail ends. I used this in a
couple of the models.
- Instead of
starting with a central ring and climbing out, work the
first ring as a mock ring (SCMR), and throw off the central ring leaving a
mock picot between them. Then continue as normal, after rotating work and
switching shuttles.
I’d
still like to add some graduated picots on the lower chain segment to see the
effect, but that will be for another day. Or perhaps some keen tatter will do
it and share?!
It was amazing to see the response and wonderful tweaks made to the Paisley snowflake!
And Gloria Nelson has entered her needle-tatted, graduated picots
model in a Handy Hands draw! First time my pattern has been entered in any kind of
competition/draw that I know of!
There
are ideas spinning in my head, so watch out for more spin-offs on this pattern!


Well done, great solution to keep the spin! Wonderful response to the Paisely snowflake, congratulations!
ReplyDeleteThanks, Jane 😍💗
Deletewzór jest świetny- dziękuje:)
ReplyDeleteWitam, Renata 🌹 Hope you enjoy 💗💙
DeleteI like the last version of the pattern! It makes the movement more visible. I would personally use the second method, since SCMRs are round rather than drop-shaped and it would look better as a centre ring.
ReplyDeleteGood point, Lavi 💗
DeleteI think the proportion in the last version is also better? Thanks 🌹🌹🌹
beautiful, love this version! Wow, 3 already? I'd better start, then! :))
ReplyDeleteYes, you've lost your 3 grace Sundays, Nin ;-P Glad you like this version :-))
DeleteA fabulously unique snowflake!!!! :)
ReplyDeleteThanks, Sue :-)) Good to see you snatched some time out to surf blogs :-)))
Delete