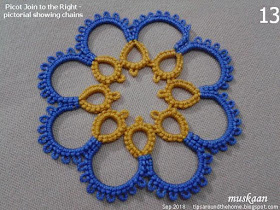
Continuing on from the previous post, not just rings, but chains too can be joined to the right in the exact same way – rotate the
work on your hand so that the joining picot lies to the left of work, make a normal picot join and continue.
A simple enclosed space medallion
was created to illustrate. Mustard colour thread in shuttle is joined to blue
ball thread.
Pattern :
Ring : 6 ± 3 – 3 – 6. reverse work
Chain: 3 (± 2)x9, - 3.
rw.
Join ring to previous
ring, and chain to previous chain.
The last ring and chain
will be joined on both sides.
Picot Join to
the Right - Part 2
(joining last chain to first using
the down loop)
In a rosette such as the ones in
Blossoms motif, rings face outward and hence a picot join to the right is
needed. However, even when rings face inwards as in this medallion, the same
join is required when linking back! So, in this medallion, we are using the
join twice – once for rings (follow as in Part1) and then for chains.
1. The last chain is worked to the point where it needs to be linked to the first chain.
This chain, with it’s joining picot is on the right side.
2. Start rotating the work in counterclockwise direction …
3. till we have the ball thread positioned under the picot
4. and pull up a loop through that picot, passing shuttle through it as in any normal picot join. This can be followed by a 2nd half stitch or a complete ds.
For frontside/backside tatting,
with a down loop or down join, I am restarting from image #2 -
5. After rotating, position the
ball thread above the joining picot
6. and pull a loop down
through it, passing the shuttle through this down loop.
7. and start closing the loop
8. The loop is now tensioned and
snug – the 2 chains are successfully linked!
Notice both threads are above the work.
NOTE : If we want both threads to
be under/at back of the work, then before starting the linkage,
place both ball and shuttle under, leaving only a short segment of the ball thread over the picot, through which we can pull a loop down.
9. Work the 2nd half
stitch (along with the join, it counts as 1ds) and 2 more ds.
This completes
the last chain.
Quite a while back another relative beginner
asked me where and how I tied off the 2 tails. This is how I do it (not all steps
are pictured here) -
10. Needle the core thread and pierce
through the base of the previous ring. (Imagine where the core thread would’ve
been if it wasn’t the end).
11. The ball thread is passed
through the tip/cap of the stitch on the adjacent chain.
(again imagine or see
how the threads lie in the previous segments when they are continuous).
12. I make a single overhand tie at the back, and …
13. whip stitch the core thread
through the ring and the ball thread through the chain.
Leave off following the middle path mantra.
Tug and then snip off excess tail ends.
So, joining to a picot on the
right of current work can be as easy as that – all a matter of perspective, and
nothing to fear. And we have seen it in use in enclosed space medallions where rings faced outwards (previous rosette), and also for inward-facing rings and chains (the above medallion).
I’d like to talk a wee bit more about
this join – a common threads kind of overview through various project pics.
to be continued (final part)
Related
Posts
Joins in Shuttle Tatting


I've done a similar method for joining. Somehow the "folded join" just never worked. The one silly thing for us uncoordinated: it is important to have both threads on the same side of the join (above is easier, below is still possible to work with). Alas, I speak from experience.
ReplyDeleteThank you for a lovely tutorial.
Linda R
Same here, Linda ;-D While I understand the concept, I just can't remember to work the fold or twisted picot ;-P
DeleteFor both shuttles below, I used to pass the shuttle through before tensioning the join (a bit fiddly). But Linda Davies has an excellent video showing how it can be done easily (link in previous post) & I've tired it successfully.
Appreciate your kind words :-)))
Muskaan I have to particularly follow your end tips. Thanks for that.
ReplyDeleteGlad to be of help, Alka :-)
Delete