Pages

Sunday, 31 December 2017

the old with the new

As we shed the old year for the new, memories of the old stay with us.
Here’s something old with something new to symbolise this transition on the eve of 2018. 
And since I love tatting, it seemed apt …

The old comes from many of the discarded bits from recent projects or experiments, 
used to make the bouquet.

The new is all Josephine Chains or Spiral Tatting - to complete the bouquet with stems 
and leaves as well as outline the card topper.
The 'leaves' are mock rings held in place with an under-over or alligator join.

The post and examples seem to indicate only spiral/Josephine chains not rings, 
so that’s what I went with.

Except for a random few rings or the set of 3 which used a thick thread, all the rest is in size 40.

Do you recognise some of the floral medallions? 
The pink are from Doily #10
most others are from later trials of my Aspiration doily center
the small 3D (layered onion rings) marigolds were made to empty the shuttles. 

 
The dark blue trim of Josephine chain is in size 20, made in one pass.
TIP : In order to turn the corner, I left a picot, and switched from 1st half stitch for vertical sides to 2nd half stitch for horizontal sides. It creates a fairly distinct corner.

for some beautiful applications and tatting !


Here’s wishing all my readers
A very happy, peaceful, healthy and creative 2018
With lots of tatting thrown in !
And looking forward to even more interaction ...

Wednesday, 27 December 2017

Vetoed

I thought I had it all figured out. 
Nope.
Turns out shuttles have veto power, just as I feared last time.


This round was visualized in cream all along, so that the doily could be finished off with the aqua blue. But after doing a couple of repeats, it didn't look so good. The round seemed to cry out for the aqua blue right here.

But I did veto the application of picots -- scuttled down to just a pair of dot picots per repeat Can't leave everything to shuttles ;-D
Reason - so I can have more picots in the final round.

This was completed many days back & Agnieszka sent me the last round pattern. But I haven’t started - dithering on the colour choice ….
Should I add that dark green for the final round?  
Or should I continue with this aqua green – a broad round reflecting the inner one?
Decisions :-(
I won't be able to complete this before the new year. But if anybody wants to join in, 31st is the last date to inform her. 
And I might have a surprise guest - if my convincing powers can crack her shell ;-D With fingers crossed ...

My journey so far –

Who holds veto power in your tatting journeys ?

Monday, 25 December 2017

seasons greetings


When Denise sent me a picture of her crocheted Santas/elves I was hooked immediately! They were a hit with the kids who received them as well. 


It would make a lovely gift wrap adornment for my niece, along with a Christmas/party themed wrapping paper for one of the books.
She kindly sent me the pinterest link. After some searching, this is where I found the original pattern 'Noelzinho' by Norminha.

There are many versions of this face, but I like this the best.
Crocheted in wool in keeping with the season - it is getting chilly here with the minimum in single digit! It measures 4 inches vertically, including the pompom.

And I also fell in love with this snowflake which Bernice worked and tatted it immediately. I’m going through a slowdown phase but this snowflake truly perked me up. I'm glad to be reminded of this blog which has so many patterns and tutorials.
Worked in size 40, it measures 2¼” across. I worked it in one pass, climbing out with a split ring.
The pattern is Snowflake for the Christmas tree by Agnieszka Michalowska 
    
I used to love Josephine Rings, but have gradually veered towards dots. Dots turn out smaller than the JRs as I had discovered earlier.
  
This is one of the rare snowflake patterns that has 7 arms! 
An error on my part had led to 7 arms on this Ice Snowflake and I didn’t discover it till months after it was shared!
In the wake of such lovely patterns, I don’t really see the obsession with 6 dendrites. Do you?


This is one snowflake I’m going to find difficult to give away, despite the watchful eyes of Santa ;-P And for 'the flower within' look, I would love to use 2 colours next time, working the rows separately.


I wish my readers a very happy, creative and satisfying future 
filled with daydreams that come true !
Z


Monday, 18 December 2017

and on we go

I just Had to share the completion of this round! It looks so pretty in real – like a large flower. A very good stage to stop, too, if one so desires.
But I changed the background to bring in some more interest.

As usual, I chose to work the few rings backside since it is largely a chains round with lots of picots.

My logic for using 2 colours? – to avoid contamination. I wanted to maintain the lovely arching effect of round 6. And secondly, to avoid too much cream at this stage, what with the cream in the floral motifs.

Now here’s something – the chains are lock/shuttle joined to flowers. But despite a different coloured core thread, I managed to minimize the colour blip in a lock join without resorting to a CWJ, a JSS (join on smooth side) or even a slope & roll join. I wanted the dip that a LJ provides and avoid the slight change in plane of a S&R join.


TIP: how to hide colour blip in a lock join - When working from the front, pull a down loop of shuttle thread through linking picot (instead of up loop), pass shuttle and snug the join. Then make the 2nd half stitch almost overlapping the join. Continue with pattern.

This hides the blip to a large extent when seen from the front, but is visible at back. For backside tatting, do the opposite (up loop followed by 1st half stitch).


Oh, and as you know, this is Agnieszka (Frywolaga) Gawron’s Doily #10 or “Pikotek” and we are attempting to a picot adaptation row by row. Dec 31st is the last day for joining in, but we work at our own pace.

My Previous Rounds using picots :

happy tatting always J

Friday, 15 December 2017

a floral path


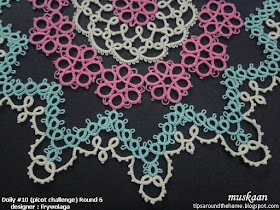
Round 7 of the ‘Pikotek’ or Doily #10 is now completed and sent to Agnieszka.
In Anchor size 40, it now measures 8½ inches at its widest. 
This gives an idea of how deeply set these 1 inch flowers are since round 6 was 8” across.

These little flowers are a joy to tat!!! I can easily finish 3 in just one evening, 
including sewing in tails.
Yet other activities slowed down this round, but not the pleasure.

And in order to reduce the pink dominance, the centers are made in cream.

I dallied whether to use them alternately with all-pink flowers (as in above pic), 
but the 2-colour ruled. 
Which meant I had to cut out and tat 2 extra but who’s complaining! 
See the pic below for comparison.

TIP : If the entire pattern was available, I would've worked each flower separately, 
and joined to the floating ring while working round 6 (as I had done here).
I did a quick rolling pin block without pulling out/shaping every double picot...will do it at final stage. 

3 more rounds to go, but they are mostly chains, so should tat up quickly.
While I have a couple of ideas on where I'd like the colours to go, 
it's up to the shuttles to behave themselves!

Previous Rounds :

shuttles are like pet cats – they rule!
happy tatting always J

Monday, 11 December 2017

tallying

Here’s a peek into my current tutorial project - multi-colour Cluny tatting.
Georgia asked whether I could do a tutorial on 3-coloured Cluny leaves. Always up for a challenge and broadening my horizons!
But first I had to refresh my memory, hence started with a Hanging Cluny in single colour. Then went on to 2 and 3 colours, with a bit of experimentation in the repeats.
These are merely my practice & experimental pieces.
I find myself unable to make a diamond-shaped tally; it invariably turns into a spindle or leaf. Not that I mind, personally - I like this shape.

Then on to regular tallies in 4 colours (inset shows  a close-up)
The last one in purple has uneven number of passes – 2 purple and 1 mustard.
All woven on a card stock loom with tapestry needles.

These are all done with scrap threads, hence colours may not be as distinguishable. For the pdf, I am using other colours.

Dagmar Pezzuto is the only one I know who has made 2 and 3 colour tallies. I watched her video and made a few of my own tiny tweaks.

For the pdf I thought a sequential presentation from 1 to more colours will be a good idea? It does increase the number of pages, but it will also keep everything under one roof and progress logically. It also gives us a chance to refresh our memory before embarking into multiple colours.

QUESTION : Do you prefer this type of all-in-one pictorial or only one separate 3-coloured Cluny Tatting pictorial ?

The weaving itself is very easy and basic, but I must admit that it takes a bit of practice to  manage the many threads required for coloured weaving ;-P I've gotten better!

Related posts
All my Cluny Tatting Tutorials, along with many resource links


Happy tatting always :-)

Saturday, 9 December 2017

whizzing past

I wanted to share the next few rounds of Agnieszka’s Doily #10 (zabawa pikotek) together in one post. But Round 7 may take a while because I’m busy with a pictorial and don't want to lose focus. So might as well get this off my list.

I returned to dot picots for 6th round. A ‘repeat’ of the 2nd round.
Surprisingly, even with all that switching between shuttles for dot picots the round went smoothly and quickly.
I tried to make the dot picots mock rings (SCMR) instead of thrown rings, to avoid switching shuttles But the latter was easier and came out better for me. Moreover, I kind of got into the rhythm and didn't mind at all. 

In Anchor size 40, it now measures 8” or 20½ cms.

Next round is again flowers. 
Carollyn suggested different colour for the center of the flowers. I've been thinking of interspersing all pinks with a cream center to avoid an overload of pink. Think it will work???

Check out Frywolaga's latest post. The invitation is open till the end of the month. I think it's a cool way to begin designing. With the pattern all laid out, and no trials/tribulations for stitch count, etc. all one needs is to play with the picot and create our own version!

Don’t you love when the day’s tatting & designing is stress-free and relaxing!


Related posts

Wednesday, 6 December 2017

slow colour fast colour

The power of colour often amazes me!
And I don’t mean the usual aesthetics and visual appeal of our colour choices and placement.
Go a step beyond to the speed and pace of working. eg. certain colours in finer thread merge with my skin tone making it difficult to eyeball picots, etc.
This time I experienced an even greater power! 
Colour affected my involvement and motivation!!!


For this round I deliberately chose a darker green - thought it would make a statement ;-P
I even had my husband select from an assortment of colours (without telling him my preference) and he also chose this. Yet, as I worked, it had me on edge continuously. And after every couple of elements I would wonder about my choice and stow it away. The shade seemed overbearing in real (and hubby agreed – no, he’s absolutely Not a yes-man!!).
Took me several days of uninspired working to do just the 2 arms of simple rings and chains.

Frustrated, I coloured in some options in Sketch Guru, and tried a combination – green rings/cream chains & vice versa. Ugh it looked bad!
Rejected everything and went to the safe option of similar colour strength.

So much better and even tatting went smoothly, rapidly, and happily thereafter ! The entire round was done in 3 days flat.
This time I chose simple decorative picots. I like how the rings are joined to create those angles!

Round 5 in size 40 measures 7 inches or almost 18 cms tip to tip.
2 shuttles used because of thrown/floating rings.

But you know I'm wondering whether I was wrong again. The pastel green has brought the pink into too much prominence. There's yet another round of these flowers! Sigh, will just live with it for now and see what happens. It does look and feel good in real though.


‘fast’ colours make for happy tatting  J

Related posts

Sunday, 3 December 2017

lazy or smart?

When was the last time I posted something unrelated to tatting? Hmmm, probably a year back for the Pinterest Challenge in December – that cute little bird. It still sits on my bedside cabinet with pins stuck in it!

This time I'm sharing a very quick mixed media project involving painting and embroidery, done sometime around mid-2000.
These pics were taken quite a while back, hence not as sharp, bright, rich and clear as I’d like them to be. Apologies for the poor quality.
The background is a light yellow but not as washed out as it looks here.

I’d wanted to embroider a bedsheet for ages, but was fearful of it becoming an UFO. Once during our summer vacation we forced our Mom to give us separate bedsheets to embroider and she succumbed despite her valid fears of us not completing them. The sheets did get finished but only after she sat alongside and embroidered the remaining motifs over the months following the vacation ;-P

Going by that experience, I decided to do something quick but covering a large area. After scouring through my pattern collection, I zeroed in on my favorite book – Creative Stitchcraft. It has a beautiful Bouquet of Roses Quilt – red stem-stitch embroidery on white background.

I went for colours, but a mere stem-stitch outline would look too barren. So after I had enlarged the template – drawing manually, since I was excited to start immediately – and transferred it to the cloth I looked in my fabric paints box – I use Fevicryl acrylics.
I had a few left over from painting a free-hand saree border for my MIL earlier.

Diluted them and did a quick wash. A thicker coat of paint could've caused some stiffening of the fabric making it difficult to embroider, and taken longer to dry obviously.
There’s a bit of yellow paint in the rose petals, too.

I deliberately didn’t ‘stay within the lines’, keeping it a bit random with some unwashed areas or some overlapping of colours, to give it a natural shading.

Then simple stem-stitch along all the outlines.
I kept the stitches very short, using 2 strands of Anchor embroidery threads throughout.
Manoeuvering becomes easier when stitches are short. Abrupt curves, sharp ends, pointed ends, etc. can b e neatly managed. 
Mary Corbet has some excellent tips & tutorials which I had already figured out on my own. 

There is also a lovely Morning Glory border in the original pattern which I did not use here. This seemed fine on its own. 
Yay, it was all over within a week – from enlarging to the very last knot! 
Is this multimedia project smart or sheer lazy? You decide :-D

Bouquet of Roses pattern from the book "Creative Stitchcraft". (Better Homes and Gardens) Murdoch Books. 1991.


Wednesday, 29 November 2017

mixing


This month I Love Tatting consisted of working a pattern with at least 4 split rings. I kept tossing ideas in my head – so many to choose from! Jean Lugert’s rose was a top contender – it’s on my to-tat list. Or a pattern from Karen Bovard’s book? Then there were 2 of my own designs – one prototype done a couple of years back, and another – a split ring snowflake, no less – in my sketchbook. Also jostled with some braid ideas.
Finally fate intervened in multiple ways and I chose a pattern mixing colour effects, techniques, and events. And kind of apt – 3 colours for edition #3 of kocham frywolitke!

Adaptation of
Patty Dowden’s Mardi Gras Snowflake
for I Love Tatting / Kocham frywolitke 3
Googled Mardi gras colours and loved the 3 that showed up! Never tried this combo before, and in order to get the right shades, I chose Anchor embroidery threads – 3 strands of each colour.
My initial thought was to wind 1 strand of each colour, but discarded the idea.
And in order to use all 3 colours, with justice to each, I planned on adding another round.

Substituted single shuttle split ring (SSSR) with the 2-shuttle split rings (SR) to comply with the challenge. Incidentally, SR is a composite ring while SSSR is a true ring.


The path wasn’t easy! Here is my 1st attempt. Something was wrong, I knew, but it took me a long time to figure it out.
Decided to start afresh and made the very same mistake at the very same spot again!!!! 
This time I unraveled and re-tatted. Kept a close eye thenceforth ;-P

This is how the original pattern would look. It measures 6 cms.
One of the advantages of split rings is that one gets to play with colours in interesting ways.

The additional round is worked with 2 shuttles because of the thrown ring. But one can work the round with ball and shuttle by making it a mock ring.


Stitch count for this round is notated in the picture, but it can be changed to suit your preference and tension.
I deliberately used simple lock joins throughout.


It measures 8 cms now.

There are a couple of mistakes here but I’m still happy with the outcome. The purple chains create lovely petal outlines around the center (as do the yellow halves). And if we increase the stitches, the ‘petals’ will overlap!

I hope you give this a try some time - with SSSRs or SRs. Either way, it's a beautiful design.


happy tatting always J