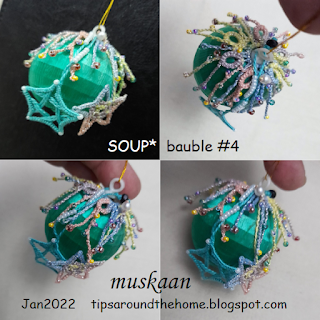
Believe me, I have never done bauble tatting! Oh, every year I think I will embellish at least one bauble, but all for nothing. In December 2021, the admin of the Italian FB group 'Chiacchierino: Filo Amore e Fantasia' held an online event with my MatheMagical Star pattern and several tatters used it to cover their bauble ornaments. All this really inspired me to do one..er 2, er 4.
Due to paucity of time and energy, I settled on using whatever motifs I had on hand - a SOUP (Sewing On/Using Pieces) moment. These 4cm ornaments will soon celebrate their 20th buy-day! At the time we didn't have a lot of options in this city and since the tree was decorated only the 1st 2 years, I am hesitant to buy. Next time I will certainly include more beads and crystals, more flamboyance. Perhaps I Should buy a few good quality and larger sized baubles. This little exercise has got me excited and more confident.
In chronological order -
Bauble #1 - This edging is draped diagonally and temporarily taped down behind. (don't look behind!). But in Anchor size 20, it is too thick. A daintier edging/insertion would look better. And a tiny motif or 2 on the bare side spaces?Bauble #2 - There is no good angle to capture both flakes in a pic. These are in Lizbeth 20 and perhaps the reason I put them together. Spin Away above and ConcentriCity below.
Bauble #3 - This is the small version of the MatheMagical Star in size 40 - the only one that ... the others were too large for this bauble. And I kind of liked how the crystals sat like a crown on top.
On the underside is the Folded Fun Star. I hope you can see how I went a bit adventurous and joined the 2 stars.
I simply sprinkled a few of my snowflakes instead of suspending them - yup lazy. Hubby even offered to put up a string of lights but I hope to be better prepared next time.
It happens Every year! I let the sunny days slip by and when I finally get around to decorating the tree, the sun gives me the slip! So the pic comes out insipid. Oh well, this should be a staunch reminder to start early this year!
I really want to thank all the wonderful versions shared by tatters around the globe - in the event (one tatter inserted it inside a transparent star ornament; and others who used beads in exciting arrangement) as well as ornaments in general - that got my juices running, finally. Feeble firsts, but determined to be better later this year!
All the star and snowflake patterns can be found here -https://docs.google.com/document/d/1r4OmXX_c5LjFebMN2UbSNiYqXYETLmoridK0X1YIQco/view


It’s a very good way to use small tatted bits. The results are lovely and the bits get a home!
ReplyDeleteThat's a better way of looking at it, Jane, thanks ❤😍 And the best part is that everything can still be changed and reused 😁
DeleteI just gave away a bin filled with baubles that I never decorated. I've just never been inspired. I have some that my friend Denise made for me, and I love them. Maybe I'll get inspired to try one day. Luckily for me, Dave loves putting lights on trees... lots of lights! Without his help, there would be very few lights in our house!
ReplyDeleteDiane. embellishing these baubles was pretty fun surprisingly! And yesterday we scrolled the net for some good baubles 😃 There was a time when hubby had lights on the trees all year round for several years. Now we are old and lazy 😍🤣💖
DeleteWszystkie piękne 😍 Bardzo ciekawa jest ta ze zwisającymi sznureczkami z koralikami-taka inna😍 Szczęścia w nowym roku ❤️
ReplyDeleteI am so happy you like them, Agnieszka 💖 That beaded one is the 'new' version of Sparkle Snowflake. Although the updated pattern is not shared, all other tutorials, etc. and old pattern are listed in the link I gave. Hope you use the technique in one of your lovely designs 😍
DeleteW O W. So unique! Awesome tatting
ReplyDeleteThank you Lelia 💖 I am pleasantly surprised at the reception these got 😃
DeleteThose are fabulous and in the Christmasy color I think they would really stand out!!! :)
ReplyDeleteI love most of them with the pieces you have used especially the Interlaced Cumulus in red and white on that green ornament!! ;)
Love your suggestions and visuals, Sue 💖😍 I will be better prepared this time and start well before the very end 😆
DeleteMy favourite are the blue ones. They're lovely! I've a miniature xmas tree with one of your snowflakes on, tatted in silk, I remember you every time I turn the little lights on.
ReplyDeleteFeels wonderful to be remembered like this, Nin 😍💖 We found some 1cms baubles and bauble lights yesterday, but I am hesitant to buy such tiny ones 😆 Haven't made up my mind about the size yet.
DeleteBeautiful xmas decorations :)
ReplyDeleteThank you so very much, Anetta, although they don;t hold a candle to your perfect handiwork 💖😍
DeleteThe twisted picot is my favorite! It's like no other!
ReplyDeleteTrue, Anita 😍 I still haven't shared this updated version with interesting bead effects. Someday this year, perhaps? 😆😃💖
Delete