Pages

Wednesday, 30 January 2019

a winter rose

Huh, paper roses are so easy to make?!

The net is teeming with DIY paper flowers and I love browsing through the eye candy (pics, videos and my saved pins). After salivating for so long, I Had to try one.
Got the hubster to go buy me some double-sided coloured squares (grumble, grumble,...;-D) since the origami ones I had are coloured only on one side.

And last night, after tatting lights were switched off, while watching a show, in the soft light of my bedside lamp, I decided to give it a go.
Not yet confident, I picked up a regular A4 sheet, cut 4 squares (I needed only 3) of 10cmsx10cms and went to work. Folding, cutting, gluing the edges, curling, and gluing in layers. Perfect for a first !!!
No more grumbles – he LOVES it and I’m back to full marks on ‘talent’ ;-P

There was a rectangular strip left from the A4 sheet which I folded and cut into leaves. Then folded to mark veins and curled.

I can't find the exact video from which I made this rose, but you can get a idea here and here. It's that simple, really!
I'm glad for the trial, so I know how large a 10x10 rose is.

The white itself looks so lovely, that I wonder if I really need colours now ;-P

And if you are wondering what I’m going to do with the flowers I make – they are to embellish the gift wrap for MIL’s saree.

Tuesday, 29 January 2019

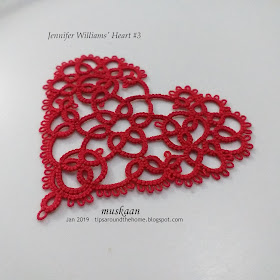
Jennifer's heart


Life is too much in the way to get some uninterrupted quiet time to tat. I face this slow-time during winters. I am barely spending an hour every other day at the desktop L No wonder the pattern presentations I’m working on is sloooooow!

But this beautifully designed filigree heart warmed me and was quickly shuttling away! Jennifer Williams has so many beautiful patterns to try out. And her instructions are easy to follow and presentation is superb! 

Worked in Anchor size 40 (shade 00047), it is 6cms high and just under 7cms wide.

Made with the most basic techniques, in one pass, using a shuttle and ball. One only needs to be mindful of the chain segments, which she points out clearly.

TIP : Inner round starts with a picot on chain to avoid cutting thread and a good skill to possess. But if a beginner is uncomfortable, they can start with any inward-facing ring and end with chain, cut and tie. Then start the outer round afresh.

TWoT analysis revealed that my shuttle will remain on right side when climbing out to the next row where there are chains with lots of picots. Hence I decided to do the chains frontside and rings backside (rods). It helped to think and plan ahead. 

I am tempted to keep this heart - it feels so good to look at, and to touch ;-D


Wednesday, 23 January 2019

rising from the dead


aka the seven-year itch ?!

Flashback Oct 2012...
For a few years I had been following a cross-stitch designer who shared the most fabulous embroidery patterns on her blog. She decided to stop blogging and shift to facebook and in a moment of temptation, I signed up. Within a couple of weeks, though, I stopped visiting the site and soon forgot my password! Until ….

...Flashforward to the present Jan 2019
…..until I got an email from fb giving me a link where I could update my profile. Curious, I checked it out. Then Ninetta, my friendly fb correspondent, guided me further and now I have reactivated my account, including changing my password ;-P

I need time (and guidance, Nin!) to find my way around. At this point my very simple aim is to connect my blog activity through pics without spending too much time there. 
You can find me here. Or the mobile link here.
 !" caught in the fb web ?! shiver me timbers ;-D


And this is what I’ve been up to when life permits me: sewing blossoms motifs to the saree. Yes, those 40 thieves were unshackled and boxed before being tampered down again. 
This pic was taken about a week back. I now have only 8 more motifs left to sew. But I might need to tat a few more. Shuttles have been lying idle while my hands itch to pick them up. So I might just tat a few bonus motifs just for the fun of it ;-D

Sewing/appliquéing with regular white sewing thread, doubled.
TIP : I dislike flattened picots. Hence the tiny stitch I make is at the base, on one side. It is sufficient to hold the picot in place, yet provide some lift.

Monday, 21 January 2019

a gesture of thanks


It is so heartwarming to see people from around the globe come forward to send positive thoughts and energy virtually and digitally. As a small thank-you gesture, this is the pattern for the awareness ribbon.

When I made it earlier this month (without any direct pattern/reference), I thought I’d come across the body design on pinterest. After a lot of hunting, I finally found it this morning here and here - centre row of a vintage insertion from Priscilla! 

A single page pdf with diagrams and a few suggestions – Positivity Ribbon pattern 
One working diagram is included for transition to next row.
I think it's nice to personalise the ribbon.


TIP : In order to hide the colour blips in the tinted lavender, I used Ninetta’s blipless joinwhich is my go-to on the rare occasions I use such a join. However this time, I counted the join as a complete stitch and I truly like the effect! Can you tell the difference between stitch and join?
Will be using it more often now. 


Techniques I used: frontside/backside tatting, folded chain (similar to folded rings), blipless join.
Both ribbons are worked with Red Rose pearl cotton size 8 ( 20).

This one-pass shuttle and ball pattern could work well as a straight edging or insertion.  But for a bracelet or choker, some tweaking will be required if one wants to have beads on the joining picots. I hope to get around to it....


A slight modification of the butterfly I used on this heart. It has a Josephine ring for head and a lock chain wrapped around for body. All with one shuttle, with a length of thread left at beginning to tat the lock chain.

UPDATE : This pattern is adapted into a hairband - Positivity Hairband.


the support a group provides is priceless !

Thursday, 17 January 2019

a small gesture

A tatted gesture for a very special person
Will you join me in sending positive energy and prayers? 
Just a little 'Hi' in the comment box to show we care.

UPDATE : click to download Positivity Ribbon pattern


Tuesday, 15 January 2019

celestial razzle dazzle


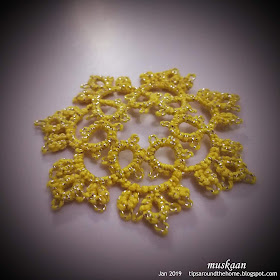
an adaptation of Sharon's Dec 28 snowflake. Although “undecided”, I am so glad she decided to share the pattern.
In the pics the sparkle seems spotted. Part of the reason is that a single metallic wire is twisted with cotton thread. In real this wire creates a stronger and nicely cohesive shine. 

I loved how the elements in this flake seemed to fan out! Which is why I waited to tat it in metallic threads thus magnifying the radiation and radiance! So this time I have a sunflake with a few differences, if you can spot them?


What I did differently :
  • Increased motifs to 7 instead of 6 because there was cupping.
  • Worked the 2nd round with thrown rings, instead of chains-only.
There was ruffling as the rounds were added, but roll blocking flattened it okay. Made me think I could've retained 6 dendrites! The cupping is NOT a reflection on the design; it is my own shortcoming with such medallions.

What I could’ve done differently :
  • Make longer joining picots in inside facing gold rings, thus keeping the motif count to 6.
  • Reduce the gold & increase the silver.
  • anything you would like to suggest ???
In Red Rose size 20, it measures 11cms. Now to attach it within a large enough frame to hang in the window, letting it razzle and dazzle as it catches the sun’s rays.


Related posts
one more sunflake (Lene Bjorn)
unintended 7-armed Ice Snowflake (Nancy Tracy) mistake discovered over a year later!
intentional 7-armed superbowl snowflake (Georgia Seitz) for the blocking pictorial.

Friday, 11 January 2019

new and old


metallic thread, background, snood


As promised yesterday, this is the medallion (not blocked) I started immediately, using Red Rose metallic thread.
The thread is nice to tat with – soft and smooth - but very strong. It is so much easier than using 2 or 3 strands of metallic embroidery thread.
I did consciously loosen my stitch tension. And no extra half stitch at end of rings. 

TIP to close ring: While closing rings, pull evenly till almost the very end, then another tug towards the left (for right-handers) to close that final gap.

TIP to retro-tat: I had to un-tat a ring. It felt safer & easier to undo half stitch at a time (using the blunt head of #10 crochet hook) instead of forcing open the ring. After a few stitches were taken out, it was easy to pull open the ring loop wider and quickly unravel the rest.
ùùùù

Playing with camera settings for background using same metallic thread medallion. Didn’t know my phone camera had such a wide range – these are only a few I selected to upload. The top right is 'autumn'.


ùùùù

And a UFO from mid-2016! I kept finding and losing it in my closet. But this time when I found it, I felt energized to complete it. Perhaps Eliz's perseverance rubbed off on me. Also, I need to replace this 2017 snood because some of the end chains have frayed due to daily friction.
It measures about 5½ cms across (in size 40) while I need at least 7 cms. So off to the drawing board to chalk out some rows. I intend to use a dark shade - brown or black - to keep the spinning wheel in focus. Now to decide how to fill that space - a daunting task.

ùùùù


Thursday, 10 January 2019

up-lifting Anchor


Anchor aweigh!
Tatting away :-)

I just Had to share my excitement with you. I had a huge shipment arrive yesterday that included mainly Anchor and Red Rose threads and a smattering of sewing/knitting/crochet accessories. Yup, still doing the happy dance ;-P

These are some of Anchor Pearl Cotton size 8. Absolutely gorgeous colours, silken, sheen, and soft texture. It’ll be my first time with these. I saw them first in Usha’s tatting and now bought all the shades that Pony Craft Store has. I started cataloguing and counted 67 balls (10 gms each; Art 4591)!

These are top-ups or new shades in Anchor size 40 and size 20 (20 gms each; Art 4054).
I think the Anchor 20 balls I’ve been buying since 2013 from my retail store and another online store were fakes (or has Anchor improved it’s quality since then?)! No wonder I kept ranting – they are thicker than the ones here. But I had no way of knowing coz the labels and price were exactly the same.
Oh well, a huge weight lifted off the Anchor brand now! Uplifting Anchor, ahoy ;-P

Now these are new entrants Red Rose metallic threads size 20. There are over 20 beautiful shades - solids and variegated - in the online store. Each ball is 100 gms!

Here’s the whole thread stash straight out of the carton, including Anchor assorted embroidery threads – a pack of 25×2 shades (8m each; Art 4624). Sorry for that blurry image.

Over time I will do some proper thread/brand/size comparisons. For now, I need to catalogue and find storage bins and space, sigh !
But watch out for my first metallic medallion tomorrow ...  

Tuesday, 8 January 2019

more flower flakes


Still chugging away at small projects … 2 more of Sharon’s flakes visualized as flower flakes, taking my count to 10. Sharon has numbered all 26 flakes with respective patterns here.

This time I've used strands of Anchor embroidery threads.

Baby Flake as night jasmine flower flake !
Nycanthus, commonly called parijat or harsingar in India. A beautiful flower with white petals and orange stem! Among my favourite with fond memories - watering and picking up the flowers strewn under the tree at my granny's place.

3 strands (Ξ Lizbeth size 40). 5½cms as flake ; >4½cms as motif. 


12-25 2018 Snowflake as Chrysanthemum flower flake !
SLTs helped bring out a flower amid foliage. I worked the coloured rounds continuously.
For some reason lots of un-tatting was involved here, including a thread-break, but I persevered. Wish I’d chosen a lighter/darker shade of green.
2 strands (Ξ size 40). 6½cms as flake ; 6cms as motif

Please note that the inside rings in 2nd round are linked together. There is a bit of crowding in the diagram and I missed it.

Thought: Split chains are excellent to climb out to next round. At times, though, it is good to have separate rounds, especially in case of retro-tatting. The thread broke so close to start of outer round that I would’ve snipped and started it afresh. Now I had to retro-tat.

Against a black background.


I’ve chosen colour schemes for some more of Sharon’s flakes but am waiting excitedly for more threads to arrive soon to tackle them. Meanwhile I’m working on a 2016 UFO! 

Wednesday, 2 January 2019

looking in looking out

It’s that time of the year – a transition from the past year to the new! 
A time to look back but also to look forward through the glass of a windowpane, perhaps?

here’s wishing every person who steps in (leaving ‘thoughtprints’ below) or 
peeps in (a quick glance through the window) 
a very happy, creative, peaceful, and TATalizing 2019 !

I thank you for being a part of my blogging journey – 
happy memories of inspiring interaction, personal growth, and creative connection.
I hope you stay a bit to answer a few questions....

Q.1. What is the best thing you like about this blog?

Q.2. What is it you most dislike about this blog? 


Windowpane Square is this new motif I’ve been working on sporadically. It started out as a kind of pointless exercise and that’s what I called it – a pointless square ;-P But you see the paradox there?!
As I went along, though, loads of ideas cropped up. The large negative space can be filled in completely or partially; cut out a square from cardstock and glue this as a frame …. Hey it’s a window frame with a windowpane !!! The accessories could be glued (mixed media) or tatted over the 'pane' or behind it depending on whether the viewer is in front of the window or behind it?

I was hoping to make at least one such new year’s card out of it, but my whole world slows down during winters.

In order for it to look more like a window, I tried using 2 colours. 
Each of these has a slight tweak. The bottom 2 don't have picots in the center.

All squares are worked in size 40 Anchor and measure about 5cms. 

Q.3. Does the square look better in single colour, variegated/tinted, or 2 colours? 

All 5 laid together. One can join motifs to make a large fabric. 
I think it might lend itself to a Magic Square, with the use of SCMRs, but am not certain yet. Robin?

Q.4. Of these 5 squares, which do you like best?

Your answers will help me improve both blog and motif presentations. 

And here’s another arrangement I am eager to tat – a bookmark or wide lace, with some overlap between corners. My first thought had been to interlink them. What do you think?