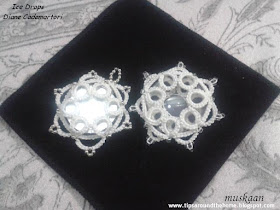
tatted ornament/jewelry/cabochon using large glass beads, mirrors, etc.
Diane (lace-lovin’
librarian) Cademartori
Magnified !
A while back, some 3D movie promo scheme had sent in a pair
of glasses with magnifying lens. Don’t know why I kept it, except that the lenses looked very cute. Tore off the paper specs & got to work with the lens.
The lens is a bit flat for this ornament, but had to make do for now.
It is a bit over 1”, hence strung beads for 8 repeats; 7
repeats sufficed.
Unfortunately the transparent beads don’t show up clearly in
the pic, but the ice drop looks Fantastic – DH was impressed and considered it
a pendant. He guessed right for a change, coz I wanted to keep my options open
& didn’t tie any ribbon, string or tatted braid.
TIP : I used a Fujito Join slope and roll join for the second round. The Lock Join didn’t seem to come
out right for me. So instead, I pulled out a loop with the ball thread &
passed the shuttle through. That’s all.
There are a few mistakes in round 2, which I noticed later –
a bit of twist in a ring & a chain.
Here's how it looks from the 'back' ...
My second Ice drop is made with 2 mirrors glued back to
back. This idea had been on my mind ever since the pattern was shared. I
checked the edges & they were smooth. A tad less than 1” across.
Everything went very smoothly. A vintage size 20 thread,
which is slightly thinner than the newer one I used above.
TIP : For directional
tatting (frontside/backside) :
Round 1 (the back of the bead) – tat rings frontside, RW,
and chains frontside as well.
Round 2 (front of bead) – tat rings frontside, RW, chains
backside.
Finished off with a beaded loop. Absolutely reversible.
I can vouch for their "addictiveness" ! Wanted to keep making
them – they are so quick to tat up and look oh so pretty in real, even though I
didn’t have the specific materials. The only downside (always) was stringing
beads. Should stick to larger pearls ;-)
happy tatting always :-)


They are beautiful and love the directions I stared one and thought I had enough thread on shuttles but did not so not I made little trouble and left it for a bit. I am really bad sometimes with the way I just move on, wanting to tat so many things it's ruff to stay focused.
ReplyDeleteJust TOO many temptations, Carollyn !!! But everything is so pleasurable ;-P
DeleteI believe my fully loaded Pony shuttle bobbin could easily tat 2 ice drops; the chains coming from the ball.
Thanks for the front side tip. It makes perfect sense, along with the join.
ReplyDeleteMel, I just made a correction to the join - it is slope & roll not Fujito (I didn't 'pop' the thread back). I always get confused with some terms. I've updated the post, with link to the S&R join.
DeleteYour ice drops are cool!
ReplyDeletekiitos, Marja :-)) Stay warm !
DeleteHaha! I like that you caved! I love your inventiveness! I only used one mirror, and I wish I had either used two or put a tiddlywink on the back. The dull silver makes a poor showing. Maybe I should have painted on some clear glitter nail polish! I was a bit disappointed in the quality of the mirrors I ordered. They have rough edges and require gentle sanding to smooth them out.
ReplyDeleteSo glad you liked them, Diane! These are recycled mirrors - can't remember where I unglued them from (possibly some gift box) - they were too beautiful to throw away ;-P
DeleteBut I agree that mirrors within the tatting can always pose a longevity problem for the thread.
I like your idea of the mirrors, still not tatted one yet, but there's time.
ReplyDeleteDiane's ice drops are definitely on my to-do list.
ReplyDeleteYou haven't the end of these, Margaret & Jane ;-D I want to make another with curled rings & overlapping rings !
ReplyDeleteBeautiful ice drops! I must find some gems to make some :).
ReplyDeleteThanks Jenn :-) Make sure you have Plenty of gems - it can be quite addictive and friends & family will keep asking for some :-D
Deleteolá, não consegui abrir o passo-a-passo por favor voce poderia me mandar por e-mail. neydir@hotmailcom
ReplyDeleteHi Neydir :-) The email I sent you came back undelivered. Hence responding here - hope you come back to read...
DeleteHere is the link to the stepwise tutorial - http://lacelovinlibrarian.blogspot.in/2016/11/step-by-step.html
and here Diane has made an updated pdf -https://drive.google.com/file/d/1CBuEl6qQjiWm_y0wo52a5iUjkQTVcdFN/view
She has shared a lot more patterns for Ice Drops after this first one. You can ask her on her blog. There is an active Ice Drop Addicts group on facebook where you will find even more patterns and variations/adaptations by other tatters.
happy tatting :-)