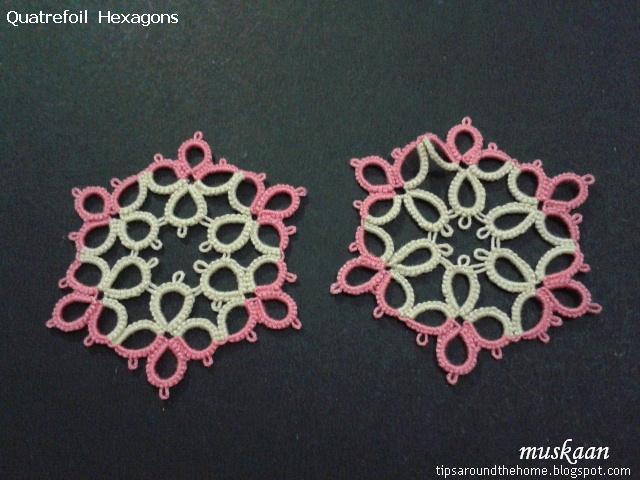
Wednesday, 5 July 2017

hexagonal scrapyard !

Pin It now!
quatrefoil hexagon – lie of the land
I mentioned how the quatrefoil hexagon was giving me trouble. My very first attempt ruffled, but settled down after the rolling pin blocking method. Not satisfied, many tweaks were sporadically attempted....

an uneven surface !
Here is the condensed result of my ‘logical’ rationale of changing the joining point, the inner diameter, the outer cross section, etc. –
1. original – lays flat after blocking
2. long inner rings – I like the effect, but overlaps around the edge
3. works perfectly as a pentagon
4, 5, 6 – discarded midways.
There was one more which turned into a nice square, but has run away somewhere – it had a small SR between each quatrefoil.
This scrapyard does not include all the tiny scraps I threw away immediately ;-D

a volunteer to clean up ?
As the name suggests, it is a quatrefoil pattern – 4 equal-size rings; hence I cannot change the stitch count on any of the 4 main rings.
Can any of you experienced designers/tatters offer some tips on how to get it flatter, without  compulsory blocking?
Or perhaps someone could offer to test tat this medallion (only left one above) to decide whether the ruffle is negligible or workable or whether the pattern needs to be scrapped ?
I would very much appreciate a volunteer to test tat it

charmed perhaps
Meanwhile I went ahead and completed the bookmark. It is made in one pass, using quatrefoil squares, and hexagon for the main body and a pentagon for the charm, all connected with lock chains.
This is just the prototype, with a few distracted errors (one cannot watch a tennis match and create a pattern simultaneously !) Once the hexagon issue is resolved, I will re-tat and write up this bookmark pattern.

squared paths
While writing my previous post I had identified a simple path to create a magic square out of the quatrefoil square. It involves tatting the entire square and climbing out with a SR. This is possible because there are no chains in the pattern.
But Robin’s tutorial post rekindled my curiosity and I wondered how the triangulation would work on this all-rings pattern. Well, it works fine obviously (the left one in pic). So this pattern actually has 2 paths to choose from.

I have worked further since this pic was taken & it reminded me suddenly of the Fandango motif (round 1 only). Quickly checked it out – phew, not the same.

It will be interesting to see how the 2 colours work out since some of the corner rings are split.

I believe that this rings-only magic square might perhaps be easier to work as a first-time serpentine magic square because one does not have to reverse work between rings and chains.

All tatting done in size 40 thread.

Please leave a comment (or email me) if you wish to test tat the hexagon. 
I also have a question about writing/presenting the pattern.
Grateful for any help you can provide.  

tatting scraps make the best scrapyard !!!!

Related Posts :


Friday, 30 June 2017

hacking out instant designs !

Pin It now!
This ‘hack’ hit me earlier in the month, while diagramming some vintage edgings. I was thrilled & eager to share, TILL I began writing this post & went over to Robin’s blog for her tutorial link. She’s already covered it meticulously in her last 2 tutorials – I’d totally forgotten (yeah yeah my encroaching greyness …quit teasing me already!)

But I’m still so excited about this shortcut because it led to instant designing – literally within minutes! Relatively simple and skeletal designs thus far, but such fun playing around ! Want to see how? Read on …


How can any of my Inkscape post Not have a reference to Robin?! She has shared free diagramming templates to get us started. Earlier, I would pick a specific ring or ring combo and arrange as required by flipping, rotating, resizing, etc. For clovers in a snowflake, I’d choose the 3 rings and adjust. This not only required additional steps, but some possible heartburn when they decided to change shape on rotation ;-/ 
(Of course, post-event I know that her Drawing ‘Automatic’ Pattern Repeats tuts eliminate all that heartburn & I’ll be internalizing it for future).


So, anyway, with just a few hotkeys and her Rosette template (6 outward facing rings), I created Instant Trefoil & Quatrefoil Patterns ! And went about tatting the latter, too.

This is just the tip of the creative berg - choose and move around templates & motifs !

click on images to enlarge
 
See how easy it is to ungroup and rearrange individual motifs. One does not need an advanced knowledge of diagramming or Inkscape here.
Although clicking on images will enlarge them, here it is in pdf for easy reading and reference.

 
The top left on p3 is a hexagon from trefoils. 
This skeleton is converted into a working tatting pattern diagram - a simple 2-round snowflake - with the inclusion of chains and picots. 
In the alternate method shown below with quatrefoils, more steps have been eliminated by working with a set of 3 motifs & flipping it!

I draw my own guide lines using the grid and a bezier. Actually this was to be the 2nd hack I intended to share, because many of us still find using the guide lines and snap commands confusing. But for those who can, use the actual guide lines.

Errr, tatting wasn’t as instant as designing – the first ‘hexagon’ turned into a square (the one with tails)! Just a slight stichcount tweak, and I got a square, pentagon And hexagon all from One skeleton diagram (on the left) !!! The picots & joins were shifted in the pentagon & hexagon on the right. It creates a visibly different look, but the hexagon refuses to lay flat.
Incidentally, all rings throughout have 24ds.
  
And there's another possible pattern on p4 with quatrefoils and thrown rings, but the quatrefoils are 'inverted' ! I think it can be accomplished in one pass using SCMR with thrown inner rings and split rings along the outer circle.


Now the Quatrefoil Square & Hexagon seem to be pretty basic, although my searches did not throw up such a medallion. And even the stitchcount – I came up by myself.
If you have come across an exact replica, please do tell.

I will share this pattern & it's myriad design possibilities next time. These different shapes seem to have a nice fit to create a larger fabric. Hmmm, a magic square, too, perhaps :-D No harm aspiring, is there - & I might just have got the sequence! 
But first I need to design a triangle to fit within. All help is welcome :-) 
In the meantime I'm halfway through a bookmark & next a coaster tatting it in one pass.


Related Posts

tatting or drawing – the name of the game is fun !
enjoy :-)


Monday, 26 June 2017

hiding in vein

Pin It now!
Stepwise pictorials for dot picot leaf
and how to use dot picot strings as fillers

I’m forever playing catch-up with my blog posts; this time, too, it is ‘in vein’ :-D That did not stop me from taking a much-needed net break. Not in vain! 
Spent some relaxed de-cluttered time tatting a lot (which means more catching-up ;-P) and watching another net - the grass court season in tennis ! I'm sure this is Federer's swansong year and wouldn't want to miss his matches. And what a match the Halle final was - a glorious Master Class !!!! 


In my previous post, I was asked how the veins were joined to the leaf. Posting a pictorial showing my ‘hack’.

Dot Picot Leaf and Veins
Step-wise pictorials 

This freeform leaf is worked in size 20 thread, and the veins in size 40.
Techniques : large ring, dot picot on ring, dot picot string, whip stitching end tails, tatting over tails (knotless start. this is optional.)

I already shared how the leaf was worked, with 1 dot picot on ring at the tip, in this collage. Posting again to bring it all in one place. 
Dot Picot Leaf (with Dot picot on ring) pictorial
Complete sequence is notated in pic#11 below

1. What is ‘missing’ in the collage is that I started with both the leaf and the vein threads joined at the base as seen in this pic. The vein thread is merely 15-18 inches long. I used knotless method, but a weaver's knot can easily be used.
2. After completing the leaf to desired size and shape (it is not bilaterally symmetrical), I turn it over and work the veins from the back side, tatting over the tail in the first few dot picots.
Vein is simply a dot picot string.
3. We make the middle vein first & when the desired length is reached, unwind thread from the shuttle and thread the end through a tapestry needle.
4. Insert needle at the tip (point B) - specifically at the base of the dot picot on leaf and ….
5. whip stitch under the caps on the right edge for a few stitches.
((Yes, the entire vein can be tatted on a needle. But I’m not that skilled/confident yet.))
6. This is how it looks on the older leaves – invisible ! Despite the different shades, the dark green does not show up at all, only partly because it is thinner.
7. At desired point (point C) , I rewind the thread on to shuttle and tat the shorter vein.
8. When the required length is reached, pull a loop around the main vein, pass shuttle through and ….
9. tension carefully. Something like a lock join. It stays in place due to the notched texture.
10. Continue with the left side vein for required length and join to the edge (point D). With a needle, whip stitch along the left edge for next pair of veins.
11. Tat the vein, join to main vein & continue last vein which is attached to the right edge. I continue to whip stitch down this edge right up to the base. This pic shows how the entire pathway. Black arrows depict whip stitching.
12. This is how the leaves look from the wrong side.
These measure just about 1 inch.

NOTE : Instead of dot picot strings, one can make the veins in Lock Chains, Twisted Picots (as in rustic leaf), or simple bare threads ! Even regular chains ! Improvise & enjoy :-)
This effect can be used as a filler for any ring or mock ring ! Fancy some petals, wheels, et al ?!

The leaves are freeform, asymmetrical, & I eye-balled everything. 
If you wish, you can draw a sketch-to-size as reference. Remember this rustic leaf sketch turned into tatting ?

no tatting is ever in vain J