Pages

Friday, 30 September 2016

from pin to pin


Confession : This month I did not work on any project specifically for the pinterest challenge.

Yes, I did make a start with my personal challenge of 2D tatting design, but this post will not talk about that.

Instead, I will fall back upon a few things I have been doing ever since I saw them on pinterest. Please excuse the quality of pics – they were taken back in 2013 (when I was still new to photography) & I don’t even have the unmarked stock pics. I urge you to check out the original posts for the great pics and instructions. Mine don’t do any justice to them, although it has become part of my life.

Healthier Butter

It all started with Jillee’s post on how to make your own herb butter.
For daily application, herb butter wouldn’t be accepted in my home, so I skipped the herbs and mixed only butter and olive oil – almost equal amounts.
Mix normal Butter with desired amount of Olive Oil 
(I used approximately equal amounts - 50gm butter + ~50ml olive oil). 
Mix with fork if quantity is less, as in this case, or pulse in blender as Jillee did.  
Olive oil has blended with the butter. Refrigerate and use as normal

I use a stainless steel container with tight lid. This small container easily fits into the bread box sitting cozily beside the bread.
And due to the oil, the refrigerated butter quickly 'thaws' to room temperature when taken out & kept on the kitchen counter. No longer need to Remember to take the butter out earlier !

Besides toast and sandwiches, I sometimes use it for grilling, too – oil gives it the fat, and butter the colour.
Works great in baking too - I use this for cookies, muffins & cake....

Eggless Cake using healthier butter

This was my first attempt at baking an Eggless cake & it wasn't As spongy as my usual cakes (with eggs) although the taste was great. It had a slightly denser feel, which I remedied the next time. I used Sharmi's Chocolate chip cupcake recipe (sans the chocolate chips)  
This pic was taken a few days After the cake was baked – more than half had already been consumed and the remaining pieces relocated into a smaller container. When I remembered, I just took the container out of the fridge and immediately took a pic. Hence the dry, crumbly look.

I have since used the healthy butter in muffins and cupcakes as well. They all bake fine.

Tear Drop Eggless Shortbread Cookies
I chose a slightly healthier version
1. A mix of APF & whole wheat flour (3:1)
2. A mix of butter & olive oil (the healthy butter above)
3. Only about 75-80 g of the butter & oil mixture.
Frosting would've improved the look, but added calories, hence not applied ;-)

As the visual show, baking is not my forté . My cakes and muffins come out great in taste, but cookies & biscuits have a love-hate relationship with me.

That’s it for this month.
I did overcome a personal challenge by finally being comfortable with designing 2D tatting patterns. Simple and small for now, but I felt the barrier lift. This month will always remain very special to me – my shuttles are actively tatting up little medallions and motifs, yay!

To see some really special stuff, though, let’s all hop over to our talented group (you are welcome to join in any time; simply pick a monthly pin from pinterest !) :

happy pinning :-)

Monday, 26 September 2016

TWoT-1


So, here we go ! The TWoT series begins !

This Way or Tat?

Read the Preface here.

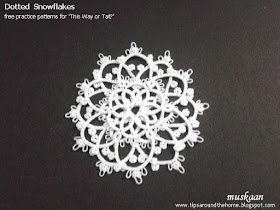
The Introduction consists of : bullet points to give an overview ; snowflake patterns (2 versions) as a practice or baseline piece ; and a worksheet or table to jot down your observations.


These Dotted Snowflakes have been designed specifically for this series to establish a sort of personal baseline. You can choose to tat any version or continue to tat whatever you have on your shuttles. Just be mindful of the way in which tatting is progressing at each step.

The table will give you an idea of what to look out for. This is a prototype table. You can use, alter, adapt it as you wish. 
I think the table itself , or a modification thereof, can be used by tatters & designers to keep track of any new project. I know I’ll be using it for my future designing !!!

These and future patterns for this series will be fairly small, simple, quick to tat.
Any resemblance to known patterns is purely coincidental and unintentional. I have not referred to any pattern, any stitch count, but one can never be sure of the subliminal influences and inspirations that seep in. 

Both are tatted in Anchor size 40 thread and measure 2½”

This 2-round pattern can be tatted in one pass.

In Round 1, the starting ring has a ¼” picot to which the 5 rings will be joined.

How to Estimate the Length of a Central Picot ?

Thread size, tatting tension, etc. make it difficult to standardize the length, despite a designer's best efforts. 
A thumb rule has emerged (but needs more confirmation). 
TIP :    length of central picot = 1DS span/width for each future ring.
Make the picot loop and fold back along the first part of ring. Going along, if 5 more rings need to be attached, the folded loop should span at least 6 DS ie. it should be 6DS wide. 
Similarly, if there are to be 8 rings around a central picot, the picot loop (doubled) should span at least 8-9 DS.
If you are tatting these snowflakes or any similar medallion, what has been your experience ? I would love for you to experiment and confirm or reject. Please do share.


In Round 2, I have deliberately used both dots & Josephine rings in this pattern. Interestingly, they have the same total half-stitch count, yet the JR is larger than the dot, as I had discovered here ! Dots are very small rings with normal double stitches. Now you know why the snowflakes got their name! Perhaps 'Dotty' would've been more appropriate ;-)

Both versions stacked together :
Love the way the 2 snowflakes stack up! Idea for a new version, using both ?!!

Download the complete pdf of Introduction to ‘This Way or Tat?’ here.

Set 1 (Rings Only) will be uploaded in a week's time. 

Feel free to ask any questions. Your feedback, criticism & inputs can benefit us all. Please take a moment to share your thoughts and observations. 

happy tatting :-)

Related Posts :


Wednesday, 21 September 2016

In the dark of night , quo vadis ?!

(this post has two parts - scroll down for a preface to a soon-to-be-posted series)

Well, no, I wasn't tatting in the dark, but the light in my brain/mind was surely switched off! How else can this be explained, how else can it be rationalised ?! This is the third snowflake in a row that has a fraternal twin !!!


Reflected Nights
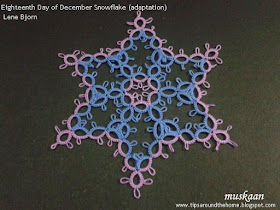
Pattern : Eighteenth Day of December Snowflake
Designer : Lene Björn
For : 2016 Snowflake Challenge on Craftree
So happy was I to have finished one WIP, and so eager was I to strike it off this list. Sat down to write the post and while referring to the book, a glaring mistake dawned on me!

True, I was tatting this in very short, interrupted spells – a ring here, another there.
True, I was getting a bit uncomfortable following the sequence.
True, I had been having trouble with the inner trefoil cluster - kept wondering why there was so much overlap.  Cross-checked not once, not twice, but almost every time ! Yet no light shone through :-( and I put it down to the joining picots being too small.

Sigh, nothing to it but tat again. There's a saying in Hindi idiom that fits in perfectly. It basically bemoans the fact that at a time when one is totally broke (financially), the dough (flour/food) too gets ruined. In my case, I was ‘broke’ for Time.  

Might as well make the most of it & bring in a bit of change. But first things first ….

Materials used : 2 shuttles; size 40 Anchor cotton (blue-4054-00131, lavender-4054-078); picot gauge (⅛th inch vertically or ¼th inch horizontally).
Techniques I used : directional tatting (RODS – reverse order double stitch), rings, split rings (SR), double core single shuttle split ring (SSSR), turn work (TW), switch shuttle (SS)

The Mistaken One !
As others have noticed, it is simpler to start with Ring 2, then Ring 1 (both normal rings), & continue thereof, all tatted in one pass, from the front side.
The inner round is worked clockwise while the outer counterclockwise.

To tell you the truth, I had started this snowflake in green & cream ! And I took a printout of the pattern in order to play with colour placement. The different rings (normal, SR, double core SSSR) were also marked on the sheet. Since I kept making mistakes, & unknotting, retro-tatting, this was boxed & I picked out 2 different colours more in keeping with my darkening mood.

I was working with 2 colours, hence all 6 innermost rings are SRs.
To climb out to outer round, 2 rings were worked as double core SSSRs, enabling me to hide (encapsulate) the lavender & get all-blue rings.
To work the rings at the tips, TW, SS, RODS ring, TW, SS & continue.
Shuttle 1 with blue thread  consumed 1 full bobbin load ; Shuttle 2 with lavender used up only half a bobbin.
Measures : 3½” 


The Un-Mistaken One !
Measures : 3¼” 
Switched colours to see effect.
Tatted outer round in clockwise direction.  Yay, worked really well !!!! The tatting went much faster & smoother. Mental grasp was easier, too.

Used the picot gauge horizontally (parallel to the core thread). Again, worked much better than vertical, especially since the thread was not easily visible.  When I first did it for the Elizabeth medallion, it didn't appeal much! Goes to show that one can always reset one’s comfort zone. Perhaps when working with finer thread, it is advisable to use the gauge horizontally ? What is your experience ?

TIP : One interesting observation : In first snowflake, when tatting went counterclockwise, the outer ring at tip had to be worked in RODS ; in this piece, where tatting was in clockwise direction, the ring at inner end had to be worked in RODS.
Both snowflakes together …. love the effect ! In above pic they are placed on a chikankari saree with mukesh work. Below, the correct version is placed above the 'adapted' one.

Related Post : double core SSSR


Quo vadis ?!
This Way or Tat - Preface

For the above two snowflake repeats, I deliberately chose to tat in a different direction. (And it threw up interesting ‘changes’ when combined with directional tatting, as pointed out in the TIP). I had experienced the same discomfort when tatting the Melt into Spring Snowflake in counterclockwise direction as the diagram called for.After snipping and re-starting in clockwise direction, the tatting went very smoothly.

But have you ever faced this dilemma where you Think you are going to be tatting a row/round in one direction, but turns out it wants to go in the opposite direction ?!
I have had this encounter many a time, in projects that have multiple rounds, irrespective of whether I was tatting with regular double stitches throughout or with directional tatting; whether I was cutting off the thread after a round or climbing out. All four of my Renulek’s doilies are witness to this dilemma and I have detailed my direction enigma for most of them.

Always wondered why, but it was my Scarlet O’Hara moment ‘hmm, I’ll think about it tomorrow’! Well, many tomorrows came but no thinking ensued. After all, an experienced tatter can easily make the shift - much easier to do for a simple symmetric pattern, but can be done nevertheless. 
That tomorrow finally arrived when a question was forwarded and I had to sit down and really think about it. 
Started with a few illustrative diagrams, it soon stretched to a series of diagram sets detailing situations and options. It even led to the discovery of some common rules/observations and the factors that affect the outcome.

But before I start with the 'This Way or Tat' series, the following scenarios might strike a chord somewhere?
  1. Whatever you are tatting right now, which direction is your tatting going ? Seems like a simple question, but there are 2 answers/parts to it. I’ll let you figure it out for now.
  2. Are you working directional tatting (frontside/backside with reverse order of double stitch) or simple double stitches all through? Do you think the former would make a difference to the direction of progression?
  3. Do you sometimes use direct tatting (reverse or unflipped or wrapped stitches as when working the split ring)? Have you noticed any difference in direction?
  4. Has it happened that the pattern/diagram calls for you to take a certain direction, but you find yourself tatting in the opposite – either deliberately or accidentally ?
  5. Have you faced the same dilemma when you climb out of one row/round to the next using a split ring or split chain? You thought you’d be going this way, but the shuttles are wrongly positioned?
  6. In multiple row/round patterns, how would two colours be positioned for next round after we climb out with a split ring or split chain?
  7. Similarly when working with colours in regular tatting. Have you wondered how to get the right colour in the right position/element ? There are some that flow naturally in a certain direction but in others we use a SLT. Are there other techniques or tweaks that could accomplish the same? How to decide what to employ and when?
  8. Would you much rather work from the front? How will the traditional pattern behave and how would we apply our choice?
  9. Do you sometimes wish the pattern diagram had given some indication of the direction in which to go?

If you think these questions deserve answers, and the answers interest you, look no further. I will start posting soon, along with practice patterns for all who are interested. The first post will be an introduction to the document with a quick practice pattern where the tatter can choose her/his own path since I will provide only the stitch count with no other instructions.

Are you up for the challenge ? Do I hear a resounding YES ?


happy tatting always :-)

UPDATE (Oct 8) : INTRODUCTION pdf with exercise posted here
Set I - RINGS ONLY post with pdf
Left-handed tatting by Eliz Davis


Friday, 16 September 2016

where Am I ?!


I'm kind of mired, pleasantly so, in a lot of WIPs! The web of WIPs has me snared in such a maze, that I wonder where I am at !

Let's see if listing what I remember will create some sort of organisation in thought & prioritisation in action..... may be you can pick what you want to see first ?

Common Threads series
  • Common threads III - all pics taken long back.  Needs to be textualized & pics notated.
  • Common threads IV - wanted to take different route, by tatting a collage using all similar techniques in that composition.  Tatted this tiny grape bunch below, but pics revealed bare thread :-( Need to restart.

2016 Snowflake Challenge
  • Day 7 needs to be written, pics notated, and posted.
  • Day 18 in progress.
  • 14 completed, 1 WIP, 9 to tat with 3 months remaining.

Bookmarks
  • One free-styling bookmark completed long back, which I hate for many reasons.
  • One bookmark almost at end, tatted mainly to use up various practice pieces. Want to snip off the last segment & tat with finer thread.
  • One bookmark on filet tatting needs to be restarted, using size 40 thread this time.
  • One bookmark in ideation stage – for a book I recently read (design based on the book).
  • Latest bookmark started - love how it will probably turn out. An extension of a dear friend's motif. Have made drawing, then cutouts to ensure correct placement & attachment. This is how far I've reached ....

Books I've read
  • Want to share some enjoyable books I've read this year - many are direct or indirect recommendations of dear online friends. Lots in my thoughts, but how do I find the time to write a post ?!
  • Also need to take pics of last read novel & the short stories I am currently reading.

More tatting & posting
  • Floral Fantasy Doily – shelved for the present … need to work out the last round to include my placement of colours.
  • Snow Doily – final rounds to write about & choose pics (there are so many !) to post.
  • Nina Libin’s gorgeous earrings. I intend to tat them again to do a better job, hence held off on posting
  • Experiments with filled-in rings, picots, etc. etc. Can’t even remember all of them :-(
  • Many more snowflakes tatted last season, including a by Teri, Wanda, Amanda, but not happy with some of them.
  • Joins in Shuttle Tatting Series – collected all info & material but need to tat samplers for the Part III & organize the text.
  • Many blog post ideas yet to see the light of day.

My tatting patterns
  • Want to share a beaded bracelet pattern. Models & pdf ready. Need to work on blog post. It was part of the goodie bag at Palmetto Tat Days (thanks for this opportunity, Georgia)
  • A new snowflake pattern – designed on Inkscape. Tatted round 1 & hope to tat second round tonight. Happy with it so far.
  • An edging (designed in mid-2014!) that can perhaps be converted into a rectangular doily. Did a very small initial trial, but haven't worked on it further.

Inkscape & 2D tatting designing
On a more positive note (a major culprit of my recent distractions) ...

I've gotten pretty good and quick with Inkscape diagramming over the past few weeks! I've discovered & devised many shortcuts for myself! A real silver lining, coz this has helped me break my glass ceiling for regular 2D tatting ! These are still simple patterns but hope to gradually progress to larger &/or more complex designs.

Here’s how it went …
My next post was to be a diagrammatic compilation of the direction that tatting takes in different situations (a tongue-twister that !). As it developed, I decided to include ‘play-sheet’ which comprised of commonly encountered motifs in doilies, etc.

As I got more proficient with drawing, many new patterns emerged including a heart, edging, medallions, and the WIP snowflake. Just in time, too, for snowflake season !

I am now confident of converting many of my tutorials/patterns into diagrams over the next year !!!

* * * * * * * * * * * * *
Above are my more 'recent' WIPs – ones I can remember right away. (I’m sure to find a great many more if I scroll through my albums & files). Others include posts about my
  • Memory Afghan (crochet) &
  • Legwarmers for my MIL (knitting) & tons of older stuff.
  • And not to mention the monthly Pinterest Challenge – still haven’t gotten around to doing anything this month !
* * * * * * * * * * * * * 

I realise how dreary & unexciting this laundry-list sounds. But we've all been there, and know that you will empathise. Lots to write but not much to write home about :-(
Hopefully this list will give me the motivation to strike them off the list. Notice that I haven’t included any of the want-to-tat inspirations that you talented bloggers keep posting ;-) So the quicker I shorten the above list, faster I can start new projects, yay! 

happy tatting always :-)

* * * * * * * * * * * * *

Most links to projects & series can be accessed from
My Tutorials  and
Or by clicking on the Labels listed on right panel
See, I'm trying to save time here ;-p


Wednesday, 7 September 2016

multiplier effect of mistakes !


Doubling the Fun …

Mistakes can double the enjoyment; can double the opportunity. That's the reason you see 4 'snowflakes' instead of the desired 2. There is a common thread running through both ‘mistakes’ which involves a thread size mismatch.

The Snowflake Within
Remember ‘The Flower Within’ series where I tried to highlight the flower within various snowflake patterns ? Well, this time I reversed the trend, trying to bring out the snowflake within – oh what a cold heart this snowflake flower has ;-)
The Twenty-First Day of December Snowflake
Lene Björn

Threads : Anchor embroidery 4615-1335 ; Anchor MCC size 40 (4054) black & white.
Techniques : Josephine Rings (JR), thrown/floating rings, Lock join (LJ), Catherine Wheel join (CWJ), directional tatting, 2 shuttles

Mismatch of threads !
 
I started with 2 strands of the variegated embroidery thread . Only one black JR could fit in the cramped center space! Further, the size 40 white in Round 2 was much stiffer & thicker. Made a few stitch adjustments - decreasing chains by 1ds. Interestingly, black thread is 'normal'.
Yet, I realized that continuing on to Round 3 with 2 strands would’ve definitely cupped the piece. It was looking so pretty, that I went ahead to complete the present round, and stop at Rnd 2. I like the smaller size as well – just over 2 inches.
Measurements : Rnd 1 : ¾” ; Rnd 2 : 2¼”  

 
Started a new one right away, this time with 3 strands of embroidery thread along with the size 40 crochet cottons. Went smoothly & lay flat.
Measurements : Rnd 1 : 1” ; Rnd 2 : 2½” ; Rnd 3 : 3¾” 

TIP : I used 1 CWJ to anchor the trefoils in Rnd 3. This was counted in the chain stitchcount. Experimented with placement, & found that it did not matter whether the join was made before or after the trefoil.


  • Perhaps the JRs in last round could’ve used fewer half stitches. They are too close to each other; compounded by variegation it all looks too dense & busy :-( 
  • This is a great pattern to showcase fancy variegated threads or expensive HDTs because a lot of the tatting is on chains. 
  • One thing that escapes me is why the black JRs seem to fill the inner space. Need to see whether it is a matter of using 2 different threads/colours or just my own tatting goofs.  


The Twenty-Second Day of December Snowflake
Lene Björn
I’ll start with the correct version (left one in pic), and then recount my mistake, which of course occurred prior to this & was shelved for over a month.
Threads : Anchor Mercer size 40 (4054) – black, tinted pink – 1203, & green - 00229
Techniques : Josephine Chain (JCh), thrown/floating rings, Lock join (LJ), Catherine Wheel join (CWJ), 2 shuttles
 
  • A Lock Join causes a slight dip in the chains & this would’ve given a more petal-like effect in round 2, but with the black core thread blip showing. In order to avoid this colour blip, I chose to do a CWJ. 
  • Again, as in previous snowflake, it made no difference whether CWJ was made before or after the thrown ring. CWJ was counted as 1ds here.
  • I couldn’t get the star-like points that Lene has in her tatted model. Probably had to do with smaller size of green thread. 
Measurements : Rnd 1 : ~2⅜” ; Rnd 2 : ~3¼”  
  • For the Josephine Chains, I went for a mirror effect, using all 1st half stitches on one side, a very small picot, & all 2nd half stitches on other. (In the correct version I did the opposite - shs on the way up & fhs on way down).
  • The pattern doesn’t call for a vsp since the thrown rings are on the Josephine chains of round 1. Since I wanted to play with colours, the ring was thrown to 2nd round & a vsp was needed in round 1 for joining.
  • This is a pretty straightforward pattern. However, to keep tabs on the half stitches, I drew tally marks for every 10 half stitches, while dropping & 'posting' the shuttle after every 5 !

Now for the "forced adaptation" due to mistake in first attempt ....


The Heart Within
Day 22 adaptation

Doubled Up !!!
So here’s what happened … I got confused about the stitch count for the Josephine chains & got no answer when I asked on Craftree. Was the number meant for each side of the chain or for the complete chain ?! I went with the former, resulting in Double the chain lengths !!!
This pic shows the correct version on top. Inset, to the left, is round 2 which required doubling of the stitches too.
But doubling also brought an opportunity to try something different.
I played around with the long Josephines (they actually looked like a large flower - it is over 4" wide across)! Folded them over, and I saw Hearts being formed !!! 

The collage showcases the process I went through - very very fiddly, since this was an afterthought. If one has to make it again, one can add picots for joining & securing as one tats. In the collage below, I used sewing thread to join temporarily, snipping it off in the end.
In this case, though, a mismatch in thread sizes actually came to the rescue ! It is probably the first time I’ve tatted with different thread sizes in a regular pattern. The larger size 20 for round 2 helped me keep the same stitchcount that was used for size 40, but it spanned the distance & avoided the cupping issue. Easier to change thread size than to rework stitch count.
Threads : Anchor Mercer size 40 (4054) – black & tinted pink – 1203 for round 1
Size 20 vintage maroon (022) & black for round 2. The new black thread is much thicker than the vintage thread.
Techniques : Josephine Chain (JCh), thrown/floating rings, Lock join (LJ), an adaptation of Join on Smooth Side (JSS), shoe lace trick (SLT), very small picot (vsp), split ring (SR), reverse join (RJ), 2 shuttles
Measurements : Rnd 1 : >4” before folding ; 2½” after folding . Rnd 2 : 3¾”  


Pattern for Round 2 of adaptation :

Shuttle (SH) 1 – black ; Shuttle 2 – maroon
abbreviations listed in Techniques above ; fhs - 1st half stitch ; shs - 2nd half stitch.


Join to a folded arm of chain from the previous round . (refer to enlarged pic above)
With SH1
Ch : 6, 4shs, vsp, 4fhs, 6. JSS to next arm BUT instead of completing the JSS with a shs, make a SLT in order to switch shuttles.
With SH2
SR : 8/7 .
R : 8-8 .
SR : 8/7 . RJ to next arm thus switching shuttles.
Repeat from chain all around.

NOTE : If only 1 colour is used, simple LJ can be made instead of JSS & RJ. The latter were used only to regulate the colour blip.


Okay, I’m off now … apologies for boring you out of your wits … but you know I’ll never learn ;-p

happy tatting
&
happy Tat Days to all who are attending