Pages

Wednesday, 29 April 2015

Tatting Tutorial : Layered Rings Part 1

Ninetta’s Layered Rings in Modern Tatting
Original Pattern : Thérèse de Dillmont  Plate V, Fig25(click for pattern details)
(pamphlet, 1956. Courtesy TOTC)

This tutorial has turned out to be quite in keeping with the term ‘Layered’. As I went about organizing tatting & taking pics , & then sharing the pdf with Ninetta, she realized that I was doing it differently than what She had diagrammed/done ! So it turned out that this modern method can be accomplished in more ways than one ! Yup, layers upon layers …

I have not been able to make & photograph Ninetta’s method yet (will do so in the next post ; it includes joining 2 picots at same time & some tips from her). But in order to avoid more delays, I will share how I understood / interpreted her diagrams especially for tutorial purposes & made the motifs through step-by-step pics. While making the 2nd motif repeat, I have shared another method (all front-side tatting that I used in my earlier trials here ). I have tried to incorporate as much as possible within the stepwise pics itself, with notations. I will also include & upload pdf versions to all methods in the next post.


Here, then, are step-by-step instructions on how to tat Dillmont’s Layered Rings 
by applying modern techniques to a vintage pattern, & doing it all in one pass.

Techniques Used :
2-shuttle tatting
“Floating Ring” variation that converts to a Layered Ring
Mock Picot
Split Ring
Normal Join/Down Join (optional or as required)

I have deliberately used 2 colours so that the progression & split rings can be easily identified. Some pics show both back & front views in order to show comparison, etc.; these have been indicated in the pics to avoid confusion.  Done in size 20 Anchor Mercer Crochet Cotton.
TIP : Make the central/floating ring picots longer than normal. This space is what lifts up the centre from the petals nicely & visibly. For clarity, picots are labeled A-D

Ring 1 is a Split Ring


When making the 1st SR of each subsequent motif, it is easier to 'split' the working into 3 parts (Figs13-16): 

1. Start with Sh1 1st half 6-4.
2. Make complete 2nd half of SR with Sh2, including the FR, and the last 2ds.
3. Go back to 1st half - join with FR and make the last 2ds. Close ring. 


 Figs 18-21 show another method of making & attaching the layered rings. This involves tatting from front/top side only ! The entire motif can be accomplished with frontside tatting, without any need to reverse or turn work. 


Can you begin to see the many possibilities of just this One pattern ?! Just playing with colours & the climbing-out Split rings can give you a wealth of options – linear, squares, rectangles, hexagons, zig-zags, etc. etc. (Fig 25 below, may give some idea. Numbers indicate which ring followed which one ....)
One can alternate colours of central ring as well as petals !
The Floating Rings can be shifted to Between Petals to get 2 layers/rounds of petals simultaneously – a layered flower !


Thank you, Ninetta, for your excellent adaptation of vintage to modern, 
for sharing the same, & for permitting me to share too :-)

Also in the works :
Ninetta’s method for making the Layered Rings And
her innovative Curled Rings with many options

UPDATE : Part 2 of Layered Rings tutorial - Ninetta's method


Sunday, 19 April 2015

Embroidery 2 : Shadow Work

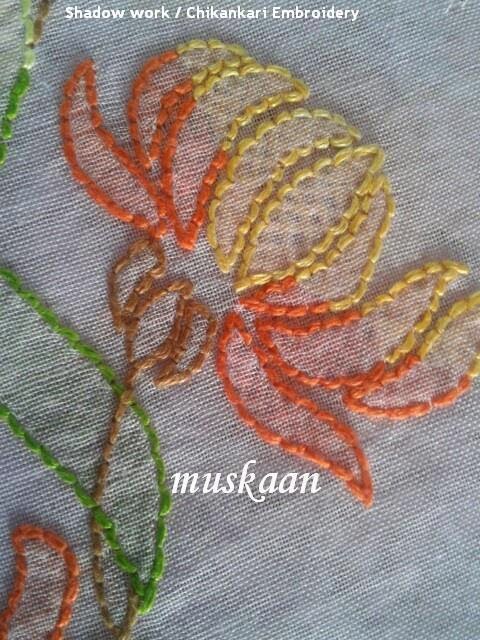
Shadow Work / Chikankari Embroidery 
on Organdy Saree

Extreme Close-up of  part of  motif
Time to take a mini break from blogging about tatting :-p 
Please excuse the poor quality of photos. These were taken 2 years back when my photography skills were worse.

Pattern : Original Source unknown. Modified patt C from Plate #56 below (my own collection).
Fabric : Plain Lilac coloured Organdy saree 6 yards (bought from Hyderabad, India. Semi-stiff quality)
Thread used : Anchor Embroidery Threads (Anchor cotton floss) in brown, dark purple, & 2 shades each of green, yellow, orange, blue.
Strands used : 2 strands.
Stitches used : This is in the style of Lucknow Chikan embroidery or Chikankari, also called Shadow work or Shadow stitch. It appears like a parallel row of Back Stitch (or Double Back Stitch) in the front, & Closed Herringbone Stitch when seen from the reverse side.
Back stitch
Eyelet Stitch / cutwork (with couching) 

Single Motifs

I altered the original pattern just a tad, moving & realigning the lower left flower to the top, so as to get a continuous trellis when repeated. 
Thus each motif consists of 4 flowers lined up in decreasing size.


In the pallu area, each motif is used separately, with a different colour (yellow, orange, blue), 
in sequence. (This sequence was maintained throughout the saree)
I think I did 3 motifs per row, with a phase shift between rows, & 4 rows in all.   
For the pallu edging, I added a very simple scalloped braid using purple shadow work


For some shading, since there was no variegated or shaded thread, I used 2 solid colour shades (light & dark) in some petals.

Trellis

The same motif was mirror-imaged & alternated to create a long trellis of 4 repeats. 
Flower colours are alternately used, within each repeat (yellow, orange, blue).
  
Flower colours also alternated between trellises. So if one trellis started with a yellow flower at base, the next trellis started with an orange & the 3rd with a blue, repeating this sequence. I made 7 or 8 such trellises, with these motifs climbing up to ¾th the width of saree, at a slight angle .

TIP While embroidering a colorful pattern/design, use multiple needles, each with required colour, for quicker & easier work.
I even separate the skeins & cut out the desired lengths beforehand, knotting them at one end & winding them around a piece of cardboard/bookmark with a slot at one end to keep the threads from flopping around & getting all entangled !
Stitches
Added a tiny cutwork area in centre of large bottom ring, surrounded by purple thread. I did this in the Lucknow Chikankari style/stitch or the Eyelet Stitch, not blanket stitch, using only a single strand of thread here, with very close stitches couched over a running stitch.
Upper end of one Trellis
I used Back stitch, instead of Stem stitch for the stems, to keep the work in sync 
with the shadow work (double back stitch) outlines.
Everything was embroidered from the front side .

View from the Rear !
Extreme close-up of reverse side
I actually prefer the reverse side of shadow work to the front side ! As it is, if asked to choose a single favorite, my all-time go-to filler stitch would be the closed Herringbone stitch.
Pics from reverse side show how I went about the 'shaded' effect. using only single-shade threads. 
And I like to keep everything neat - front & back ;-) 
After each knot, I tuck/weave the thread under some of the stitches to keep it neat And durable.......
Even after 2-3 years’ usage, none of the thread ends have slipped out. Neither are the thread ends & knots visible.
 
I tried to avoid long crossing-over threads for fear they might show on the right side, 
as well as to prevent accidental snagging. 
If it was necessary, then usually the thread was woven back through stitches, 
to a point where the ‘carryover’ would be a much shorter distance. 
This can be accomplished easily enough : study the motif carefully & decide on the best place 
to start with minimal carry-over threads & smooth flow of embroidery between petals.

Thread
What I could not capture in my limited prowess with photography, was the pale purple/lilac of the saree & the rich elegance of the thread.
I love Anchor threads ! These are colourfast, retain their elegant, understated sheen even after long usage & many washes (these pics are after 2-3 years’ usage), easy to work with. Have been using them since the day I learned to embroider, with no complaints whatsoever !

This sari, a gift to my MIL, was embroidered almost 5 years back when I still had normal vision ! 


Tuesday, 14 April 2015

parallel tracks

Ninetta’s Rings !
Update : Ninetta has called her invention/technique Curled Rings, here
A pendant from a floral beginning !
Parallel tracks. Or maybe ‘multiple tracks’ would better describe the scenario.
I’ve been sidetracked by a “sidetrack” even as I was working towards an upcoming deadline, besides the stalled progress on the Wiosna doily and my Inkscape diagramming !!! Make sense ? Well, let’s unravel it a bit…focusing on 2 main tracks

Track 1
While I waited for the ‘survey’ results of my colour dilemma on Renulek’s Wiosna doily, here, I took up sewing as a means of distancing & distracting myself. Among various odds & ends, I needed to sew a nightie as part of an anniversary gift. Hence a deadline awaited. Almost 2 Years back, I had tatted a broad lace for sleeves, for myself. But now when I decided to use them for my MIL they needed one extra repeat each. So got down to it….

Track 2
But it’s never that simple, right ?! I admired Ninetta’s inventive folding of rings here, but got literally “sidetracked” by the edging here . I just Had to give the technique a go.
In my very first attempt, the yellow ‘flower’ is folded horizontally a là Ninetta. But I can never let things be. So for the green ‘leaf’, I tried to fold it vertically. Well, it didn’t turn out neat (some of it only showed up later in the photograph close-up, boohoo), but it is definitely do-able . Size 20 scrap pieces of threads used & finger-tatted.


Track 1
Went back to my sleeve lace & completed the flower motifs.
While the motifs are done, there is still a lot of finishing in terms of joining, adding & extending edgings, as well as bringing it all together for the nightie. Not to mention the actual cutting & sewing of fabric, then attaching all the tatting to it! More on that in the future ….
But before getting to the attachment & lace, my itching fingers & overactive brain got the better of me.

Track 2
This time I took up size 40 threads, intending to make a proper 3D flower, with a brown centre & yellow petals. (I still have limited colours in size 40, & didn’t have the ‘time’ for silk threads, especially in a learning trial).
But here, I did not fold each ring. Instead, made 3 brown rings & then pulled out the thread through all 3 picots, made a Lock join, & got them folded.
Similarly, for the yellow ‘petals’. Made 1 large ring (52 ds total), then one onion ring, then another large ring (where the picot was a bit offset, not in center). Again, I pulled out the thread through picots of all 3 rings together, secured them with a Lock Join to form folds.
Extremely difficult to photograph the minute 3D piece!
Each ring folds differently ! I tried various angles to capture that, but it does not come through.The camera lens may capture finer details (& all the errors!!), but the reading glass lens captures the wider, bigger picture.
Now it was time to finish off the piece. For this, I made 3 concentric/onion rings in 2 colours :
Folded them over. Hey, it looked like a pendant !!! Sewed on a bead (sorry, Jane ;-P. sewing a bead later works when it wasn’t preplanned or intended. Read her valuable input here ) , inserted a gold chain through the folded triple onion rings… (The yellow rings could've been larger still, or the brown ones a bit smaller) 

I apologize for the not-perfect, not-professional depiction. My only excuse is that I like to share ideas ASAP & don’t have the finesse for either colours, or tatting. But I do hope that some ideas will strike up more ideas & some creative tatter will pick it up to create exquisite pieces …

I believe that there is Tremendous potential in these Curled / Folded rings 
for 3D tatting, freeform stylized work,  jewelery, etc.

Okay, now it definitely IS time to get back on track. The Wiosna, though will have to wait for another few days, till I get the lace tatting & nightie cutting & sewing done. (A whacky idea for the Wiosna is causing eddies in my brain. It's a fun idea, but will definitely hurt the sentiments of purists, hence I hesitate to share it ....)


Jumping Tracks
Oh, and I almost forgot of my earlier foray into another learning Track (jumped tracks from the Wiosna to this). Again, thanks to Ninetta’s diagrammatic pictorial that she so generously shared here . She applied modern tatting techniques to a vintage pattern.
It took some getting used to (both the diagram & the tatting) ; the 1st 2 motifs were a bit fiddly & I made some error in following the directions in the diagrams. But the 3rd one came out right & her diagrams are truly brilliant.
I also realized that picots on the Floating Ring should be made longer than normal for the centre to lift itself vertically.

Ninetta's Layered Rings
For the 4th ring, I tried a Josephine Ring (JR) as a floating ring (FR). While it should’ve been larger to show the characteristic undulating effect of a JR, there is still a perceptible difference between a regular FR & a J-FR. The latter seems to curl inwards, & the former seems to stand up more.

 I hope to use this technique, too, someday

My sincerest thanks to Ninetta (((hugs)))
for sharing her tremendous talent & innovation
All the discrepancies & limitations are solely mine.

Happy tatting :-)


Motif #17/II for 25 Motif Challenge