Pages

Tuesday, 31 March 2015

'coz we are tatters


On International Tatting Day, 2015,
this nonsense verse is dedicated to us, the quirky Tatterati !!!


'Coz We Are Tatters 

The room is all a-clutter
The family a-grumble,  a-mutter,
But my heart is still a-flutter,
Stashing more thread is all that matters
'Coz I am a tatter.

"That money's for food !"
Oh, honey, I'm sure we're good.
Need a new shuttle in wood
Diversifying my collection is all that matters
'Coz I am a tatter .

There's a new book online
Well I mayn't tat a design
But that book has to be mine
Stocking my library is all that matters
'Coz, peeps, I am very much a tatter !
                     (muskaan . March 2015)

Make lace, not war :-D


Earlier today (31st March), Patty D, in a Craftree thread, wished that "there was a Tatter's Song". That’s when my brain went into overdrive ;-P   Well, I couldn't belt out a verse on tatting,  but tatters & our obsession with collection did emerge .

Feel free to use it as you wish (with credit).... spread tatting and good cheer today, and always :-D


 Chat 'n' Tat 'coz we're the Tatterati !!!


Sunday, 29 March 2015

and options

Renulek’s  Wiosna  Doily 2015
Rounds 8 & 9 


Last year I was amazed at how the same doily pattern, Renulek’s Spring Doily 2014 (my version here), took on a character of it’s own, changing appearance with the colour choices, placement choices, etc. that each tatter made.
But tatters don’t just have the option of colours, threads, & thread sizes. We can also make choices with regard to which/what technique to apply to each round, to best suit our requirements & our comfort ! Many paths to the same destination :-)

I have just started on Round 9 & would’ve ideally posted only after completion. However, since this is a tat-along, & there seems to be some interest in my earlier tips, I decided to upload my thoughts so that they may be of timely help, if required …. as it is I started late & am lagging behind ;-P

UPDATE (March 10, 2017) : For a simpler working of Round 9 see pictorial here with options for different colour placement,  too.

This is what worked for me for Round 9 of the Wiosna

I have used single colour for entire round. Hence both shuttles are loaded CTM.
For those using 2 colours, you may switch colours using the SLT wherever necessary. Carollyn has posted some excellent how-to pics for 2-coloured Round 9,here.


Firstly, some pointers :
  • Work this round counter/anticlockwise ! While all previous rounds were done/could be done in clockwise direction, this one Has to be tatted in opposite direction.
  • It requires Directional Tatting. Hence a knowledge of Reverse Stitch (also called 2nd half of Split ring method, lark’s head knot,  unflipped stitches/hitches, encapsulation, etc.) is required.
  • All tatting is done on the Front Side Only. Do Not Reverse Work at all !!! I learned this from tatting Teri’s Dandelion Chain Link Bookmark here.
  • If one is not too experienced with this type of tatting, it is best to use single colour, so that any small mistake will not be easily apparent.
  • I always find it less complicated to use 2 different types of shuttles since it is easy to keep track of which is Sh#1 & Sh#2. Or else, mark them.
  • Lock Joins are made with the shuttle closest to the joining point.


The Process (Directional Tatting)

To Begin :
*** With Sh1,
Ring : start with the central ring normally (ds) . Close ring. Switch shuttles.
       With Sh2,
Ch1 : Reverse Stitch.  LJ with Sh1, to ring picot.
Ch2 : Reverse Stitch.  LJ with Sh1, to ring picot.
Ch3 : Reverse Stitch.  LJ with Sh1, to base of ring.
Ch4 : Normal ds , join to picot on round 8, continue ds chain.
Switch Shuttles. *** 
Repeat from *** to *** till end (72 total motifs/repeats)

The first ‘motif’ is complete. For all subsequent repeats, the 1st side chain will be joined to the adjacent previous side chain in this manner : LJ with Sh2, to chain picot UPDATE : As pointed out by Ninetta in the comments below, instead of a LJ here, one could easily use the Split Ring or Lark's Head Knot Join. That would not only bring about neatness, but keep the core thread in play. Thanks Ninetta :-)

Continue in similar fashion for rest of the round.

To Summarize :
Work Only the Ring with Shuttle #1, and the Lock Joins to ring from the 3 chains going around it.
All the rest will be tatted using Shuttle #2 – the 3 chains around the ring, the chain joining to previous round, and the Lock Join when connecting to chain picot on previous repeat.


I am thoroughly enjoying this round – both for it’s beauty , the colour I’ve chosen , And for the option of using yet another technique learned earlier. The only minor irritant is that one has to unwrap the chain thread from one’s pinkie to make those LJs ;-P

Abbreviations used :
CTM – continuous thread method
SLT – shoe lace trick
Sh – shuttle
ds – double stitch
Ch – chain
LJ – lock join

Just a couple of lines regarding Round 8 :
It is a simple round, which can be done with single shuttle & ball, although I went with 2 shuttles.
I added a tiny picot at base of each chain (after 1st ds & before last ds) , joining adjacent chains for better anchorage & stability, just as I did in the previous round 7,here.
I’m not too happy with the long chains – there is some ruffling – but  am hoping that Round 9 will flatten it out.

And to repeat, there is no Single correct way of tackling round 9. One should choose what one is comfortable with. This can, however, also be a challenge to learn new techniques & applications.

UPDATE :
Well this post Is about  Options!
Optional  Process (Traditional tatting) :
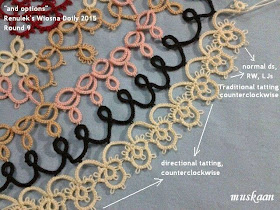
Bernice mentioned in the comments below, that she was also working counterclockwise but was reversing work. This morning, as I continued my directional tatting, it suddenly hit me that this is Essentially the Same ! All I was doing was tatting from the front with no RW, while Bernice was tatting ‘normally’ ie., with normal ds & hence had to use RW.
I had to confirm it of course ;-P Yes, it worked great (the last 2 repeats in the pic). Looking closely, I think, in fact, these turned out better looking than the previous ones !


Note : 
Ring is made on the front side of the doily. Hence when work is reversed, we are on the backside, & you might need to make a Down Join to avoid colour blip if working with 2 colours.

Also, use SLTs when required if working with 2 colours. Carollyn has demonstrated this.

So, when one looks from the front side, one is tatting Counterclockwise, but with normal ds. 
In fact, if using a single colour, then one can even work with 1 shuttle & ball through the entire round, by doing just 1 SLT before each ring.

The ring is like a Thrown Ring - a ring on the long chain! 

Another option -- if working with 2 shuttles & single colour,  every alternate repeat will be made by the next shuttle.  If you started with Sh 1, next repeat will be with Sh2, then 3rd repeat with Sh1 and so on.  No SLT required. 

The Process
Make Ring . RW . (you can see the solitary ring in the pic on top right)
Work Ch1 & join to previous repeat (ch picot) using a Down Join.. LJ to Ring. DNRW.
Ch2 . LJ to Ring. DNRW.
Ch3. LJ to base of Ring . RW .
Long Ch . Join to previous round. ……


Please feel free to share how you are tatting/have tatted this round. Ideas multiply when we share :-)
happy tatting :-) 

Related Posts : Wiosna Rounds 1-5


Friday, 27 March 2015

Experimenting with Colours

Do colours go round & round when tatting a doily ?
Do they Have to?
How about adding colour-stylishness to traditional rounds ?


Renulek’s  Wiosna  Doily 2015
Rounds 6 & 7 (pattern here)

I used a lot of collective wisdom in the earlier rounds of the Wiosna doily here. But wanted to do something more as the rounds progressed. And then I remembered Ninetta’s experiment with colour on her Anne Orr Doily here , & here ! Quelle inspiration.

Now, I liked the twirling effect of round 6 & did not want to use 2 colours within (ie. for chains & rings) since that would break up the ‘continuity’. But how about using 2 colours in segments ?! Why not play around with colour placement ?!
I also find Celtic interweaving very inspiring. Some superb effects have been created using normal shuttles, merely by placing colours appropriately. A recent excellent example is Sue’s working of Jane Eborall’s Roundabout Motif here !
  
So there I had it ; Collecting Inspiration !!! 
Round 6 would be broken into 2-colour repetitive segments & Round 7 would be the same 2 colours, but in alternating placement to previous round, creating a kind of undulating wave.

Sharing some of the techniques I used/worked out to put the visualization to practice.

  • “SLT Picot” (Round 6) 

Switching shuttles midways through a chain, And a picot required there ! So, Shoe Lace Trick to the rescue, but with a tiny space that became the picot.
The one shown in photo looks pretty good. But not all were good. This was very tricky to do since the natural tendency of this technique was to close the gap.
Why did I not use a Lock Stitch instead ? Because the colour blip of one unflipped stitch would show.

·        Large Rings (Round 7)
A little way into round 7, I came across Patty Dowden’s excellent tip on how to work large rings. Immediately tried it out with the 24ds ring & it worked Beautifully & smoothly !

In Patty’s own words & diagrams, which she has kindly permitted me to share here ( Thanks, Patty :-) ) :

Working with Large Rings
© Patty Dowden 2013

(This pattern) calls for large rings that require more than the normal amount of thread to be wrapped around the left hand that holds the working thread.
To avoid moving the working thread back and forth and produce a better double ring, or causing the thread to fray:
1. Enlarge the thread wrapped around your hand for each ring by doubling (or more) the amount of thread you normally use.
Wrap the excess around your pinkie, as for a chain, except hold the thread above your pinkie and wrap toward yourself instead of away from yourself. This allows the extra thread to be easily released one wrap at a time from the outside in.
2. Also, after making the picot or join at the halfway mark of a ring, leave a loop of core thread to allow for more easily closing the large ring in two steps. Close the first half by tensioning the core loop and then finish closing the ring by tensioning the shuttle thread.
                                           ooooooooooooo

It has many advantages – one does not have to keep pulling thread from shuttle at intervals ; it keeps the large ring from distorting ; it keeps the thread from twisting ; keeps the stitches neat & even ; closes the ring much smoother ! What’s not to like ;-P
But since habits are not easy to change, I felt more comfortable starting a ring normally, make 2 ds, Then pull the extra length of thread to wrap around my pinkie. Also, I totally forgot about the 2nd step, but pulling the thread all the way through, worked fine for this size ring.

  • Switching colours (Round 7) :

Lock Join for 1st ring of new segment
Each segment in this round is made of 6 repeats in one colour, before changing to next colour. At this point of change, a simple LJ using the core thread shuttle works because it is the same colour that will be continued for next 6 repeats.

Slope & Roll join for subsequent rings within segment …
However, while working these repeats within a segment, each shuttle has a different colour. Hence, when starting the 2nd to 6th repeats in a segment, I used the Slope & Roll Join as described/illustrated here.

…. accompanied by Shoe Lace Trick
Also, make an SLT Before & After the S & R join :
Before, in order to switch from chain to ring ; and
After, in order to move from ring to chain.
The S & R join does create a slight mismatch of surface. But it is a necessary evil in order to avoid the colour blip. The SLT helps flatten it to some degree. Tiny picot joins work better as noted next.

·        Tiny  Picot  Join  between  Chains  (Round 7) :

As mentioned above, there is a slight distortion/level-mismatch caused by the S&R join, mitigated only partially by the SLT. A tiny picot join between chains in round 7 , however, might have brought the chains more at the same level. This occurred to me halfway through the round, & didn’t want to ‘change’ at that stage. After all the next round & some ironing would bring it all together. Yet, caved in towards the last couple of segments & you can see the difference in the pic.

·        Wait  Before  Cutting  Out  Errors

When in doubt, wait ! Keep scissors at bay.
After 2 segments of round 7, I was dissatisfied with the ‘weaving’ effect because of the ring colour that connected to form a ‘wave’.
But I wasn’t certain a change would work better. So, kept off the scissors – after all 1/6th round was already complete - & started tatting a little distance away. I now had the option to either continue with the 2nd version & snip off the 1st, or vice versa.
Eventually, I stayed with the 2nd version & snipped off the earlier portion.


My  Dissatisfaction :
  • The thread colours in themselves were not inspiring enough. Too similar to bring the experiment to light. Will have to use black for next round.
  • “Interweaving” effect not prominent enough, again because the colours were pretty similar.
  • Secondly, I should’ve used Karen Cabrera’s 2-coloured Ring technique for the “interwoven”/crossover ring! As indicated in the picture above. 
  • A mistake exactly halfway through Round 7 which I discovered only at the very very end ! No patience to cut & redo half the round again.

Despite my dissatisfaction, I think it is worth trying out such an experimentation with colours even if one is working on traditional-type doilies. It probably lends some interest, some character, some modern stylishness.
Now on to the next rounds ...

Wednesday, 18 March 2015

Dead end start to Split Chains

All Coiled Up, Curled & Cozy !
No intention of boring my dear dear readers by revisiting same stuff …. 
Just thought it might still be helpful to anybody who is interested & wants to apply them to their tatting . 
And I Love curls, coils, curlicues – the shape is just so elegant and free flowing !

A brief background
It all started with this thread in Craftree and Lynn directing us to this video tutorial by Karen Cabrera, as a possible technique to apply. Well, it Was !!! And hugs & thanks to Lynn for opening up a wonderful world of Karen’s videos as well as the possibilities these curlicues have for free form/free style tatting.  

Dead end start to normal Chains
One can start a dead end chain by inserting a paper clip (Frivole) , a very small picot (Martha Ess), a lock stitch (Sue Hanson), or nothing at all (Frivole) like I did with this I Love Tatting Doodle (where no picot space was required). It is fairly easy to do it when working normal chains, where stitches are flipped, because one has the chain thread to grip, hold, & anchor. {Click on each of these for direct link to tutorials/tips. Also listed in the Resources Page.}

Neither of these techniques is, however, possible in case of a dead end start to Single Shuttle Split or Floating Chains

While browsing for more tutorials to add to the Resources page, 
here's a Gem I found ! 
Superb description & explanation by Elgiva Nicholls . 

WHY ? .... Because ....
  1. the stitches are not flipped. When all stitches are Unflipped, how does one make a Lock Stitch ?!
  2. there is no chain thread to grip & wrap around the fingers while tatting, to hold taut.
  3. there is no place (thread or element) to hold in a pinch while beginning the SSSCh. Nothing to anchor one’s tatting.
But what if one wants a “pure coil”; a simple curvilinear chain ?!

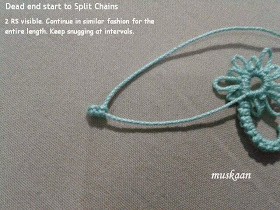
To overcome these problems, one needs , first, an anchor & grip of some sort.  Following are my solutions mainly in notated picture form with some general/overall tips summarized at the end of the post. 

Possible Dead End Starts to 
Single Shuttle Split Chains / Floating Chains
Please Note : For the main movements on how to work the chain, please refer to Karen’s video tutorial. 
I am only illustrating a few options to begin a dead end split chain , which have worked for me. 

Size 20 , 10 or thick threads ….
Clockwise Curlicue
For Size 20 or thicker thread , use a pin , a safety pin, paper clip, needle…..   
Measure the length of chain (curlicue) you desire, & make a very simple SLT-type Single knot on the pin at that point. (This kind of acts as a Lock Stitch later)
Note that since it is a SSSCh, we are working with a pulled-out length of Shuttle thread only !  


Counter-Clockwise Curlicue
These curlicues can be made in either direction ; clockwise as well as counterclockwise.
The above 2 chains were made starting from left to right, resulting in a clockwise coil.
The following chain will be made starting from right to left, resulting in a counterclockwise coil.
In both cases, Reverse Stitch is being used (also called 2nd half of Split ring method, lark’s head knot,  unflipped stitches/hitches, encapsulation, etc. )
In Jane’s pearl tatting, if one uses Sh2 movement in SSSCH, then one gets a clockwise curlicue ; if one adopts Sh1 movement, one gets an anticlockwise curlicue.
In my photo-tut, pics 3B to 3H illustrate the loop & shuttle movements in order to work the RS with caps facing on top of core thread.

One must remember, though, that in case of these counterclockwise floating curlicues, one is working from right to left. Order of hitches/unflipped stitches remains the same – 2nd half then 1st half, & repeat…

Theoretically, one could RW & tat the counterclockwise curlicue as the clockwise one. 
But I could not handle it - there are too many things going on : no place for a proper pinch ; 
short length of core thread ; And the tatted part comes in the way of shuttle movement, if Reversed ! 

For Finer threads : Size 40, 80, etc. or rayon, silk, …
A pin worked fine when working with size 20 thread. There is no space/gap at the beginning of the chain. However, this same pin proved too big when working with fine threads such as rayon & silk as I did in this Tatting for Holi composition.

My solution for fine threads – use a length of sewing thread in place of a pin ! For medium-sized threads, dental floss, fishing thread, etc. can be used. Rummage through your sewing kits for the right size of thread to start the curlicue !

Following images demonstrate some key steps in starting a dead-end Curlicue


Some Useful Tips :
·       When you pull tight, after removing the pin / auxiliary thread, a Lock Stitch effect takes place & the end ‘hitch’ gets locked in. You can push the hitches all you want, but they will stay as a curve ! No gap / space is seen at the start, once the pin/thread is pulled out & hitches snugged against the starting point.
·       For greater coiling effect, pull the hitches snug ; the tighter or closer they are, the greater the curve.
·        However, the hitches themselves should not be made too tight. Otherwise they will not move neatly, smoothly, easily over the core thread to form a coil.
·        I prefer using a pin/needle for counterclockwise SSSCh, because it can be pierced through fabric/mattress, thus keeping the work steady & anchored, & also keeps the core thread taut to make hitches.
·        Choice of pin, thread, yarn, wool, or floss would depend on the size of tatting thread one is working with. For 20 & above, pin is fine. For 30 & 40, floss would work. For 80 & less, any appropriate sewing thread can be used.


I  concede that reading or simply viewing the pics might be a bit confusing. 
But once the shuttles are picked up, it all "clicks" together.
happy tatting :-)

Related posts
https://tipsaroundthehome.blogspot.com/2018/05/i-love-butterflies.html 
https://tipsaroundthehome.blogspot.com/2018/05/i-love-floating.html

Saturday, 14 March 2015

Collecting Wisdom

Working on Renulek’s Wiosna Doily 2015

One can learn so much when one comes across the right people, the right places, the right attitudes ! One stores little snippets somewhere in the grey niches, and at times they pop up like AHA moments .

(click on coloured, bold links for source)
I started Renulek’s Wiosna (Spring) Doily 2015 a few days back. And am finding myself applying tweaks & techniques that I read of / learned along the way. A lot of it was garnered from the tatting angels at InTatters (now Craftree), some from actually tatting patterns shared by experienced designers, some from blogs (posts & comments), and of course the numerous tutorials that have been shared.  I am truly grateful for all the combined & cumulative wisdom.

·        Flat Rings :
Adding a 2nd half stitch before closing rings helps them lay flat. (InTatters).
I now do this almost on a regular basis.

·        2 shuttles :
I am getting into the habit of using 2 shuttles, whether the pattern calls for it or not. It is much neater, convenient, & it opens up numerous options. One can switch shuttles when required (instead of making SLTs) . And one does not need to buy 2 balls of same thread !
Used this is even in round 3 & was happy ! Learned my lesson during last year’s Chrysanthemum Doily, where my natural tendency was to go with shuttle & ball wherever possible.

·        Hiding ends, customized :
As detailed in the post on Hiding ends sans sewing, I learned a few techniques. However, there was overwhelming opinion in favour of sewing down the ends. One cannot ignore combined wisdom ! Hence, although I still used MTT, Frivole’s hiding ends in the last chain, SSSR, etc., (because they eliminated that eye-sore Knot!), I also sewed in the end(s) to be safe, using Jon’s instructions on sewing.
I am happy with the combo & now have many options to choose from; and I Did use different methods in different roundsCustomized treatment, shall we say ?!
hiding ends - SSSR, sewing,  & adding tiny stabilizing picots
·        Tiny Picot to stabilize elements :
The 5-ring flowers in Round 5 were fiddly. My tatting experience with Jane Eborall’s TIAS 2015 & her Chicken Wing Coaster came to mind. I had been impressed by her use of a teeny tiny picot to anchor adjoining elements. Thought to give it a try here.
It Worked ! See how flat the flower lies, and it will be much easier to join the next round, even if I don’t iron it.
Working 2 rounds simultaneously
 ·        Hiding ends with SSSR :
Working the flowers separately, gave me the added advantage of being able to easily use SSSR to finish off the flowers. 
(I remember seeing a tut long time back, but don’t remember exactly who wrote that post …. She had used SSSRs to hide ends in jewelery tatting. Will add link when I find it)
'Lengthening' Thread functionality
·        ‘Lengthening’ the functionality of thread :
Joining a length of extension thread to tail end. Many a times you Know that there is enough thread to complete the next element, before reloading shuttle. But it is so difficult to handle & manoeuvre that short length that I always ended up cutting it off. Recently I recalled another tip from InTatters. Attach a piece of scrap thread to the end so that one has ample length to wrap around & work ! I joined this extension (tan thread in pic) using a weaver’s knot , thus giving me plenty of working & wrapping length !
In photo below, one can see the very very short tail left !

SCMR instead of normal ring to use up last length of thread
·        SCMR instead of normal ring !
I could see that there was enough thread to complete that single ring. But not possible to work a Normal ring. So, SCMR to the rescue ! Used the last length (with extension) as a chain thread, making a mock ring with Sh1 thread.


Abbreviations Used (in order of appearance) :
SLT : shoe lace trick
MTT : magic thread trick / magic loop
SSSR : single shuttle split ring
SCMR: self closing mock ring
Sh1 : shuttle #1
   
Isn’t it nice that we don’t have to reinvent the wheel ?!
All solutions are already floating around
– simply collect, collate, combine, cumulate –
and wait for them to waft into our conscious from the mental storage pool! 

Saturday, 7 March 2015

Hiding Ends sans sewing

March  equals  Loopy !


Frivole is recipient of, & witness to, my loopiness ! I blame it squarely on March !
"March was the month when most people went loopy, like the Marchhares" (Edna O'Brien).

The tale of loops started when Ninetta posted her Quad 13 pattern here, & mentioned how she loved Frivole’s method of hiding ends in a chain ! Intense curiosity (one has to heed the wise words of experienced & talented tatters !) led me to her post, but the pictorial link had been removed. 
When contacted, Frivole promptly & graciously sent me the link & the 2nd loop commenced, leaving me in knots ! On her recommendation, I also looked at the Magic Loops & during our conversation checked out the Magic Thread Tricks (MTT) on various sites/blogs. 
Long loop short, I finally “got it”, first Jon’s ‘Magic Thread Method’ of hiding ends which had eluded me so far , topped with Frivole’s pictorial ‘Finishing on a Chain’!!!

Hiding Ends sans Sewing - 2 methods
Magic Thread Method - Jon Yusoff

For my 1st attempt, early last year, I had chosen a size 40 Anchor cotton as magic loop while tatting with size 20. That was a miserable failure.
This time I chose a strong Coats thread (spool in pic) but doubled over ! Following Jon Yusoff’s tutorial on Magic Thread Method, I used it at both ends (start & then at finish). And as many commentators pointed out, I chose to do the very last 2nd half of double stitch ‘normal’ (ie. without the loop). When the loops were pulled, they were wonderfully successful !!! Yippee !

Finishing on a Chain by Frivole
With this confidence under my belt, I tried Frivole’s method. She was kind enough to communicate with tips & suggestions, and also cleared my doubts. Hey, it worked so Smoothly !!! Yes, this is my new favorite, my go-to !!!
Before snipping the ends, I tugged on both ends together, making sure the wrap was tight & snug. Only then did I snip the ends completely.
Again, to make sure, I pulled at the chain that was hiding the ends. No Problem ! Nothing popped out ! 
Update : Here is the link to Frivole's pictorial : Finishing on a Chain


TIP : An added advantage to this method is that no other thread/loop/floss/etc. is required.  And in case one forgets to add the magic thread in the beginning,  it makes absolutely no difference because all one "needs" is the core thread itself :-) Except for a scissors, one does not need anything else in one's work basket !!!

Quad 13 by Ninetta Caruso
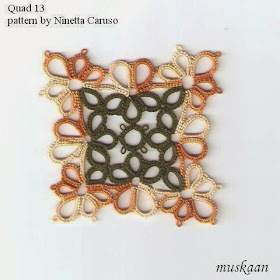
Back to original loop. The place & reason where this all started, viz. the square motif. Well, here it is …. Ninetta’s Quad 13 photo-tutorial & pattern . Easy, enjoyable, quick, beautiful ! Thank you so much for sharing the pattern !
And yes, I used Frivole’s method to hide ends. Look Ma, no sewing :-D


Threads used : Anchor Mercer size 20.
Olive Green : 4054-0269
White w/ Tan (variegated) : 4054-1218 
The completed motif measures approx. 3”x 3” (at the broadest parts) & approx. 4” diagonally.


I am adding all the links relating to Hiding Ends, that I collated, in the Tatting Resources page. Including the ones mentioned here. And the comments therein have pearls of wisdom too.
Hearty Thanks to Frivole, Jon, Ninetta :-)


Motif #16/II for 25 Motif Challenge